
 Search Knowledge Base
Projects
Add metadata

Add data
Reports
In this section we take the opportunity to list the currently supported data types and formats. If you work with a data type or format that is not in this list, feel free to contact Moveshelf Moveshelf support and inquire about the possibilities.
Data types
- 3D movement analysis data
- This can include 3D, kinematics, kinetics, EMG and gait parameters.
- Supported formats are .c3d, .mox, .xlsx, .adc and .mvnx.
- Videos
- This can include videos taken by smart phones, normal video cameras or synchronized cameras as part of an integrated setup. See below the list of system and manufacturers we work with.
- Supported formats are .avi, .mp4, .mov and .mkv
- Documents & pictures
- This can include results of a physical examination, any type of report or other free text and pictures stored as a document.
- Supported formats are .pdf, .png, .jpeg, and .webp.
 Some of the supported data formats mentioned above can be implemented with considerable variations by different vendors. Although we take care to support a broad variation of formats, some files may not work out-of-the-box or may be visualized incorrectly when uploaded. Please contact Moveshelf support if you would like us to look into such a file.
MOX format
MOX files can contain movement data such as EMG, kinematics, kinetics, force plates measurements and synchronization information. This data can be visualized and played synchronously on Moveshelf.
Reference data in Excel format
Moveshelf supports reference data in a specific format, through an Excel template. Download the template below and add your own reference data in the document. You can repeat this process for multiple versions of reference data, e.g. separate files for age and/or gender. Contact Moveshelf support when your Excel reference data is ready, so we can place this in your project.
Download the Reference Excel template here: Moveshelf Reference data Excel template.When creating the Excel, please pay attention to the following points:
- Variables in the Excel template are meant as an example, you can add / remove worksheets or spatiotemporal gait parameters according to your workflow.
- Tabnames combine the data group (e.g. "Rotation" means it belongs to the kinematics group) and variable name (e.g. "HipFlex"). Adjust the variable name in tabnames if necessary, to match it with the variable names in your data.
- Check if all units are set correctly (both in the tab "Unit" and "gait params").
- All headers (e.g., 'mean' and 'std') need to be exactly as written in the Excel file. Please pay attention to capital letters and spaces.
Contemplas videos upload
This feature is optional and only visible to Enterprise customers with this feature enabled.
Moveshelf can automatically read in files that are captured and exported using the synchronized video system of Contemplas. This workflow is currently only supported through integration with third party archiving system ArQive (section Moveshelf + Arqive).
What to store into ArQive for upload to Moveshelf
A .zbox file. This is an export option of the Templo software. It is relatively similar to a zip file and contains videos and files with information on data structure inside. For Moveshelf to read and automatically categorize the trials correctly, this .zbox file should include:- one .box file. The information (text) in this file specifies which other data in the .zbox.
- .recording files, one for each trial. This file specifies which videos belongs to one trial.
- .avi files. These videos (commonly) come in sets of multiple synchronized cameras.
Upload data
-
This section provides information on how to manually upload data to Moveshelf, checking the upload status, editing uploaded files, and modifying trial names.
- Click on ‘Add condition’ to add a new condition to this session.
- Insert a condition name (e.g., barefoot, intervention or clinical test) and click on ‘Add’.
- The first trial is automatically shown when you have added a condition. In one trial you can upload different types of data that belong to one, synchronized capture (e.g., c3d and video). Different captures should be uploaded as separate trials.
- Click on ‘+ Add trial’ to add more trials within one condition.
- Upload data to a trial by dragging and dropping it from your file explorer or click and upload. The files will show up underneath the trial in ‘Available data’. Please do not close the Moveshelf page or navigate away on the page while the green bar is still visible.
- After processing is done, Moveshelf will show what kind of data is uploaded in the trial, using different icons (e.g., graphs, video). Now your trial is available for viewing and editing.
Manual data upload
When uploading data manually, you first need to create a session. Within this session, you can add conditions and trials. See the gif below for a visualization of all steps.Add condition
Add trials
Upload data to a trial
Upload status
-
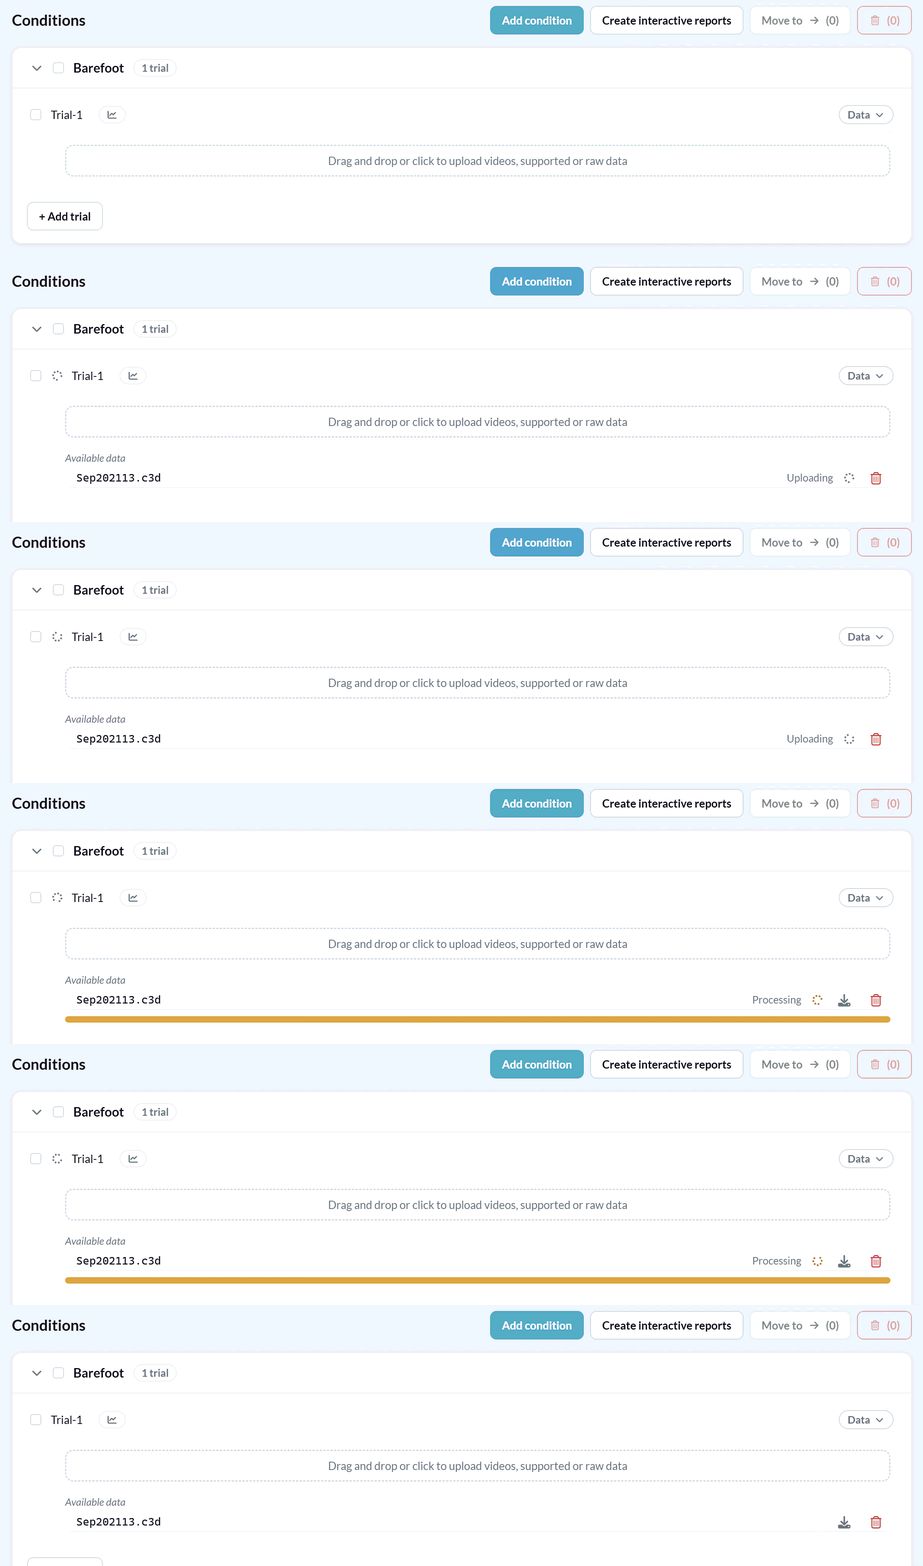
Moveshelf shows the status of the uploading files when you expand the header Data of a trial in the Edit session interfase. Please see all possible statusses in the list below, where the numbers correspond to the numbers in the image at the bottom of the article.
1. Uploading: while uploading please do not close the Moveshelf page or navigate away on the page while the "Uploading" text is still visible.
2. Processing: once uploading is complete, a yellow bar will appear to indicate the processing of the data. It is safe to navigate again to other pages as this process is performed in the backend and will not be disturbed by navigating away from the page.
3. Uploaded: the file is uploaded and processed completely, the bar is not shown anymore. A graph and/or video icon for each trial are shown to indicate respectively movement analysis data and video data are included.
4. Uploading warning: since this file was uploaded, the data processor of moveshelf has been updated. If you notice any unexpected visualizations of your data in a trial or report, please try to re-upload the trial. When in doubt or if you don't have the original data anymore, please contact Moveshelf support and we can help you to solve this warning.
5. Uploading failed: there are one or more upload errors with this item, possibily due to an unexpected structure in your data file. Please contact Moveshelf support for help.
Edit uploaded files
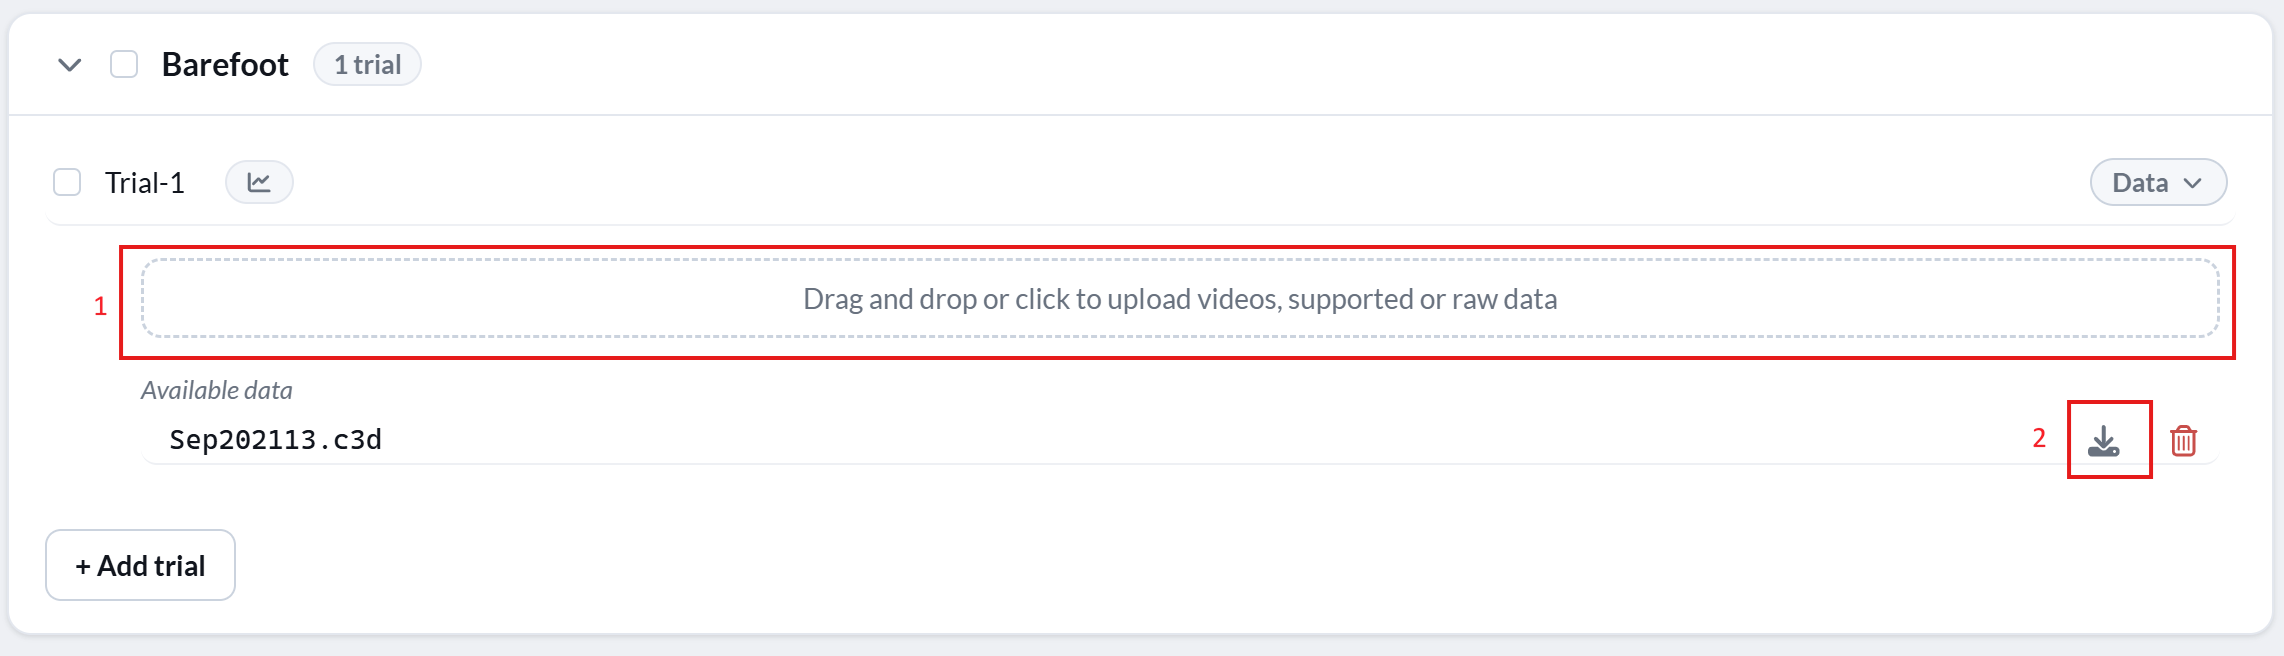
- You can replace an existing .C3D file for an updated .C3D file. To replace, drag the updated file with the exact same name in the trial upload box (see image below, 1). The file will be reprocessed automatically. To see the updated trial, please refresh the page.
- You have the option to delete a file from a trial by clicking on the recycle bin.
- You are able to download additional files from a trial. This can be done by clicking on the download button next to the recycle bin (see image, 2)
Edit trial name
-
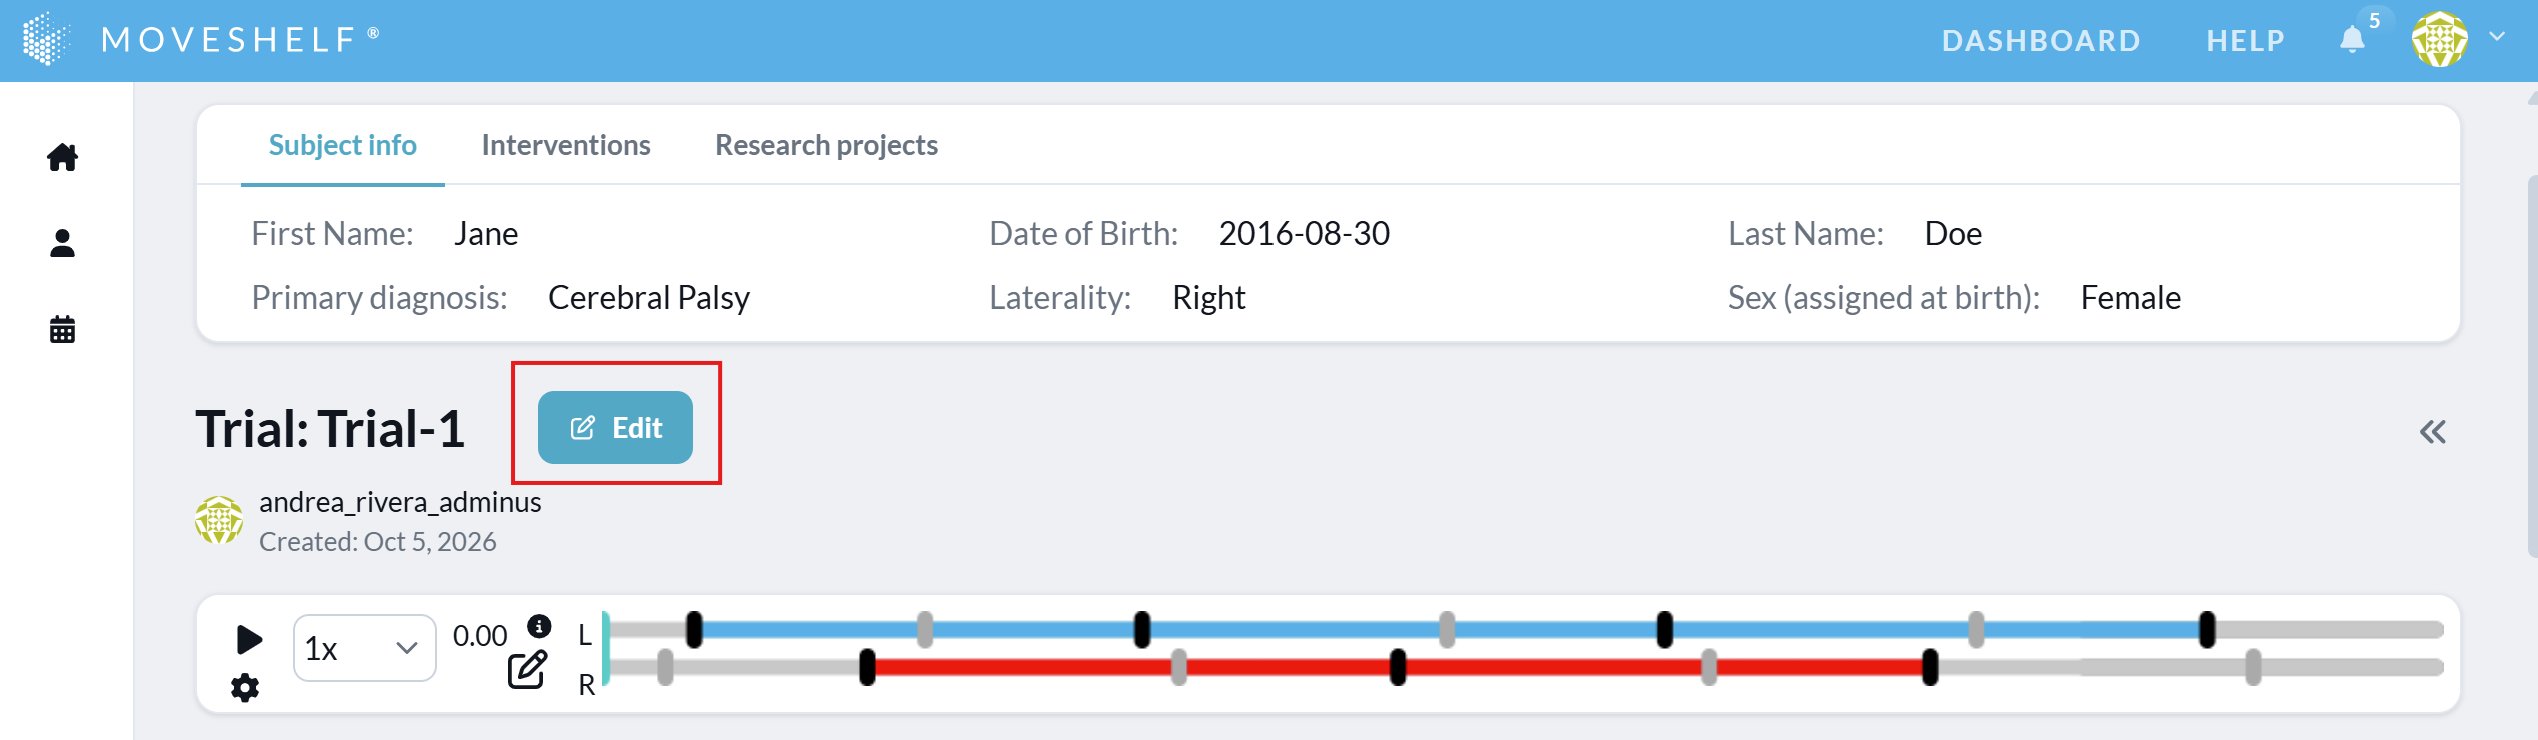
If you are on the trial page, you can change the trial name by clicking on ‘Edit’ on the right side next to the trial name.
Directory upload
This feature is optional and only visible to Enterprise customers with this feature enabled.
How to upload a directory
- Open your subject on Moveshelf either by clicking a URL in your EHR or manually navigate to your project on Moveshelf and select or create a new subject.
- Create a new session.
- If your organization has directory uploads enabled from other vendors as well, select the type of directory you'd like to upload through the drop down menu on top.
- Upload the directory by navigating in your local storage (e.g., Windows explorer) to the correct folder and drag and drop the folder in the upload area.
- Moveshelf will read the directory and show you the structure that your data will be uploaded in. The order of conditions is based on the creation date and time of the earliest trial in the condition.
- Click 'Upload'. All files will now be uploaded and processed, during which you will see a progress bar on top of page. A session label corresponding to the uploaded directory type will be added automatically.
Please do not leave the page while uploading Once uploading is complete, the progress bar will turn yellow to indicate the processing of the data. It is safe to navigate again to other pages as this process is performed in the backend and will not be disturbed by navigating away from the page.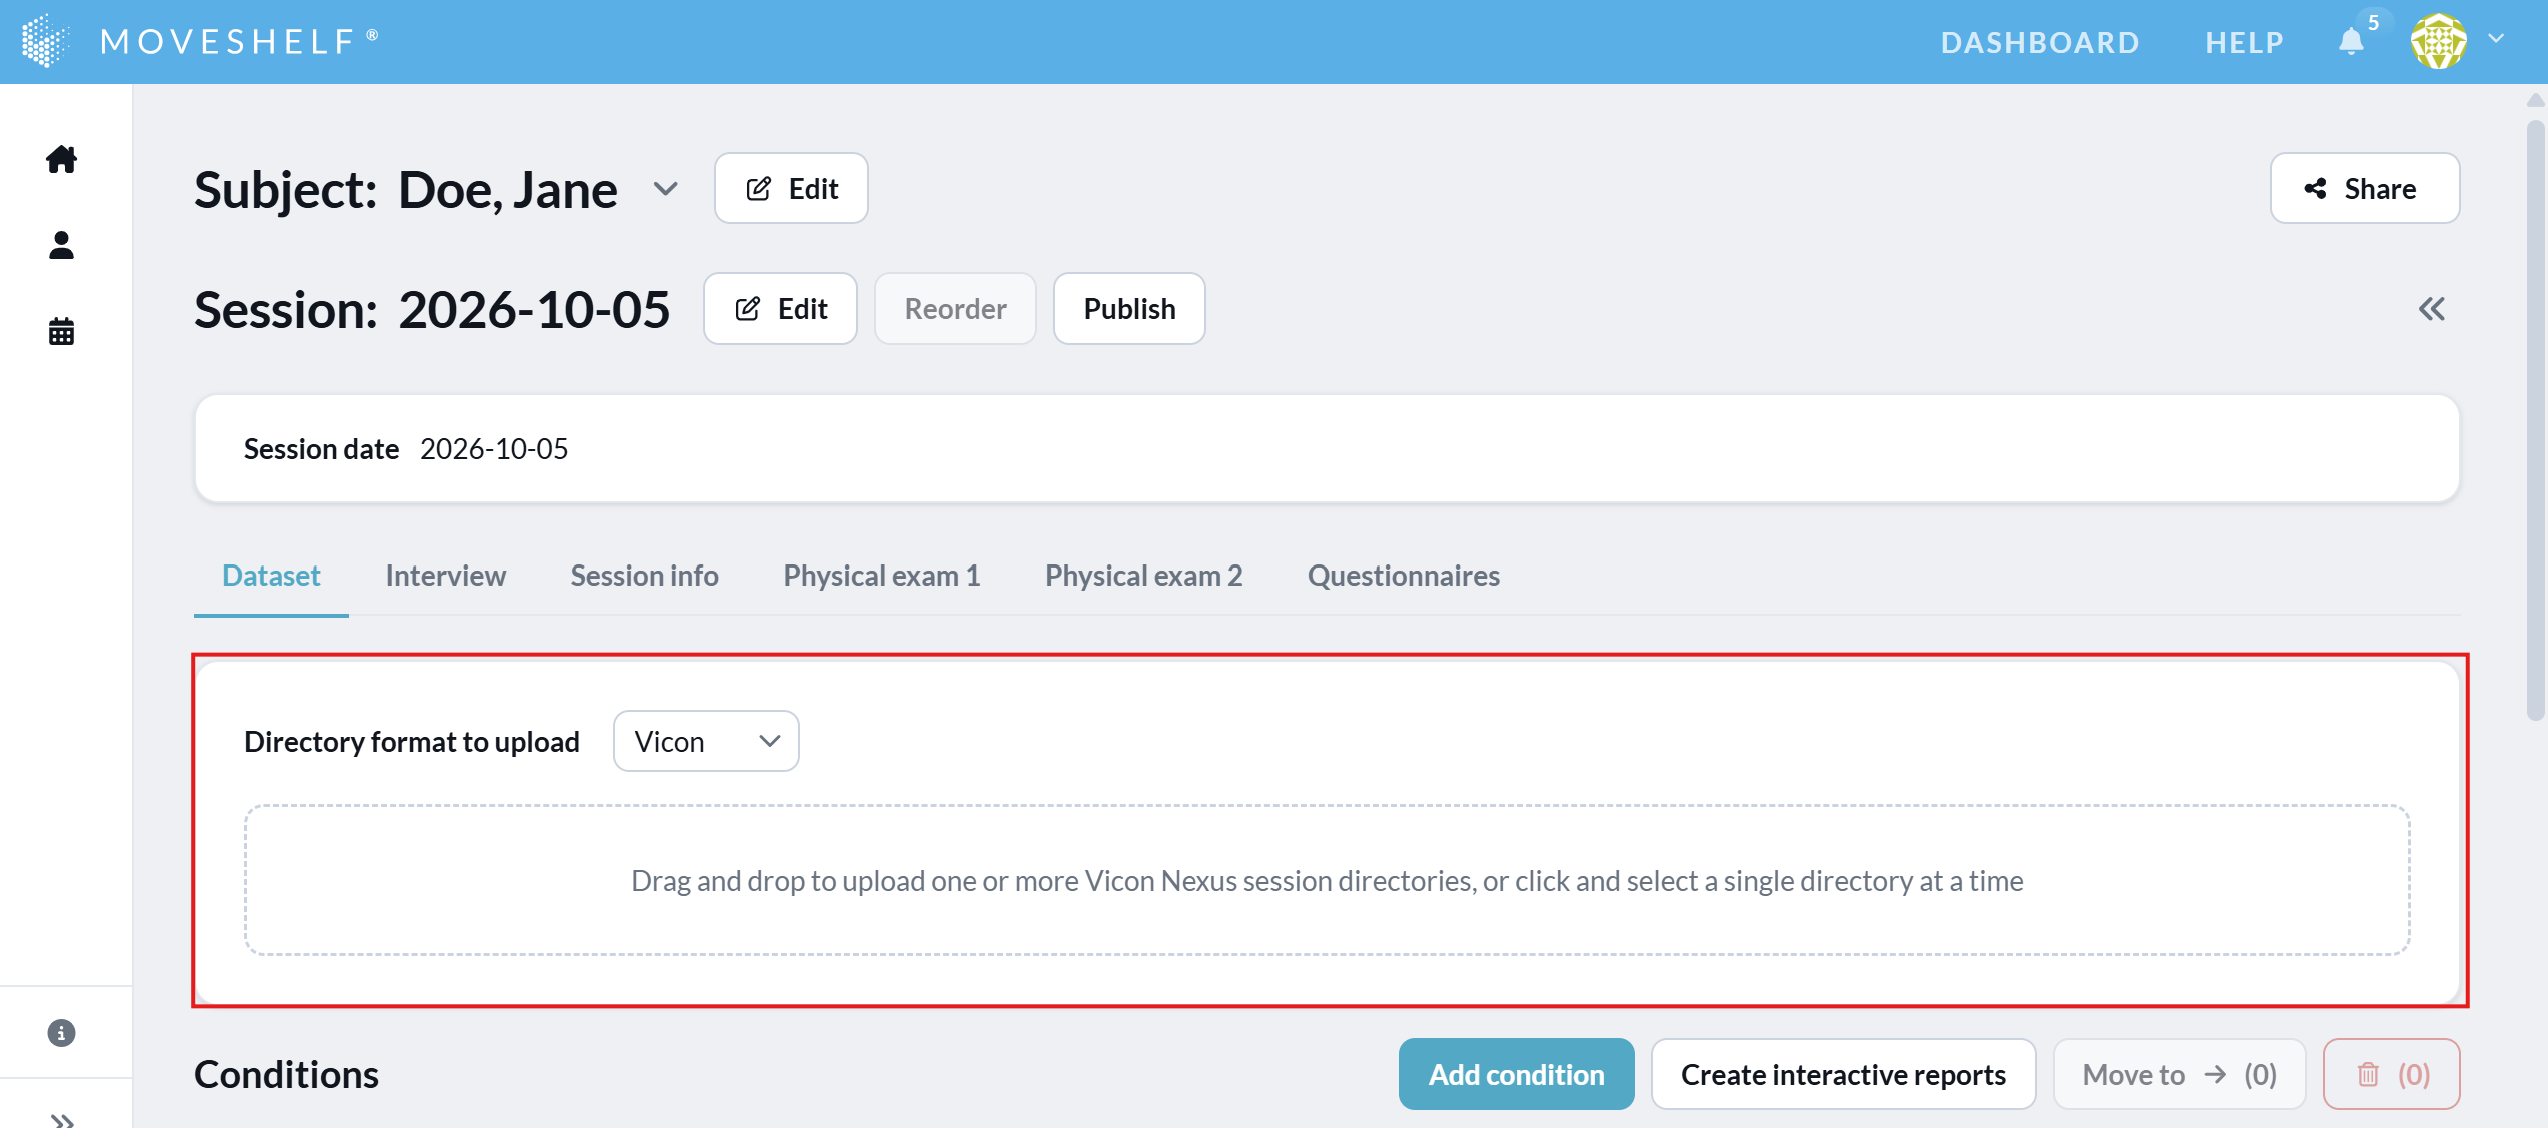
Vicon directory upload
This feature is optional and only visible to Enterprise customers with this feature enabled.
Folder structure
The Vicon directory upload works with a Vicon session folder. A session folder usually is a direct child of the subject folder, and includes all data files for one session. We support two different workflows: one using Vicon ProEclipse (session folder includes .enf files) and one without Vicon ProEclipse (session folder does not include .enf files).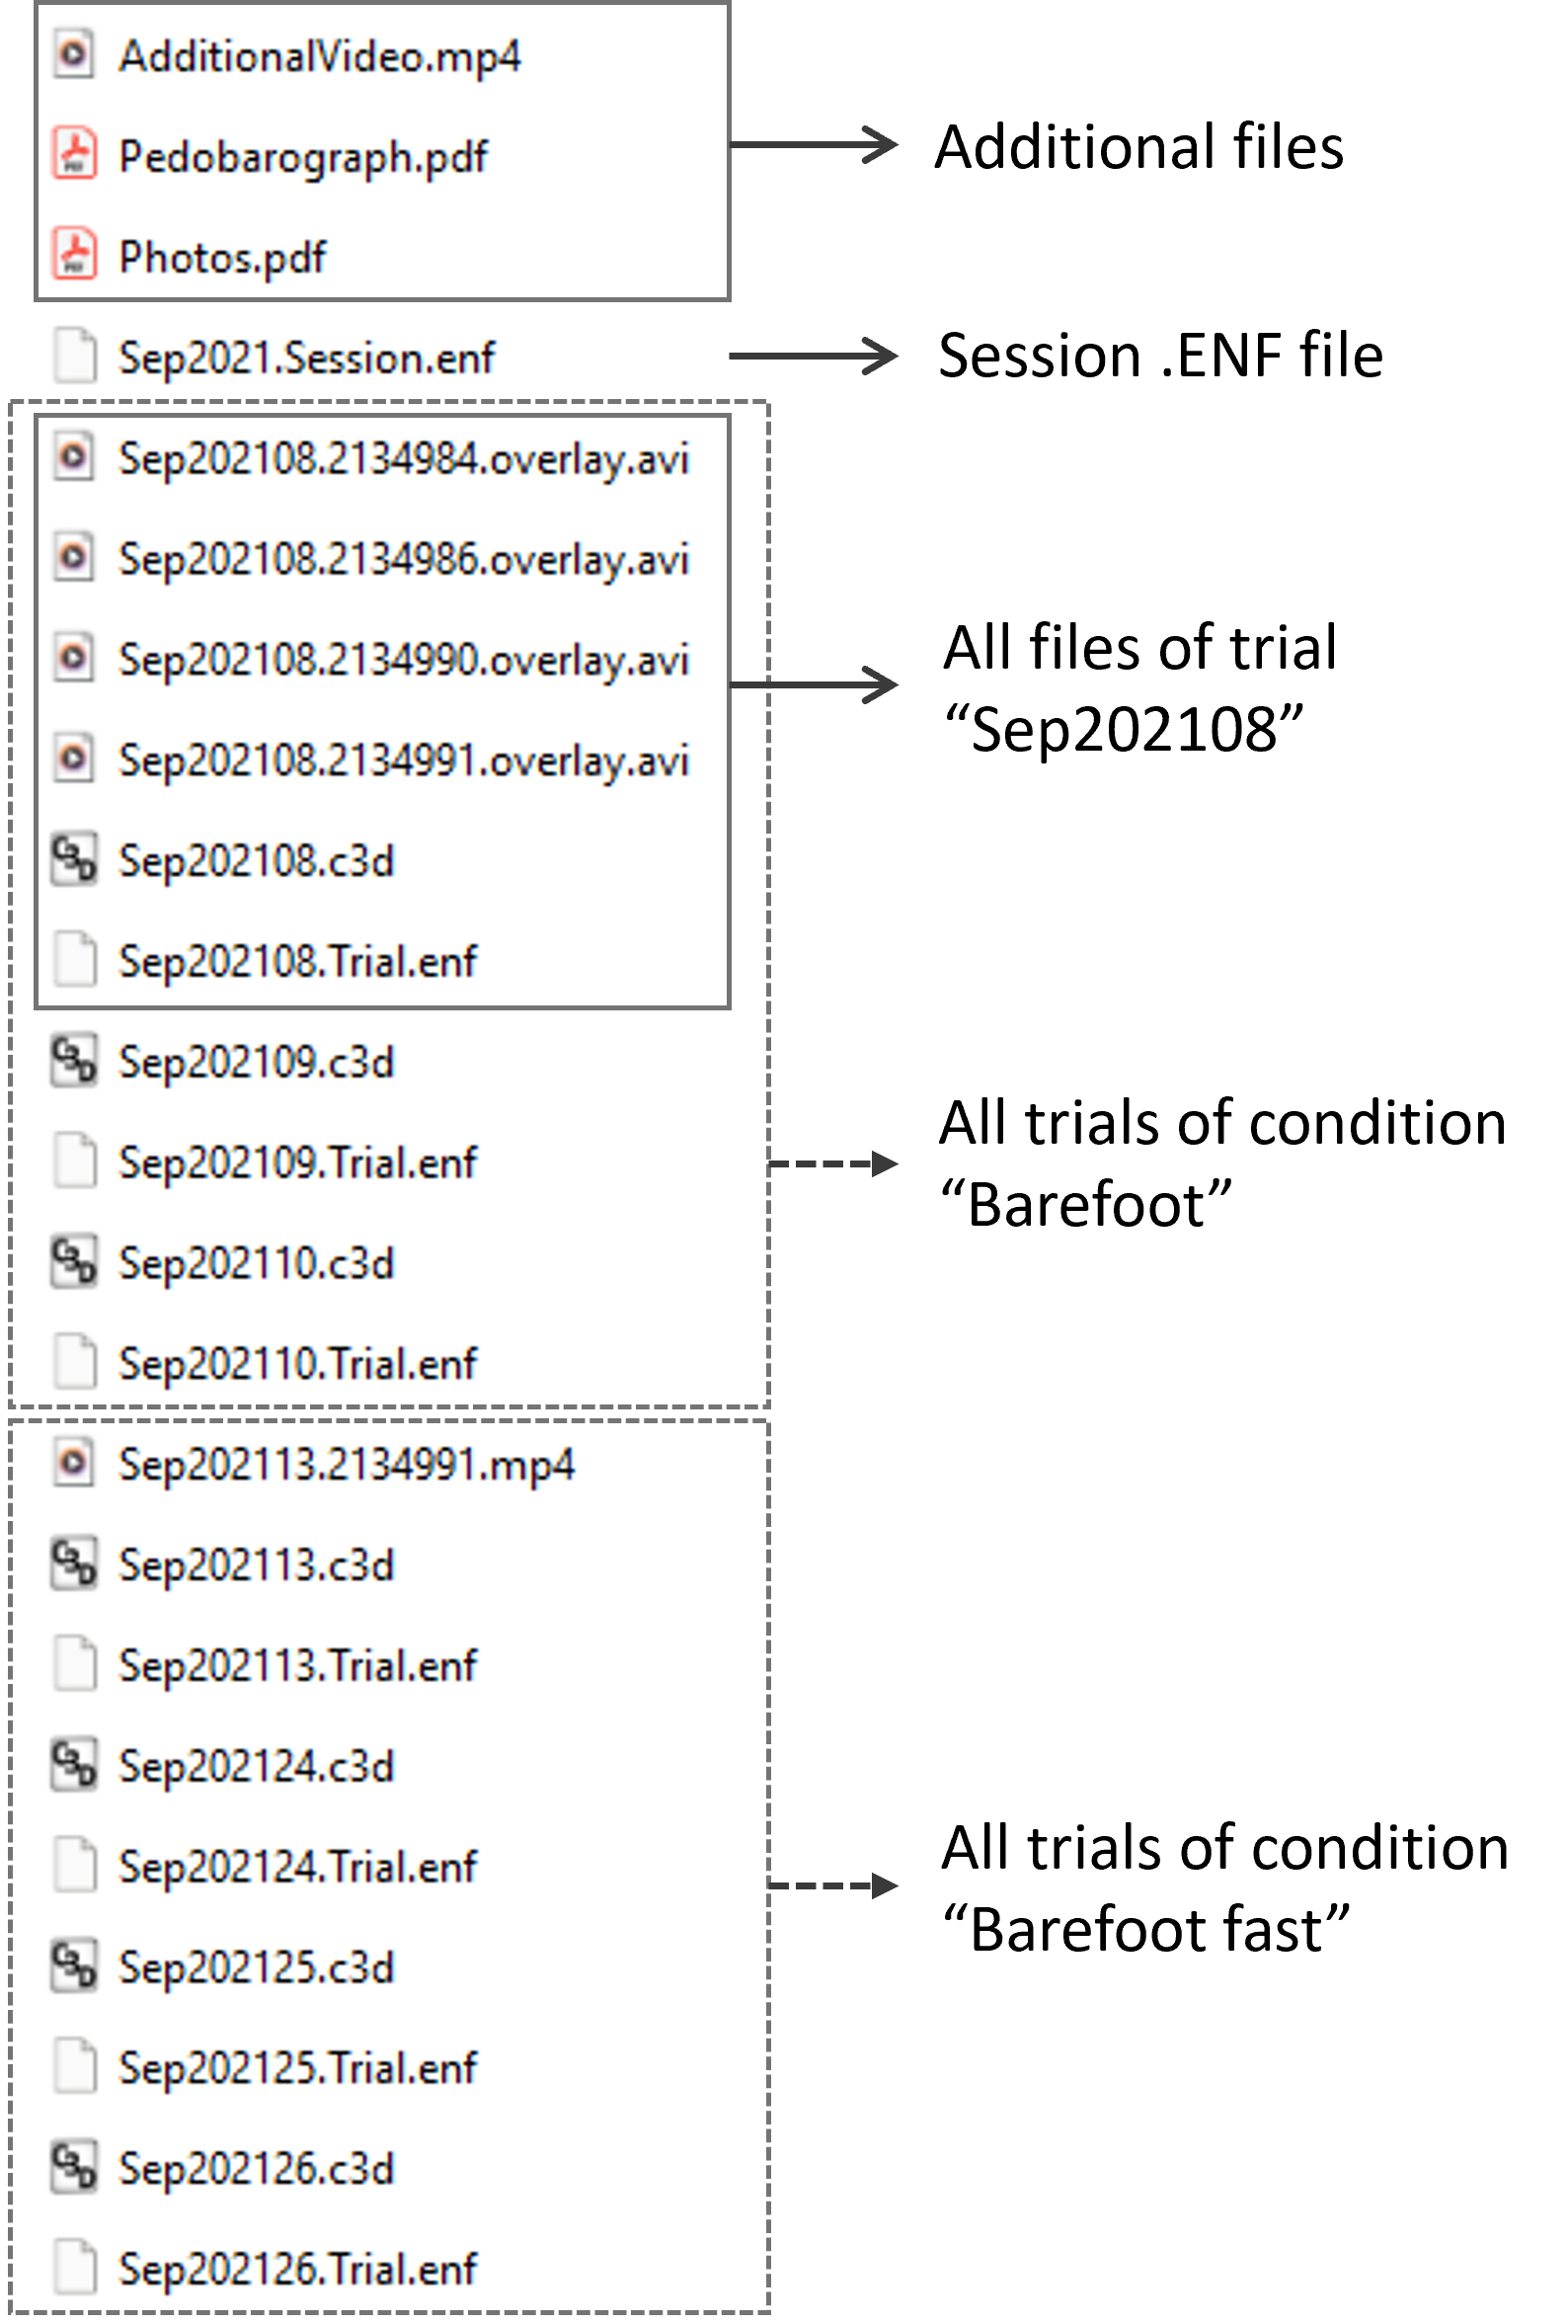
Session folder with .enf files
For the upload to work, the session folder should include:
- xxx.Session.enf file. This file is used to detect a Vicon session
- xxx.Trial.enf or xxx.Trialxx.enf files. This file is used to detect trials within the Vicon session
- "moveshelf_config_import.json" (optional). This file is used for metadata import
- .GCD files (optional)
- .C3D files (optional)
- .py files (optional)
- .avi files (optional)
- .mp4 files (optional)
- .PDF files (optional)
- image files (.jpeg, .png, .webp) (optional)
- .C3D files. These files are used to detect trials within the Vicon session
- "moveshelf_config_import.json" (optional). This file is used for metadata import
- .avi files (optional)
- .mp4 files (optional)
- .PDF files (optional)
- image files (.jpeg, .png, .webp) (optional)
-
Data groups on Moveshelf
- All data in the "ANGLES" group in the C3D file will be grouped under "Kinematics" on Moveshelf.
- All data in the "MOMENTS" group in the C3D file will be grouped under "Moments" on Moveshelf.
- All data in the "POWERS" group in the C3D file will be grouped under "Powers" on Moveshelf.
- Force plate data added as a "Force platform" in the C3D file will be grouped under "Force plates" (Trial view) or "Forces" (Report view) on Moveshelf.
- All data with "voltage" or "emg" in the C3D channel name will be grouped under "EMG" on Moveshelf. This can be raw and/or envelope EMG.
-
Add gait events to a trial
To be able to see gait events and gait cycle data on Moveshelf, you first have to add gait events (Foot Strike, Foot Off) to the C3D file of the trial. See Vicon Nexus Documentation for instructions on how to do this. -
Add spatiotemporal parameters to a trial
To be able to see spatiotemporal parameters in a trial on Moveshelf, you first have to add these to the C3D file of the trial. This can be done by adding the 'Calculate Gait Cycle Parameters' operation to your data processing pipeline in Nexus. This operation calculates the parameters in the first complete gait cycle for each side in each trial, also if multiple gait cycles are defined in a trial (see Vicon Nexus Documentation). Seeing as this is single-cycle data and not an average, only one value will be shown for each parameter on Moveshelf in trial view. -
Add force plate context in Nexus
In Vicon Nexus there are standard columns for force plates (e.g., FP1 = force plate 1 and FP2 = force plate 2). For every trial, enter the information for a good hit on a force plate by 'Left' or 'Right', or input 'invalid' in the column (see image 1 below). This will generate clean and recognizable patterns in force data in case of a gait cycle analysis (see image 2 below).
You can also edit the force plate context on Moveshelf without having to adjust the C3D again in Nexus. For more information, navigate to Add context force plates. Note that this only affects force data and not moments / powers.
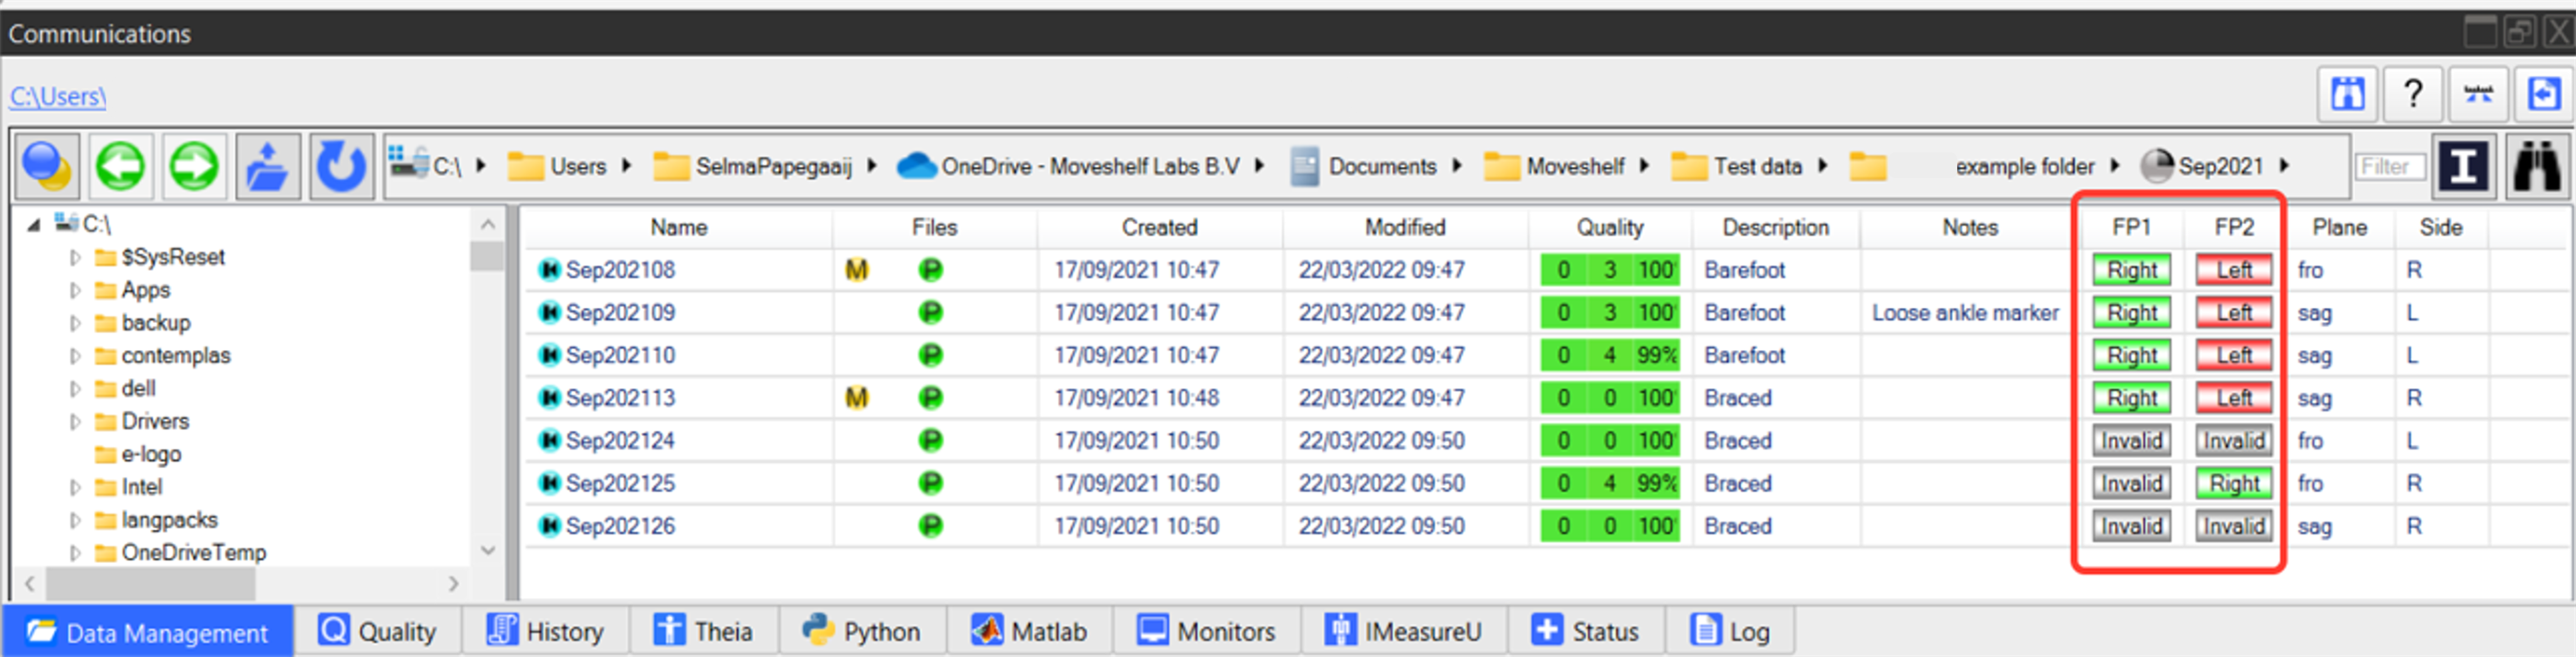
Image 1: Add force plate context in Vicon Nexus.
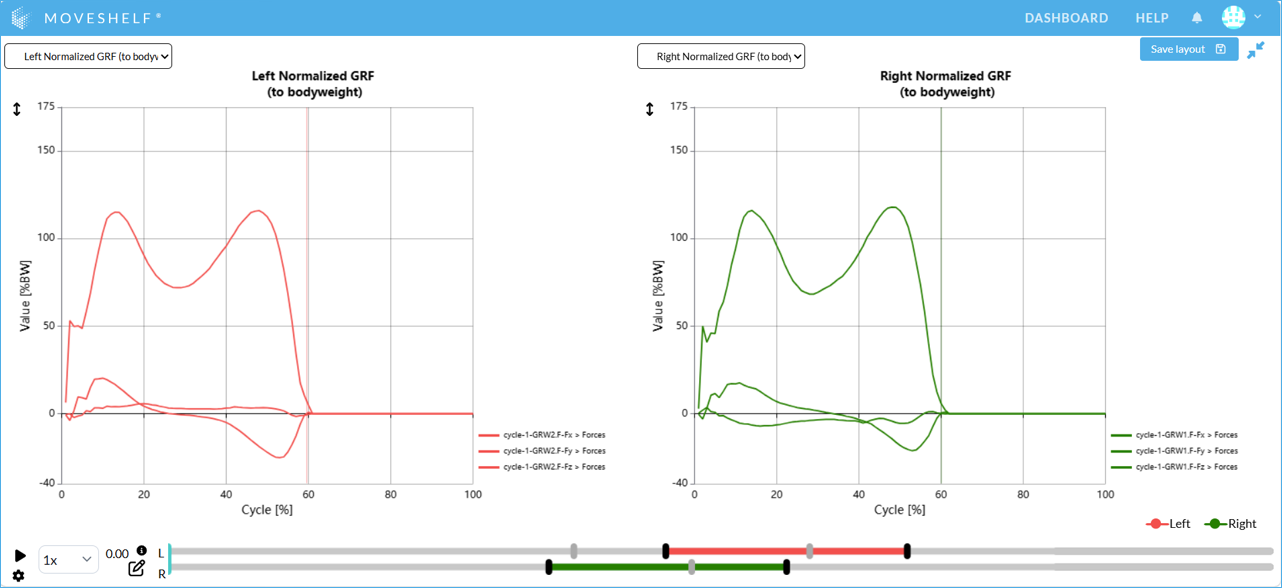
Image 2: Valid force data on Moveshelf.
-
Normalize data to bodyweight or mass
It is possible to visualize ground reaction force normalized to body weight (%BW) or body mass (N/kg). A data structure requirement for this optional report template setting is that the C3D file has to contain body mass information. If the C3D does not contain the required body mass information, a warning message will appear next to the Forces charts group in both trial and report view. In that case, you can manually add the subject's bodyweight via add subject information. The entered date of the body weight should match the exact date of the session, or a warning will be shown next to the Forces charts group in both trial and report view.
The moments and powers are provided by default in the C3D as respectively Nm/kg and W/kg, and visualized on Moveshelf as such. Moments and powers therefore don't require additional body mass information.
- Videos (.avi and .mp4) are matched to their corresponding trial when both of the following are true:
- The video filename starts with the trial name (taken from the .Trial.enf file name for session folders with .enf files, or from the .c3d filename for session folders without .enf files).
- The video file is located next to the .c3d file in the same (sub)folder.
- If an .mp4 file does not meet these criteria, it will instead be uploaded to a separate trial in the “Additional files” section.
- Automatically add a description to a trial
Populate the Notes field in Vicon Nexus to fill the Moveshelf description field (Image 1 below, in orange). - Automatically show information on the content of a trial
Show the content of a trial (laterality/plane) next to the trial name in the navigation menu on the left side of the screen, by using custom colums named 'Side' and 'Plane' in Vicon Nexus (Image 1 below, in red). For example, populate these columns with 'L' (left) or 'R' (Right) to indicate the side, and 'fro' (frontal) or 'dor' (dorsal) for the plane. If the column Plane is empty, Moveshelf will assume the plane is sagittal. See Image 2 for the steps how to create the correct columns in Nexus.
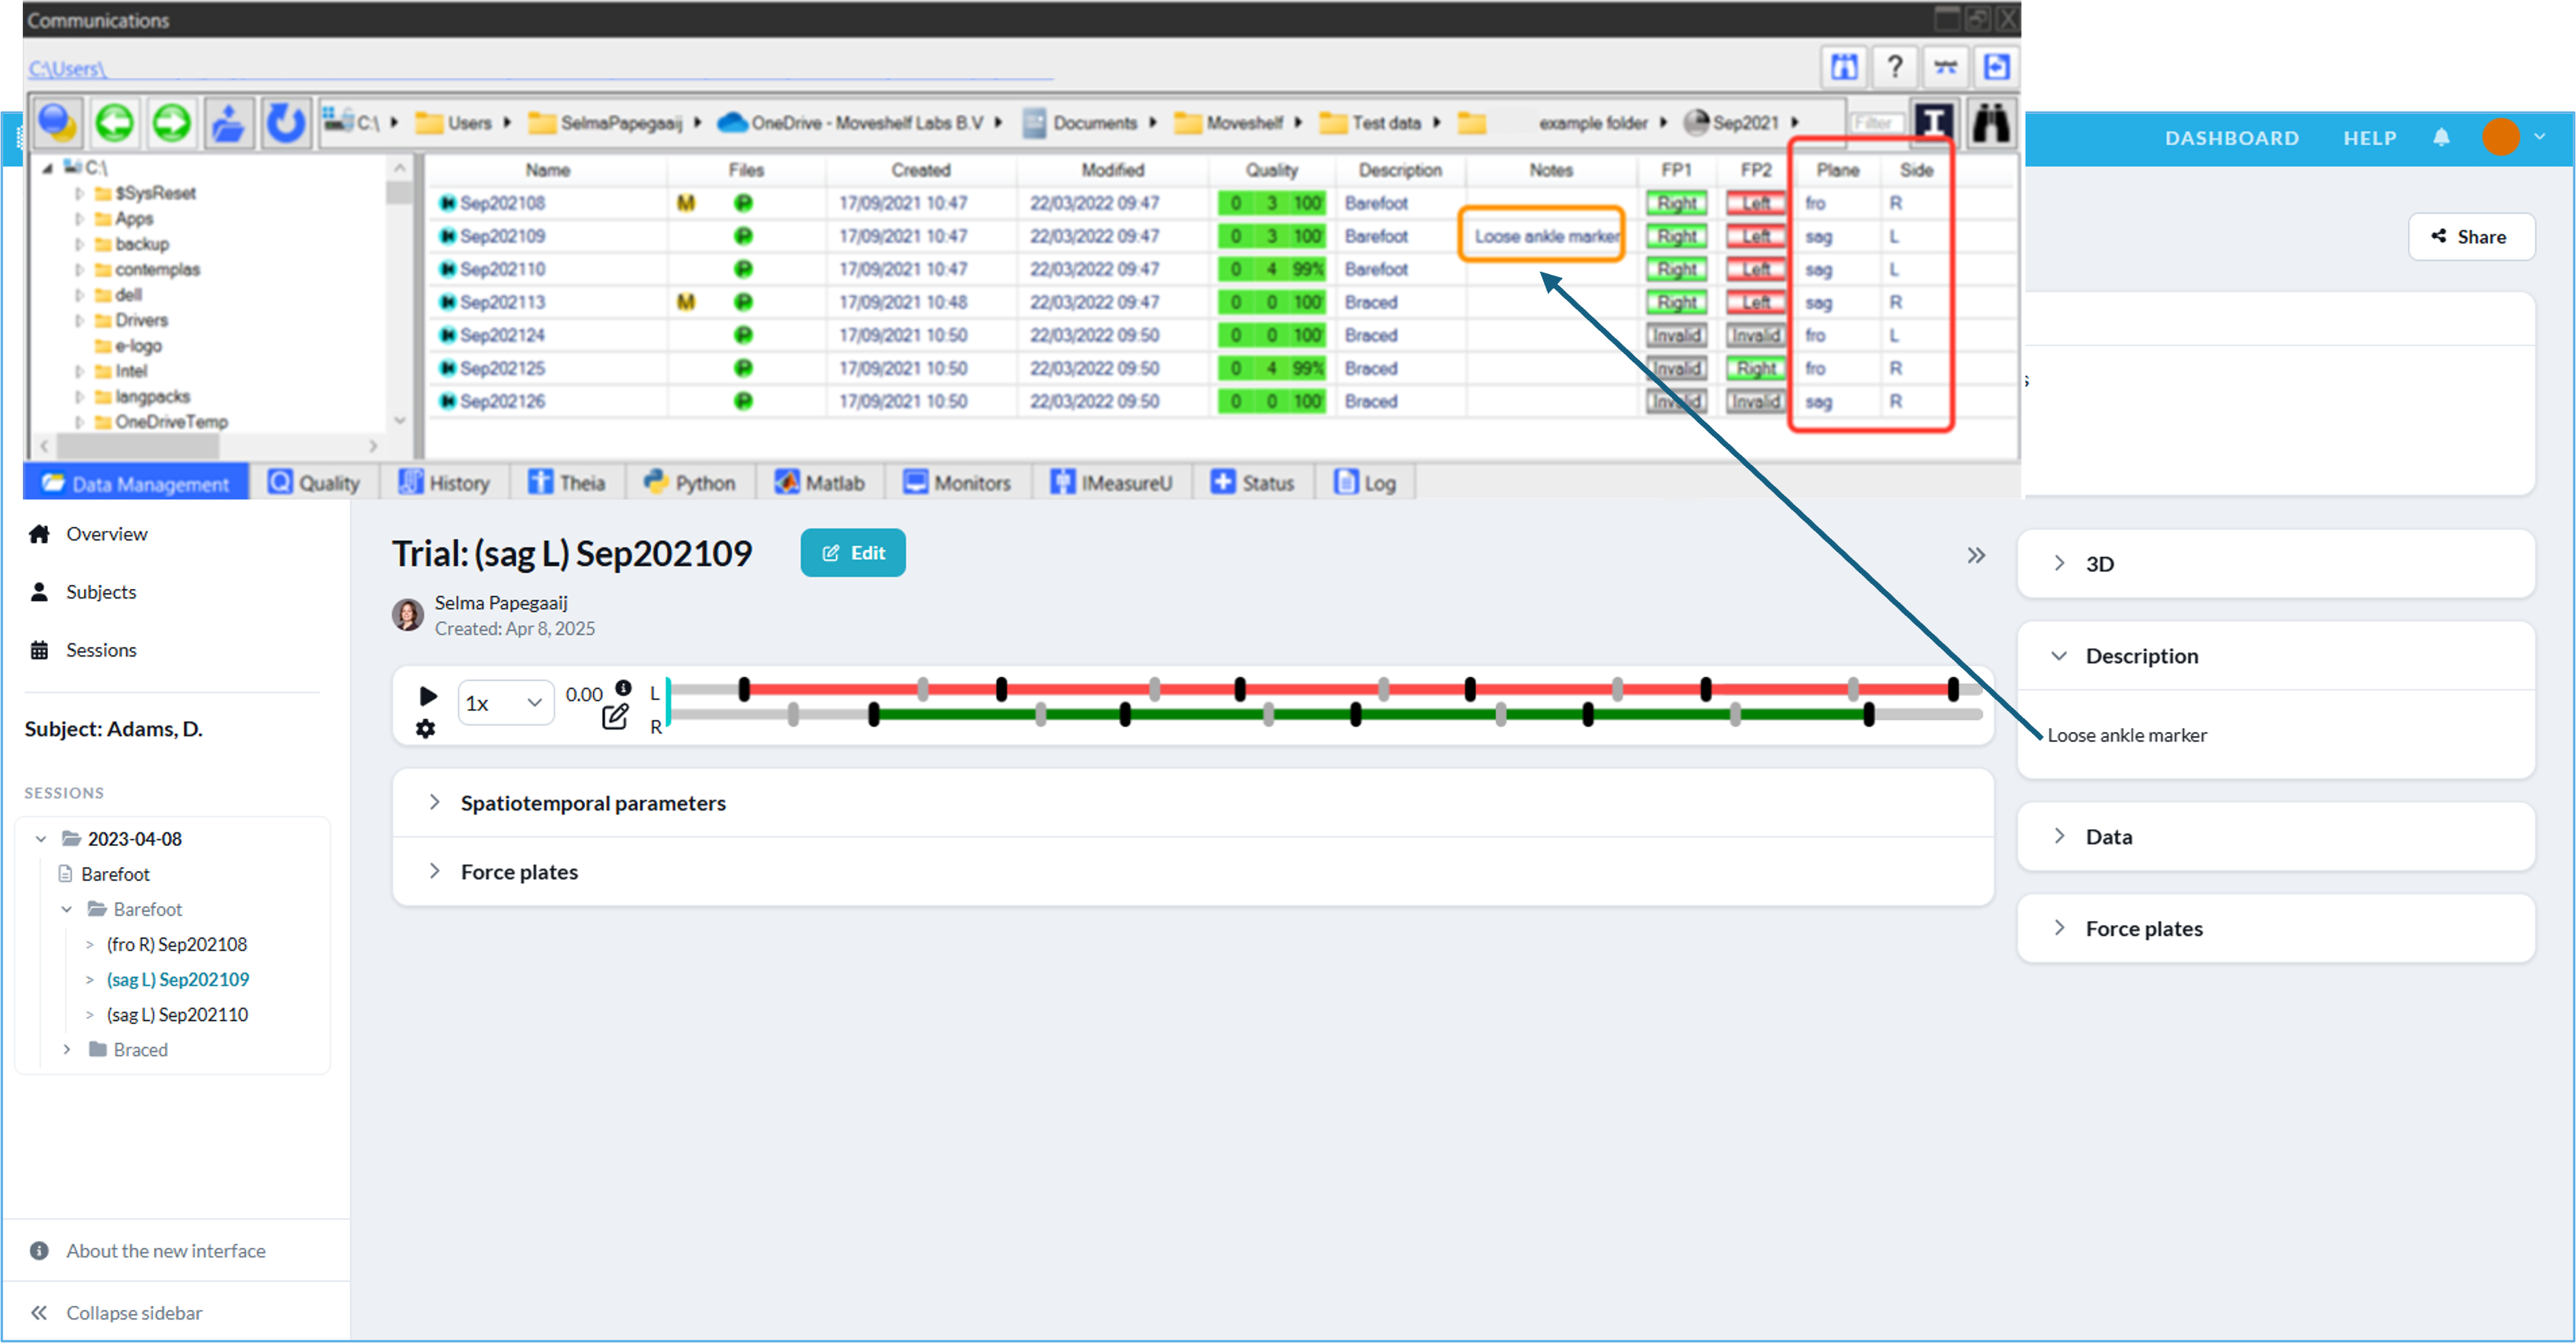
Image 1: Add trial information in Vicon Nexus.
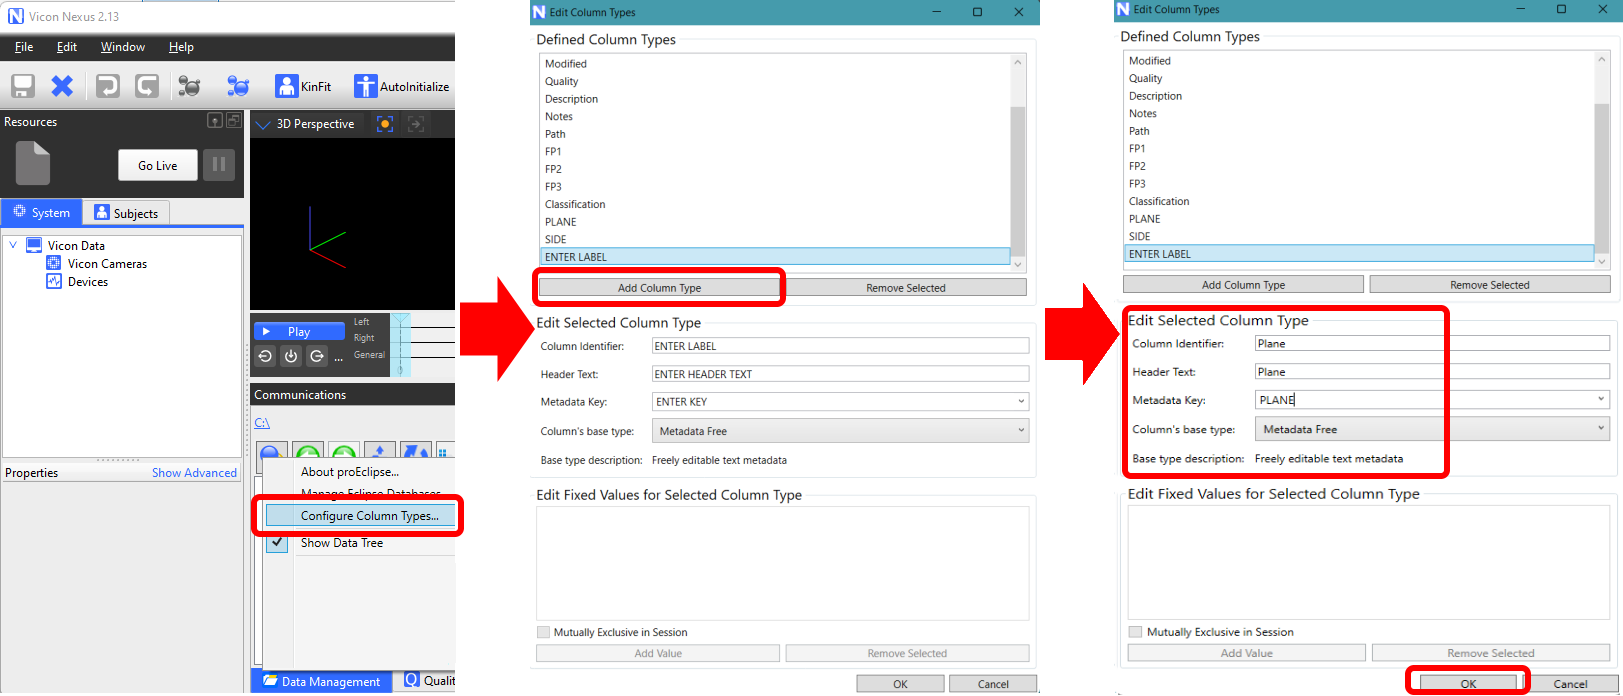
Image 2: Steps to create additional columns 'Plane' and 'Side'.
Please see the image on the right for the contents of an example Vicon session folder with .enf files. The session folder can have subfolders. All files from all subfolders will be included for the directory upload. You can also download an example folder using the link below.
Download the
Vicon example directory with .enf files in .zip format.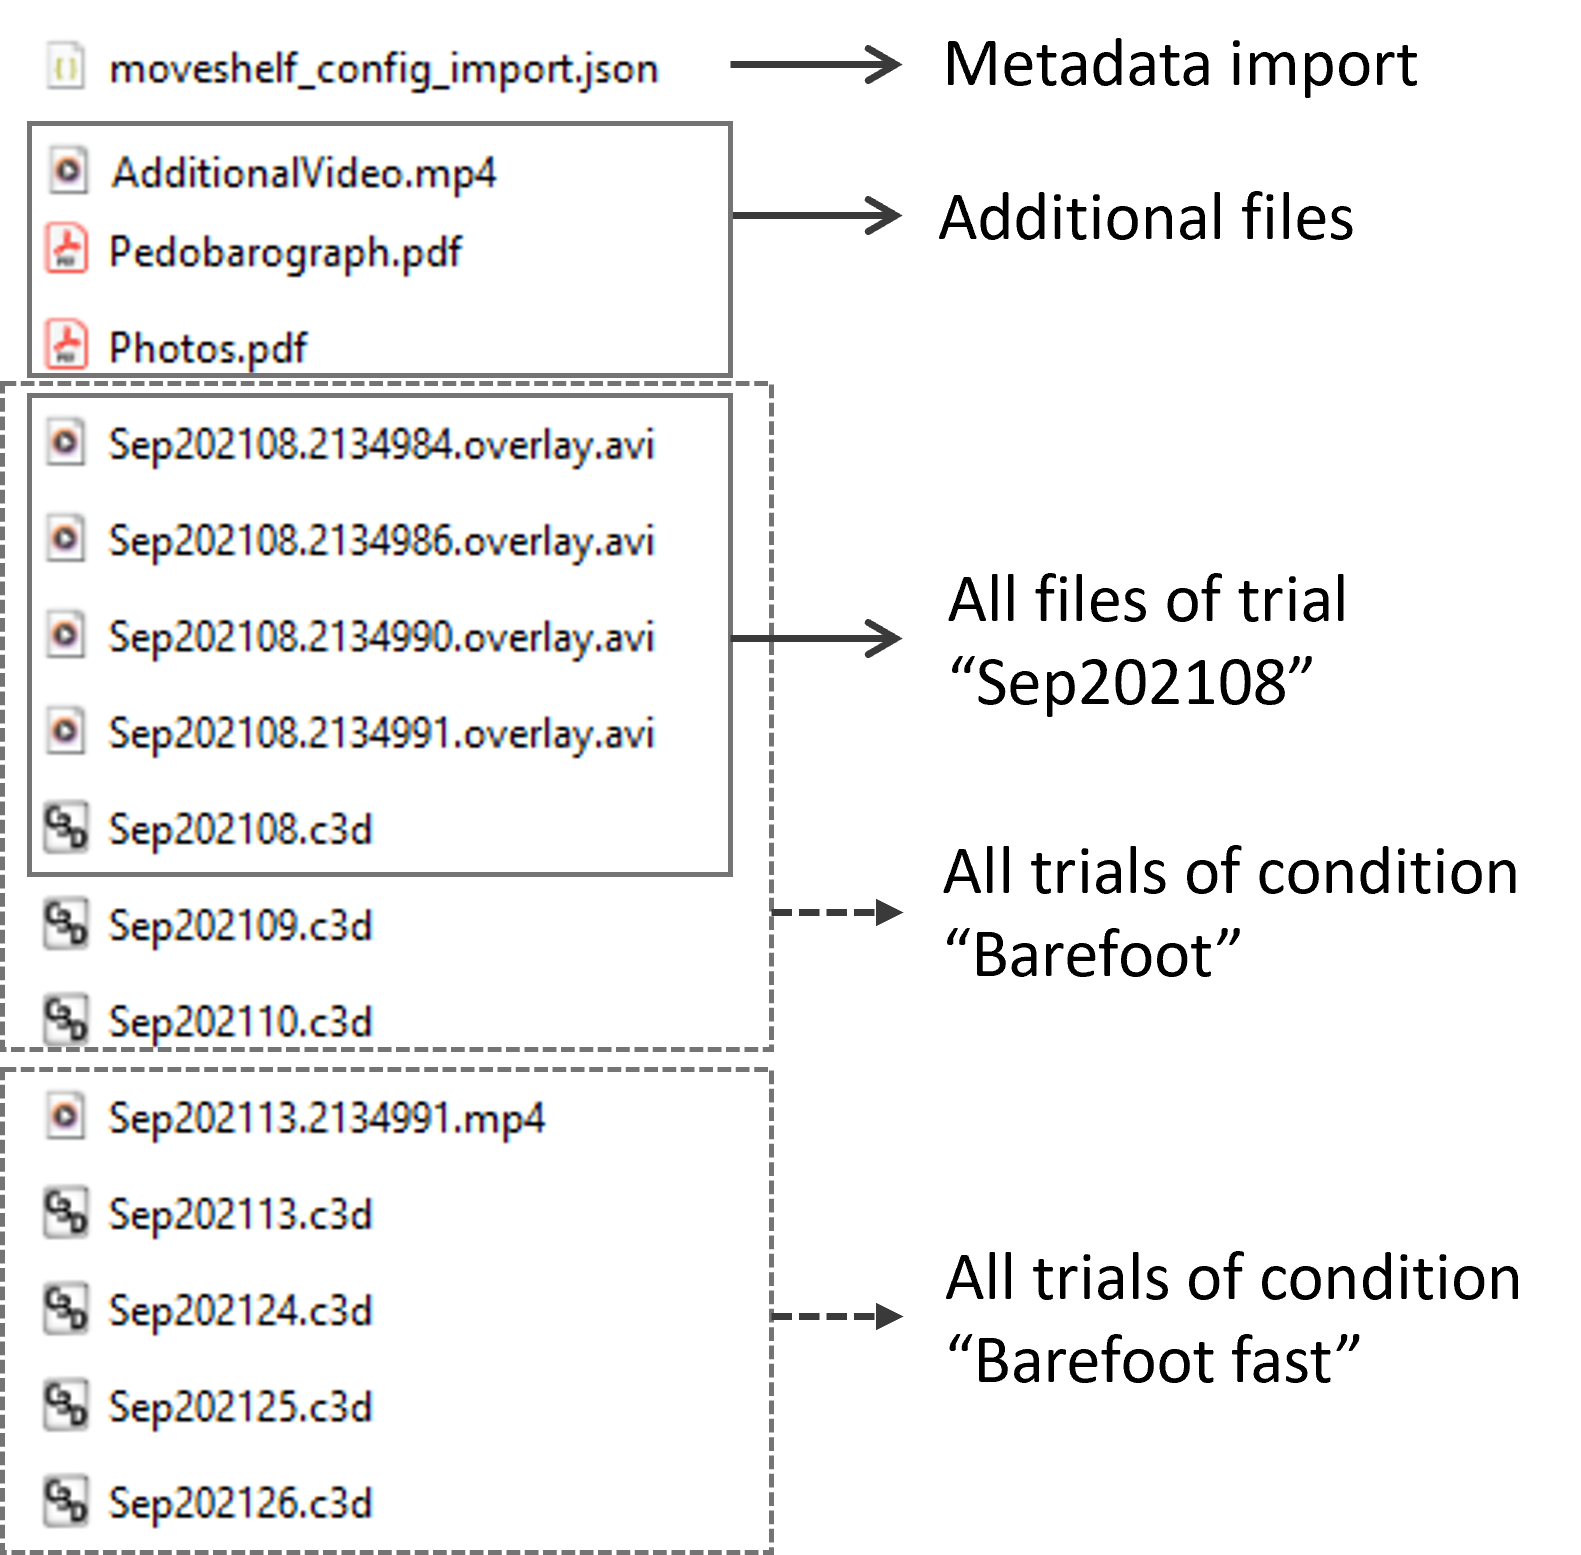
Session folder without .enf files
For the upload to work, the session folder should include:
Please see the image on the right for the contents of an example Vicon session folder without .enf files. The session folder can have subfolders. All files from all subfolders will be included for the directory upload. You can also download an example folder using the link below.
Download the
Vicon example directory without .enf files in .zip format.Automatically categorize trials into conditions
How to automatically categorize your trials into conditions is dependent on your workflow (session folder with or without .enf files):Session folder with .enf files
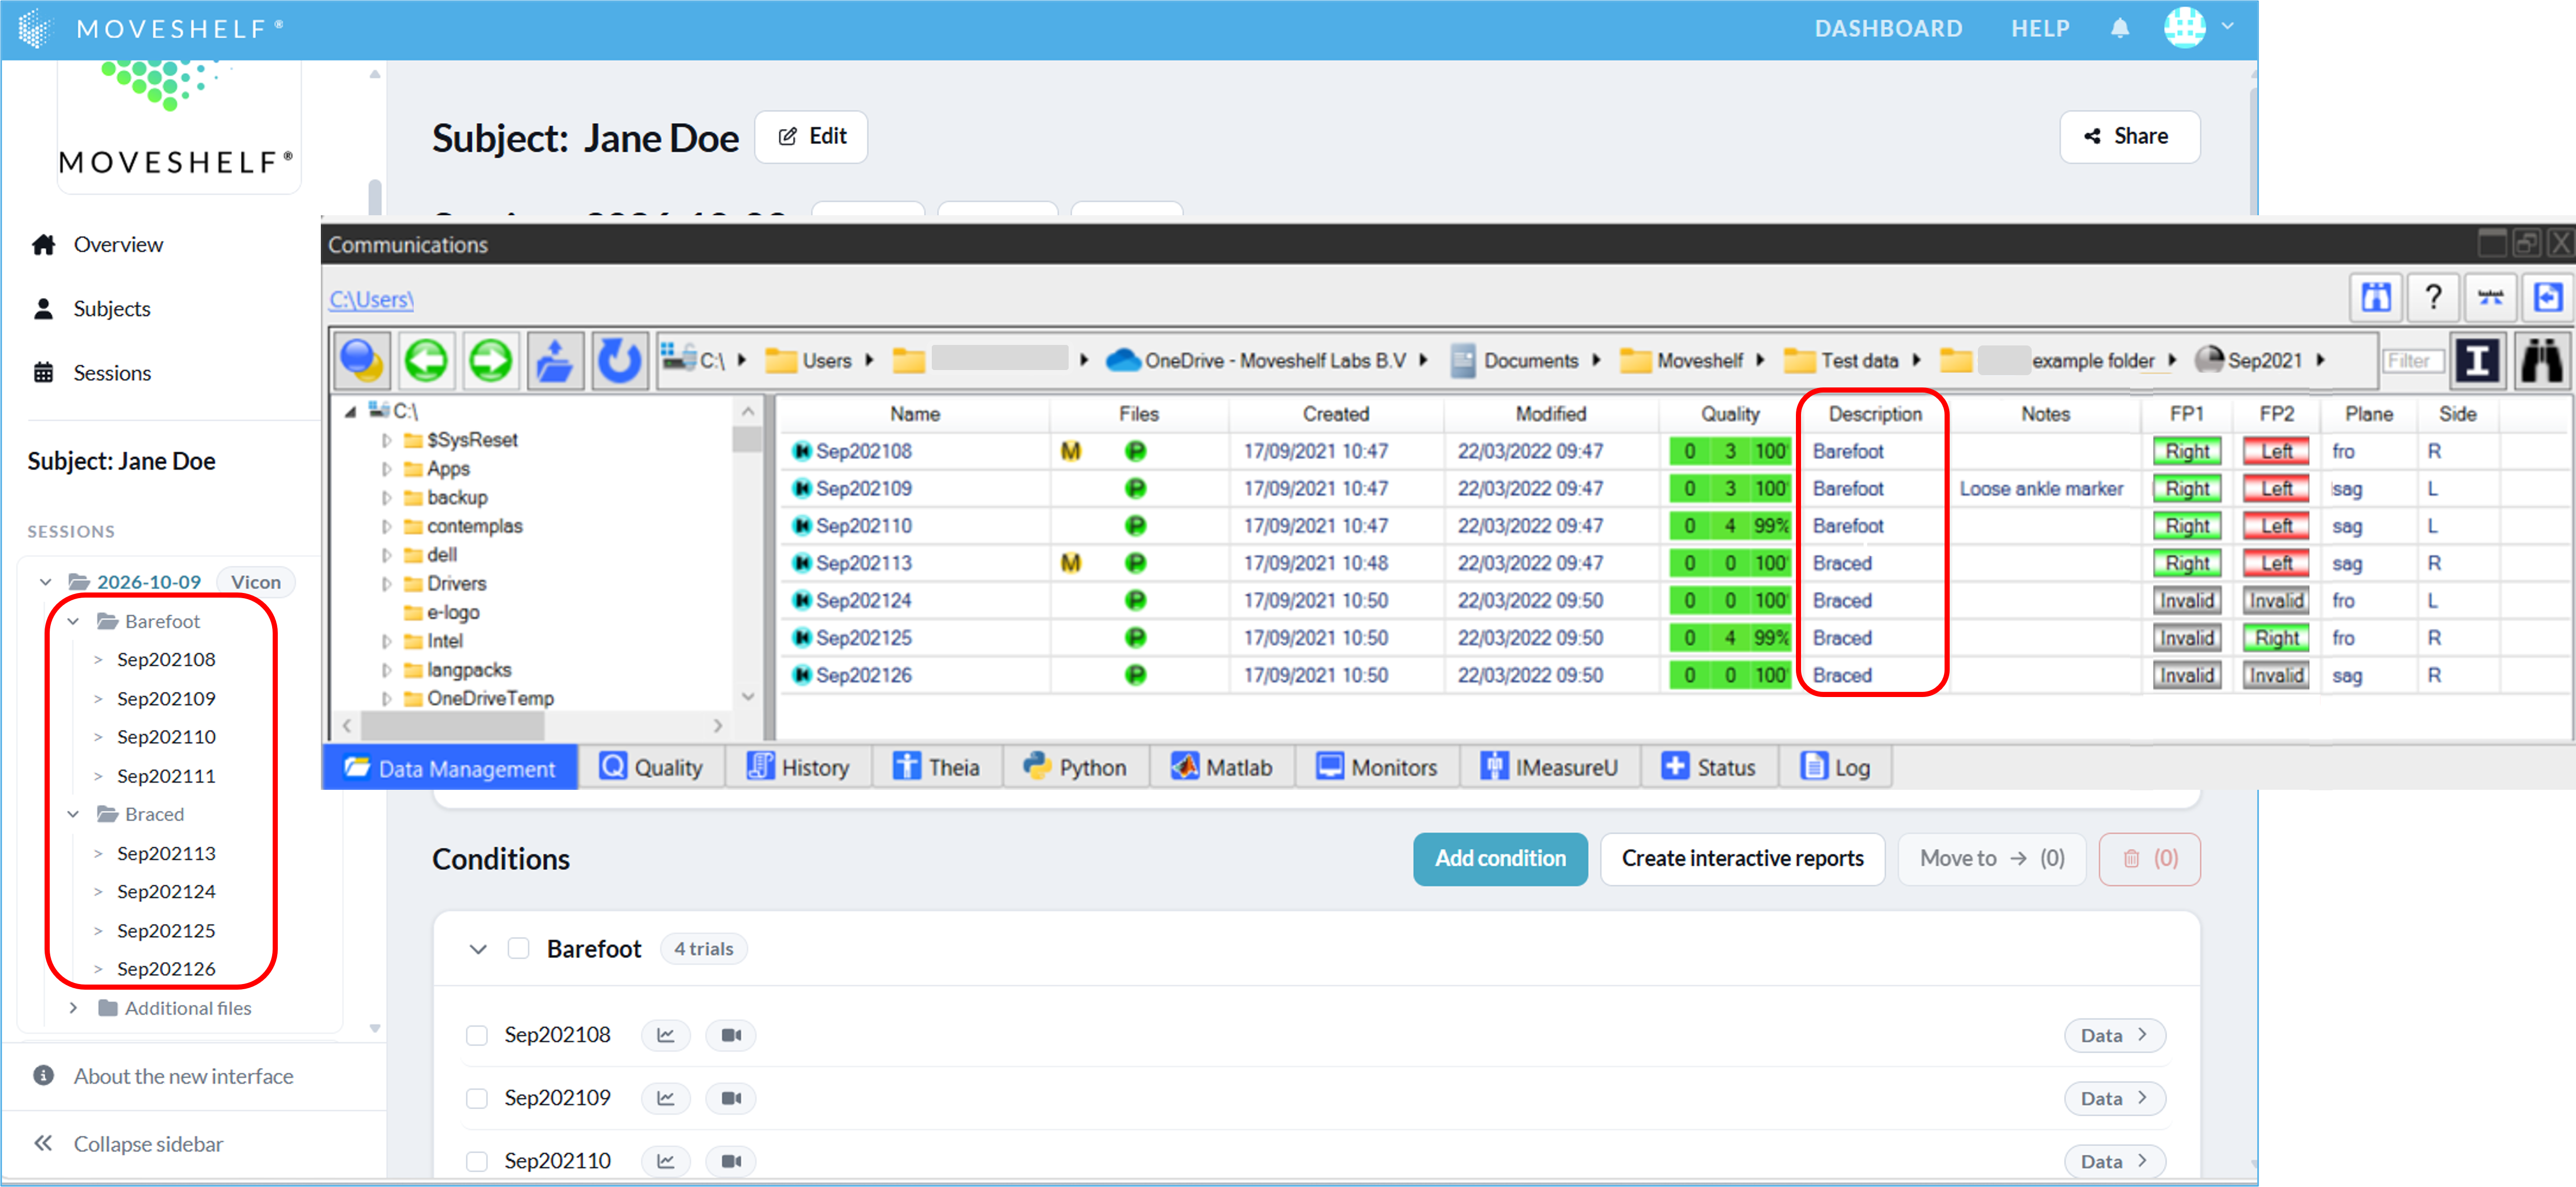
Fill in the Description field in Vicon Nexus with the name of your condition. Moveshelf will read this and categorize your trials into these conditions (see image below).
Session folder without .enf files
Import the condition name as trial metadata using the "conditionDefinition" in the moveshelf_config_import.json (see metadata import).
Movement analysis data
This section describes how to set up your C3D file for visualization on Moveshelf.Videos
Videos in .avi or .mp4 format can be included in the Vicon directory. The videos are automatically matched to their corresponding trial or included in the "Additional files" section, depending on their filename and location in the session folder.Vicon Nexus 2.13 and higher exports videos with a new transcoder (H264). We recommend using this version of Nexus for shorter upload (processing) times on Moveshelf.Additional files
An additional filter can be added to your Vicon directory upload settings to include alternative file types like PDF or images (.jpeg, .png, .webp) in your Vicon directory upload. These files will be automatically put into separate trials, in a condition called "Additional files". These alternative file types can be uploaded automatically as a child folder within the Vicon session or you can upload it as a separate folder after your Vicon session is done uploading.Add trial information
When using the session folder with .enf files, you can add additional trial information in Vicon Nexus.Noraxon directory upload
This feature is optional and only visible to Enterprise customers with this feature enabled.
To successfully upload a Noraxon directory to Moveshelf, you need to perform a two-step export from Noraxon software. Note to export the results in a self-created destination folder so Moveshelf can read all exported results at once. This parent folder should contain:
- A folder that includes the native Noraxon session export data (e.g. Noraxon MR3 data including videos and metadata).
- A folder that includes .c3d files of the Noraxon c3d export of the same session.
MOX directory upload
This feature is optional and only visible to Enterprise customers with this feature enabled.
-
The MOX directory upload currently supports MOX files for the Gait Offline Analysis Tool (GOAT) and MoXie Viewer (see Supported data types). You can upload a session folder that either contains multiple subfolders, each representing a specific condition (e.g. barefoot, shoes), or a folder without any subfolders. When subfolders are present, Moveshelf automatically categorizes the trials into conditions based on their names, treating each subfolder as a separate condition.
- .mox files
- .avi files (optional)
For the upload to work, the (sub)folder should contain:
MOX data structure requirements
This section summarizes the process of creating a MOX directory using Motek software for upload to Moveshelf. Follow these steps to ensure that the exported .mox data is enriched with the necessary information for Moveshelf to read, organize, and visualize the data effectively. For details on specific steps, please refer to documentation supplied by Motek.- Capture motion in D-Flow
- Start motion capture in D-Flow and export as a .mox file
- Process the data in GOAT
- Load the recorded .mox file: Go to File → Click Open, select your file, and click Open again
- A 'File loading option" box appears
- Under the Cycles section, select "Add all valid cycles after loading file" to initially include all valid gait cycles
- Manually edit which gait cycles are selected by using the Left/Right foot icons
- Save the updated .mox file
Theia directory upload
This feature is optional and only visible to Enterprise customers with this feature enabled.
To successfully upload a Theia directory to Moveshelf, kinematic data needs to be exported into a supported data format. Currently, the supported data format for the Theia system is .c3d, with specific export settings. The steps below describe the process to obtain this export for Theia data in combination with Qualysis hardware and software (QTM):
- Start processing when using Qualysis Gait PAF in QTM
- Click "processing" in QTM
- This opens Theia
- After tracking is completed in Theia, it will send the data to Visual3D for processsing
- Process Data in Visual3D
- Open Pipeline Processing in Visual3D by clicking the respective icon or pressing F11
- Clear Visual3D Pipeline (required due to an error in Visual3D)
- Select “CMO recalc pipeline”
- Select “Main pipeline”, then click “Clear Pipeline”
- Load and Execute Moveshelf Export Pipeline
- Click “Open Pipeline” and load the Moveshelf_Export.v3s file. This is custom script provided by a Moveshelf customer who uses this workflow. This script is an adjustment of Visual3D's pipeline 'Export Polygon C3DFile' and specifies e.g. which data to include in the exported file and required suffix for the exported file name.
- Click Execute Pipeline to generate the required xxx_TheiaKinematics.C3D files for all trials
You can upload a full session folder with one or more subfolders that each represent a condition (e.g. barefoot), or a folder without any subfolders. For the Theia directory upload to work, the (sub)folder should contain:
- xxx_TheiaKinematics.C3D files
- .avi files (optional)
- xxx.settings.xml (optional. Required for the use of Video Overlay).
TEMPLO directory upload
This feature is optional and only visible to Enterprise customers with this feature enabled.
To successfully upload a TEMPLO directory to Moveshelf, export all trials from one session using the Box file export option in the TEMPLO software. For the TEMPLO directory upload to work, the folder structure should be as follows:
- Main folder:
- One .box file
- Subfolder:
- One .adc file per trial
- .avi files (optional)
- One .recording file per trial (optional). Used to include gait events.
TEMPLO data structure requirements
By following these steps in TEMPLO, the data export will be enriched with the information that Moveshelf can use to read, organize and visualize TEMPLO data.- For gait analysis set the type of analysis in TEMPLO to “Gait analysis”.
- To automatically categorize trials into conditions on Moveshelf, include the condition in the recording label.
- For each trial, provide the timing of gait events (initial contact and foot-off). This additional information enables Moveshelf to normalize graphs to gait cycles. If gait event timings are not included, the graphs will default to a regular time scale for visualization.
- To visualize EMG muscle names on Moveshelf: make sure to select one of the configured ADCONFIG files. Please note: If the ADCONFIG file contains a mix of EMG channels labeled with muscle names (e.g., "Rectus Femoris R") and EMG channels that are generically labeled (e.g., "EMG 1"), only the channels with muscle names will be visualized on Moveshelf.
Simi directory upload
This feature is optional and only visible to Enterprise customers with this feature enabled.
Simi provides one .smp file per trial. This file is used by Moveshelf only to define a trial. Data (kinematics / forces / EMG) is uploaded using .txt files, which can be exported from Simi. For videos, we also recommend exporting them from Simi, since with the export you can include force overlay, video rotation, and distortion correction.
For the Simi directory upload to work, the naming conventions is important.
- The filename convention for the .smp files is EHR ID_yyyy-mm-dd_R#_Condition_Context_Type.smp, where # is the trial number. The trial name on Moveshelf is taken from that .smp filename, but removes the EHR ID and date so that we have: R##_Condition_Context_Type
- Video(s) (.avi) should include “R#” in the filename to include the video in the correct trial
- Kinematics .txt file(s) should be named "R#_Kinematics.txt". All columns with prefix "Kin" are included as kinematics. For kinematics, context (left / right) is derived from the .smp filename (including "_L_" or "_R_")
- EMG .txt file(s) should be named "R#_EMG.txt". Per muscle Moveshelf reads the first column (raw) and the column including the “LP-2Hz HP-20” suffix (envelope). For EMG, context (left / right) is taken from the column header (e.g. “Left Tibialis Anterior”). If context is not provided in the header, it is derived from the .smp filename (including "_L_" or "_R_")
- Forces .txt file(s) should be named "R#_FP.txt"
- Gait events can be added to the kinematics text files through a column named "MOI", where gait events are represented by ascending numbers (0 = ipsilateral foot contact, 1 = contralateral foot off, 2 = contralateral foot contact, 3 = ipsilateral foot off, 4 = ipsilateral foot contact, 5 = contralateral foot off, etc.). For left trials, ipsilateral refers to the left side and contralateral to the right side. For right trials, ipsilateral refers to the right side and contralateral to the left side.
Visual3D export
This feature is optional and only visible to Enterprise customers with this feature enabled.
This feature is currently in BETA and is under active development. Behavior and requirements may change as validation and development continue.Export events, kinematic and kinetics
This section explains how to export events, kinematics, and kinetics to a .c3d file. If this is your first export, you can manually create a pipeline. Once created, this pipeline can be saved and reused for all subsequent exports. See the subsection Export Using a Saved Pipeline for guidelines on how to use the saved pipeline. You can also download a sample export_kinematics_kinetics_to_c3d.v3s pipeline for exporting events, kinematic and kinetics data.Prerequisites
Before exporting, ensure the following:
- A CMZ file is opened in Visual3D, with all relevant trials loaded.
- The Visual3D Events and Visual3D Signals that you wish to export have already been computed.
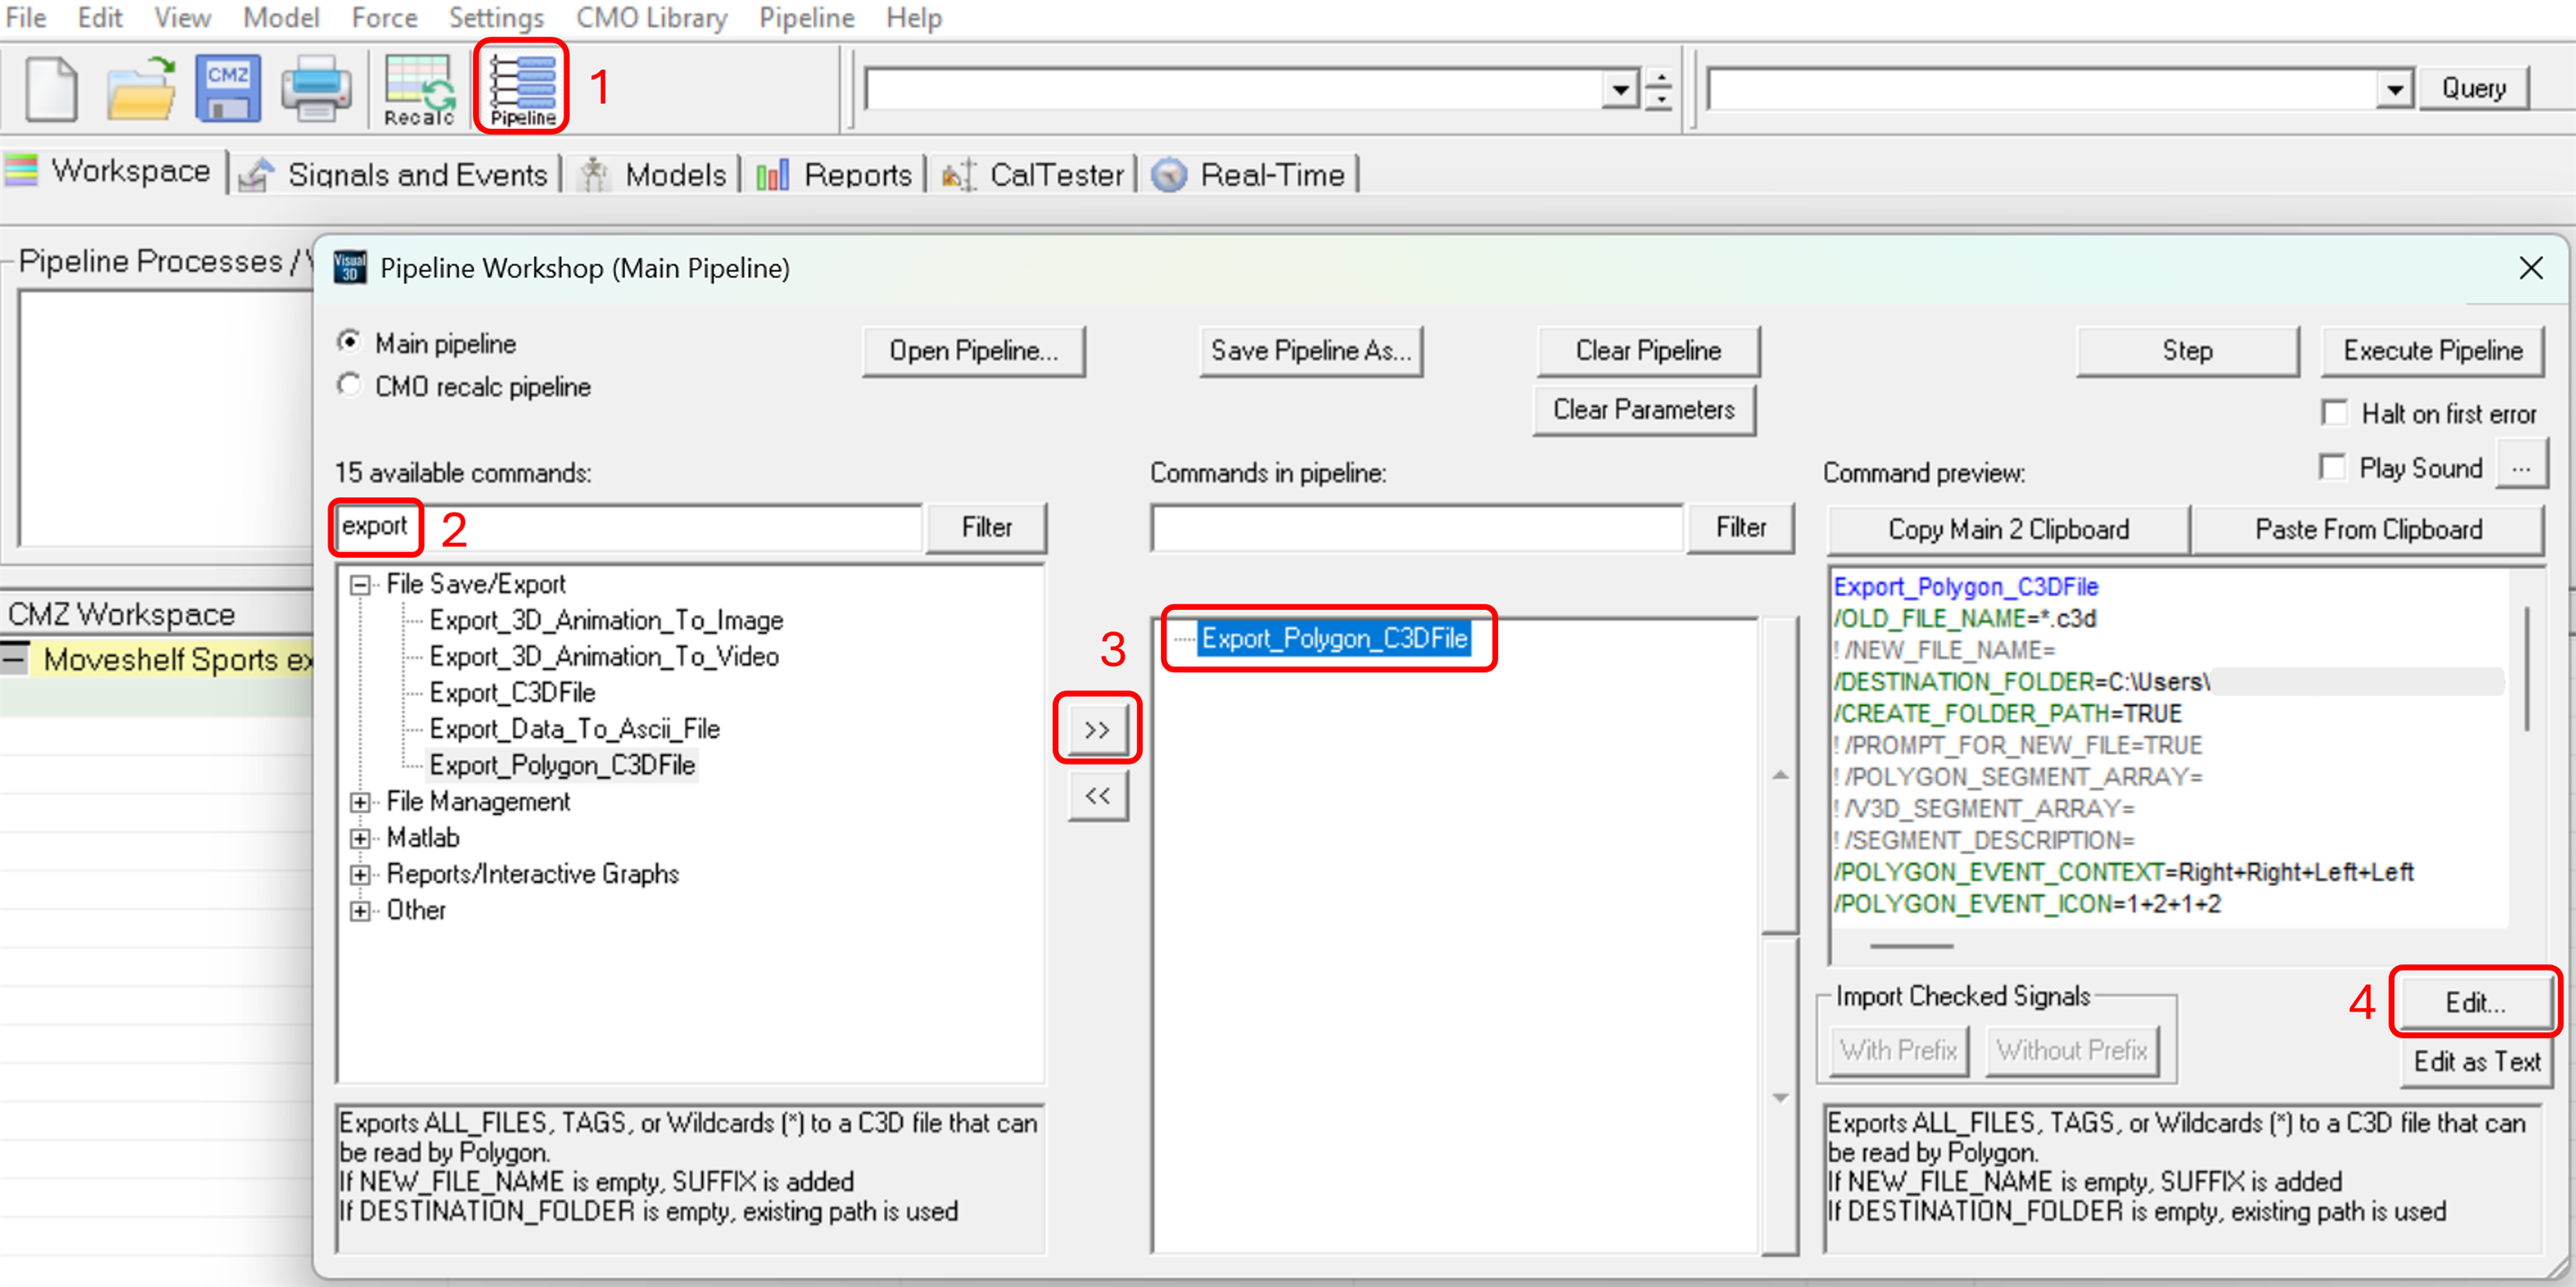
- Open the Pipeline workshop in Visual3D.
- Click 'Open Pipeline...' and select your saved pipeline (.v3s file).
- If there are minor changes in the variables with respect to your previous project, you can edit them. See Step 5 in the section Manual export (initial setup) below.
- Open the Pipeline workshop in Visual3D.
- In the first column, locate the command 'Export_Polygon_C3D_File' under 'File Save/Export' by using the filter (type export --> and click 'Filter').
- Select 'Export_Polygon_C3D_File' and move it to the second column (Commands in pipeline) by pressing the '>>'.
- In the third column, below the command preview, click 'Edit…'.
- The export dialog below will open (see image 2). Here, you have to map your Visual3D variables to Polygon variables. The Moveshelf application processes events, kinematic, and kinetic data using the Polygon variable conventions. Therefore, exporting data using the Polygon format ensures compatibility with Moveshelf. The Visual3D variables depend on your naming conventions (blue rectangles in image 2). What matters is that each Visual3D variable is mapped to the correct Polygon Variable (red rectangles in image 2).
- Select the source file(s) and the destination file(s)/folder. To export all files, enter '*.c3d' in file to export.
- For each element below, click on 'Modify Selected' after mapping to save changes.
- Map Visual3D Events to Polygon Events:
- For Visual3D Events, select the corresponding item from the drop-down list to match it to the Poly Event.
Please note that a single Visual3D event may have multiple labels (e.g., RFO and Right Foot Off). If you are unsure of the correct Visual3D Event name:
- In the Workspace tab, select one .c3d file to open it as the active file.
- Open the Signals and Events tab.
- Under EVENT_LABEL, check the data values for each parameter name to identify the correct Visual3D event name.
- For Visual3D Events, select the corresponding item from the drop-down list to match it to the Poly Event.
Please note that a single Visual3D event may have multiple labels (e.g., RFO and Right Foot Off). If you are unsure of the correct Visual3D Event name:
- Map Visual3D items to Polygon items:
- For 'Visual3D Types', select 'LINK_MODEL_BASED'.
- For 'Visual3D Signals', select the corresponding item from the drop-down list to match it to the Polygon item.
- For 'Visual3D Folders', select 'ORIGINAL'.
- Map Visual3D Events to Polygon Events:
- After completing and saving all mappings, click 'OK'.
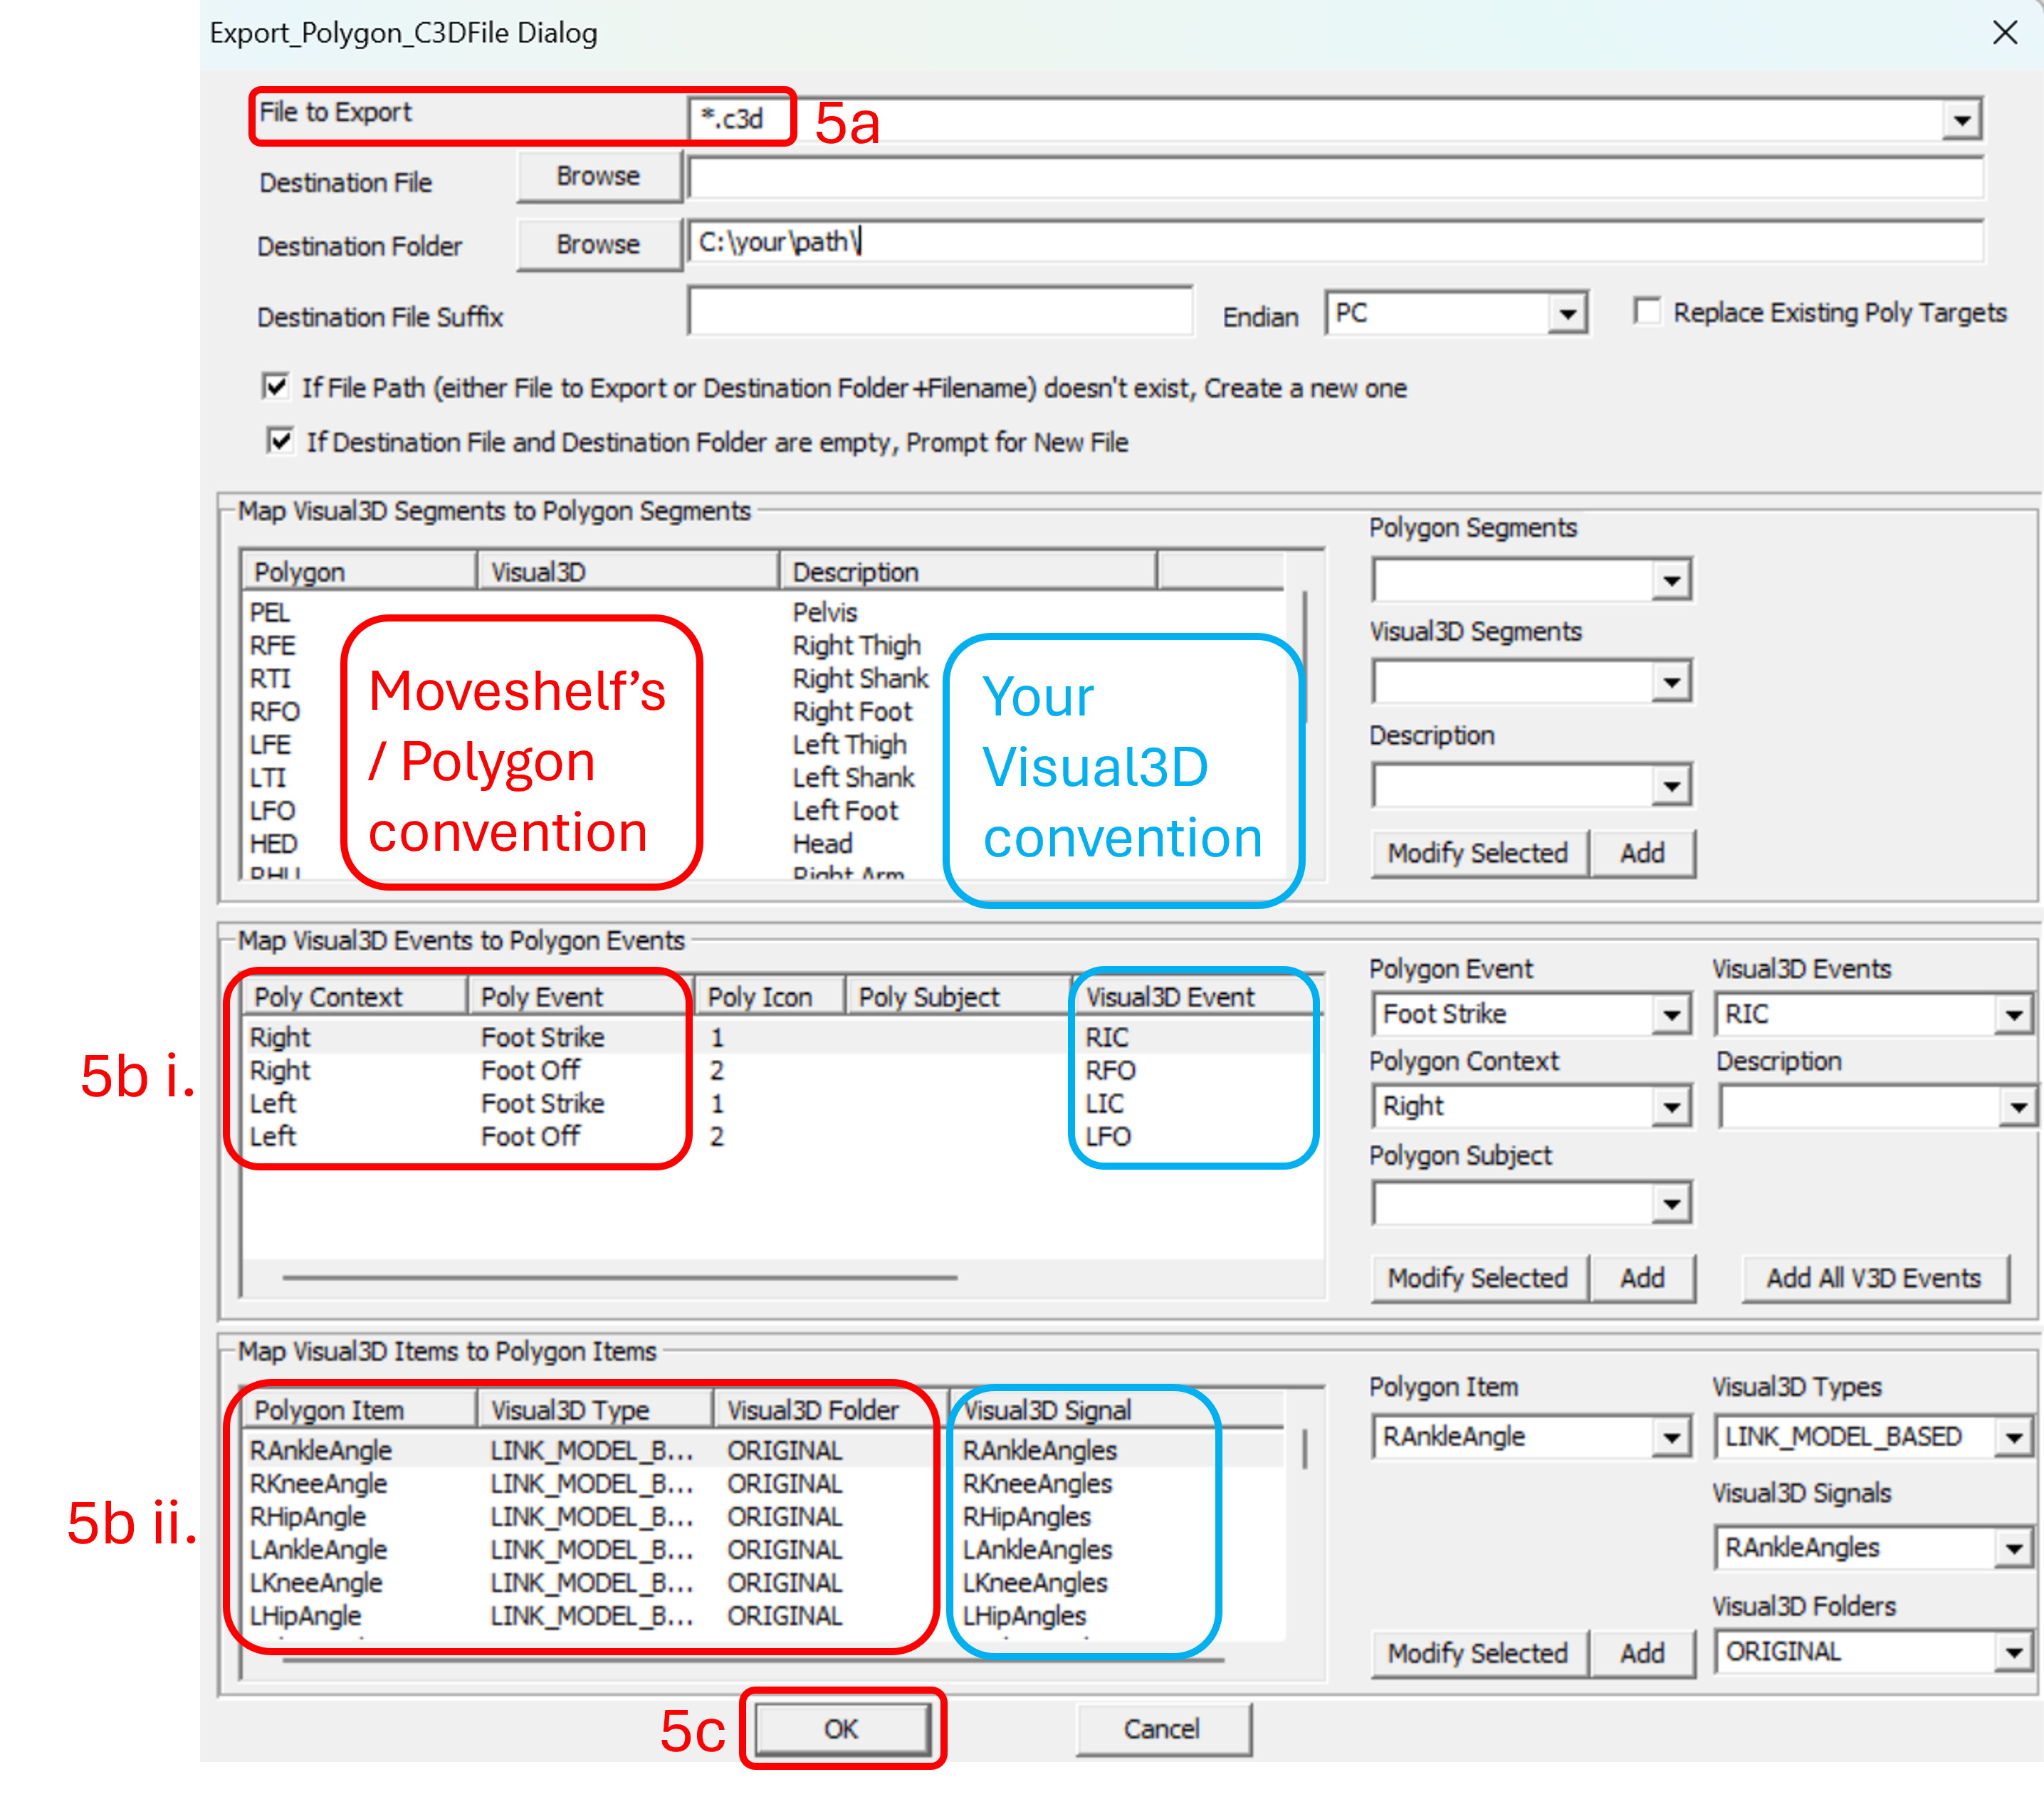
Image 2: Mapping Visual3D to Polygon variables (Moveshelf’s convention), steps 5a-5c. - You will return to the Pipeline workshop dialog. Click Execute Pipeline to export. This may take some minutes.
- Click 'Save Pipeline As…' to save the export pipeline for future use.
- A CMZ file is opened in Visual3D, with all relevant trials loaded.
- The spatiotemporal parameters must be already computed. You can find your spatiotemporal parameters in the 'Signal and Events' tab under 'METRIC' → 'PROCESSED'.
- Download the sample export_spatiotemporal_to_txt.v3s file.
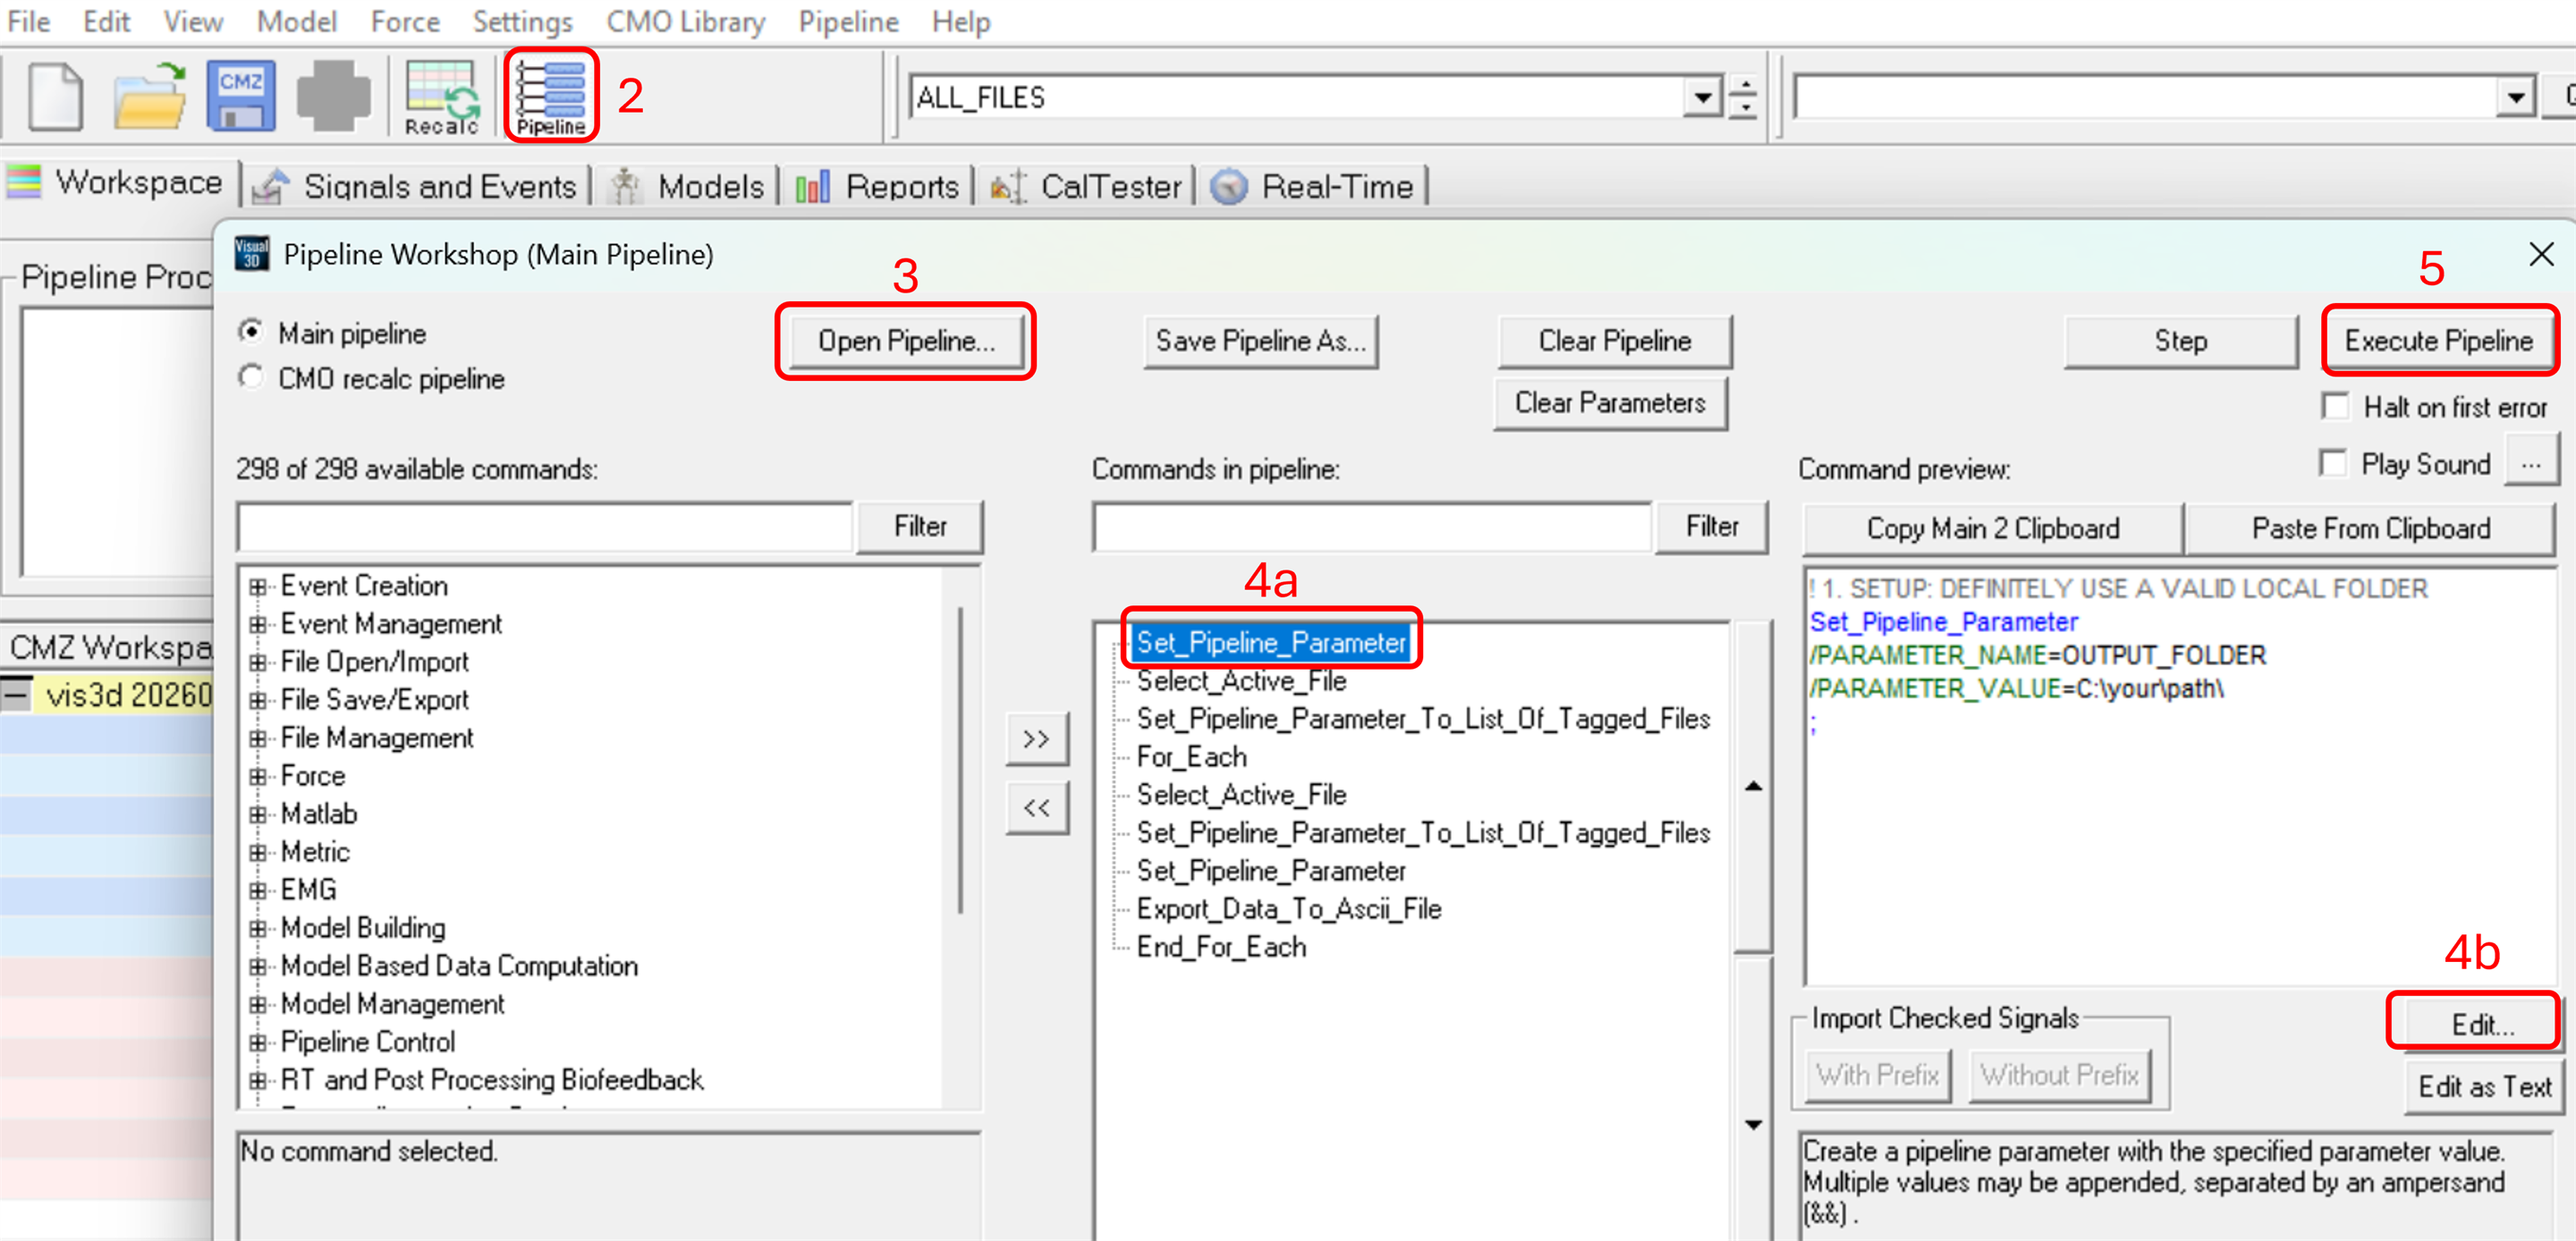
- Open the Pipeline workshop in Visual3D.
- Click 'Open Pipeline...' and select the 'export_spatiotemporal_to_txt.v3s' pipeline you downloaded in step 1.
- Set the output folder for the exported data:
- In the second column ('Commands in pipeline'), select 'Set_Pipeline_Parameter'.
- In the third column ('Command preview'), click 'Edit…'.
- In the pop-up window, specify your desired path in '/PARAMETER_VALUE' and click 'Ok'.
- Click 'Execute Pipeline' to export your spatiotemporal parameters into .v3d.txt files.
- For .c3d files:
- <L/R><condition name>_avg.c3d (e.g. DJ_avg.c3d)
- <L/R><condition name><trial number with two digits>.c3d (e.g. DJ01.c3d)
- For .txt files:
- <L/R><condition name>_avg.txt (e.g. DJ_avg.txt)
- .c3d files (optional)
- .v3d.txt files (optional). This file is used to import spatiotemporal parameters.
- _avg.txt files (optional). This file is used to create the Sports Word report
- "moveshelf_config_import.json" (optional). This file is used for metadata import
- .avi files (optional)
- .mp4 files (optional)
- .pdf files (optional)
- image files (.jpeg, .png, .webp) (optional)
Export Using a Saved Pipeline
Follow these steps to use a saved pipeline in Visual3D:
Please note the saved pipeline can be reused for other projects as long as the same variables are available. The pipeline will fail if any required variable is missing or named differently.Manual export - Initial setup
Follow these steps to manually create an export pipeline for your first export in Visual3D. Please refer to Image 1 & 2 for the interface elements in the following steps.
Export spatiotemporal parameters
Spatiotemporal parameters can be exported from Visual3D into .v3d.txt files for upload to Moveshelf. The steps below outline how to export all processed spatiotemporal parameters into .v3d.txt files using the 'Export_Data_To_Ascii_File' function in Visual3D. Using this pipeline, one .v3d.txt files is created per .c3d file.Prerequisites
Before exporting, ensure the following:
Export steps:
Automatically categorize trials into conditions
Moveshelf can automatically categorize trials into conditions based on the filenames. To ensure correct categorization, the following naming convention must be used:Important: the condition name in the filename must match the condition that is configured for the Moveshelf project you want to import to. Please contact Moveshelf support to help you with setting your conditions in your project configuration.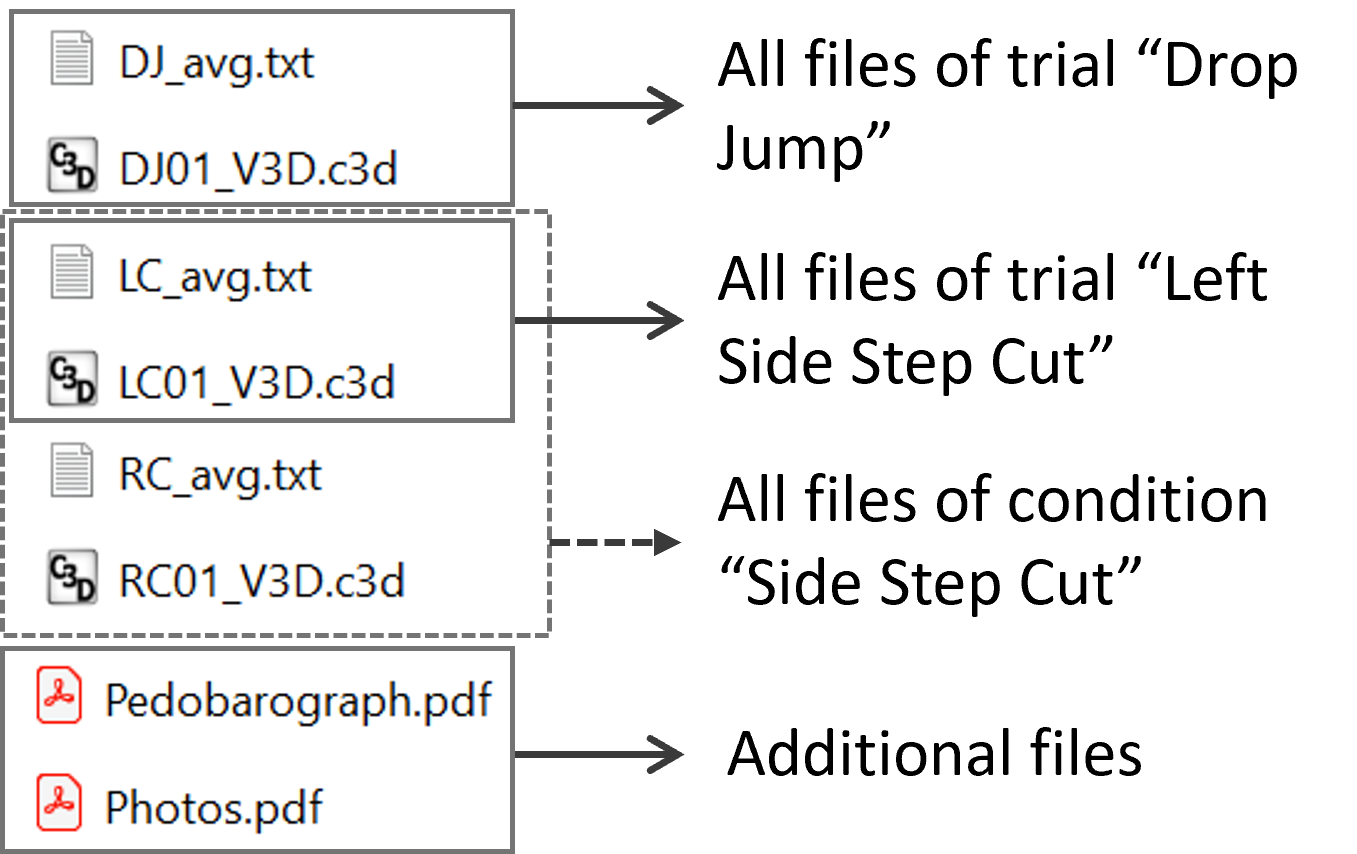
Data structure requirements
For general information about how to upload a directory see the section directory upload. For the upload to work, the session folder should include:
Please see the image on the right for the contents of an example session folder. The session folder can have subfolders. All files from all subfolders will be included for the directory upload. You can also download an example folder using the link below.
Download the
example directory in .zip format.Metadata import
This feature is optional and only visible to Enterprise customers with this feature enabled.
To import subject, session, condition, trial, and intervention metadata, you can upload a configuration file named "moveshelf_config_import.json".
This file supports the import of:
- "subjectMetadata": subject metadata that will be written in the subject info tab.
- "sessionMetadata": session metadata that will be written in the session metadata tabs when available.
- "sessionLabel": session label that will be added to the current session during the upload.
- "conditionMetadata": condition metadata that will be written in the condition info tab when available. Ensure that the condition names in your configuration file exactly match the conditions in Moveshelf.
- "conditionDefinition": to define what trials should go in which condition.
- "trialSideSelection": to define whether a trial should be used for left/right/both/none.
- "trialInvalidData": to indicate whether a data type needs to be ignored for that trial (e.g. kinetics for left).
- "representativeTrials": to indicate whether a trial should be considered representative in a condition to be used for plotting EMG in the Word export.
- "interventionMetadata": intervention metadata that will be written in the intervention metadata tab when available.
Download an example configuration file here: moveshelf_config_import.json. You can simply delete all variables that you do not need (e.g. "trialSideSelection" or "interventionMetadata"). Also, please note that the specific metadata keys may differ for your project (see note below).
Important: the keys in "subjectMetadata", "interventionMetadata", "sessionMetadata" and "conditionMetadata" must match the metadata template that is configured for the Moveshelf project you want to import to. You can download the configured metadata template from the project overview.You can upload the configuration file either as part of a Vicon directory or separately:
- Vicon directory upload: the configuration file can be uploaded as part of a Vicon directory.
- Separate upload: The configuration file can also be uploaded separately. To do this, drag and drop only the moveshelf_config_import.json file into the session upload box.
During the upload process:
- Warnings are displayed to inform the user which fields will be overwritten and which fields will remain unchanged.
- If the configuration file contains incorrectly formatted data, error messages will specify why the values are invalid. The upload process cannot proceed until these formatting issues are resolved. Refer to the formatting guide below for details on correct field formats.
Important!
Subject info, session and condition metadata specified in the configuration file will not overwrite existing subject, session and condition metadata on Moveshelf. Only empty fields on Moveshelf will be filled with the values from the configuration file. Interventions metadata is an exception to this rule, the entire list of interventions will be overwritten.
Formatting fields in the configuration file
Below is a guide on how to format the different datafields in the moveshelf_config_import.json file for importing subject and session metadata into Moveshelf. The table outlines the supported syntax for each field type, along with examples to help you format your data correctly.| Variable Type on Moveshelf | Format in .json | Example in the .json file |
|---|---|---|
| Short text | "Text" | "subject-first-name" |
| Short text - with left/right context |
[
{"value": "Text", "context": "left"}, {"value": "Text", "context": "right"} ] |
"vicon-leg-length" |
| Long text | "Text" | "surgery-dictation" |
| Dropdown | "Dropdown option" | "sessioninfo-site" |
| Dropdown - with left/right context |
[
{ "value": "Dropdown option", "context": "left" }, { "value": "Dropdown option", "context": "right" } ] |
"supine-spasticity-hamstrings" |
| Multi-select dropdown |
{
"value": [ "Dropdown option1", "Dropdown option2"], "multiselect": true } |
"sessioninfo-data-collected" |
| Multi-select dropdown - with left/right context |
[
{ "value": [ "Dropdown option1", "Dropdown option2"], "context": "left", "multiselect": true }, { "value": [ "Dropdown option1", "Dropdown option2"], "context": "right", "multiselect": true } ] |
"prone-nonwb-forefoot" |
| Date | "yyyy-mm-dd" | "subject-date-of-birth" |
Historical data import
This feature is optional and only visible to Enterprise customers with this feature enabled.
This section focuses on historical data import based mainly on Vicon data (Polygon reports) and an integration with ArQive where data is originally stored.
Data structure
- A patient is represented on ArQive by one folder, named by the EHR ID
- Vicon Polygon reports
- Every polygon report is one folder, with a standard naming convention of “Report < date > < free text >“. The < date > and < free text > in the folder name are recognized and used to create and name a new session on Moveshelf.
- A patient can have multiple Vicon Polygon reports (folders).
- All data within a Vicon Polygon report folder will be organized within one session on Moveshelf.
- Within the folder(s), a C3D file and/or video's with a uniform prefix in the file name will be uploaded as one trial.
- PDF files and MP4 videos are accepted and uploaded as a separate trial each.
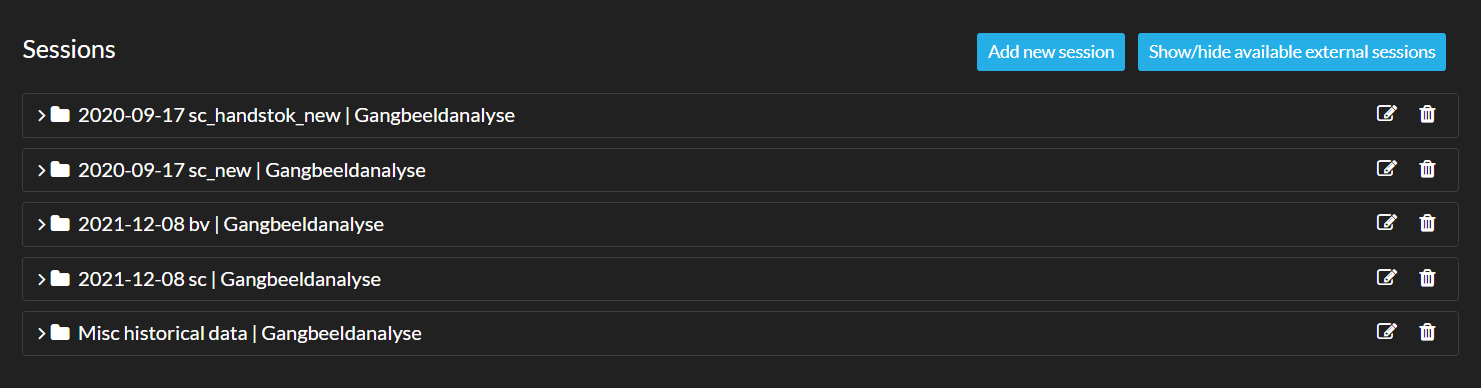
- Data not within a Vicon Polygon report folder with the standard naming convention will be grouped together into one session with the standard name “Misc historical data“ (see image below). This can either be data in a folder that does not follow the Vicon Polygon report standard naming convention or data that is stored as a direct child of the patient folder.
Accepted data formats
- C3D
- Video files (.avi, .MP4 and .mov)
The current implementation of the historical data import workflow does not use the Vicon native .ENF file, as analysis of the data structure for the example implementation in this section frequently did not contain this file. This is contrary to the workflow we describe in our Vicon Directory upload, where the .ENF is used for advanced automatic organization and categorization based on a more singular, predictable and structured session upload.Import and download historical data
When historical data of a subject is present in ArQive, a new subject is automatically created on Moveshelf with the EHR ID as patient ID or the data will be connected to an excisiting patient with the same patient ID. If you would like to view the historical data on Moveshelf you can import this data, following the next steps:- Expand the 'Available external sessions' section to see which imports are available.
- Select your external session to import and click on 'Import'.
- If you would like to download the data, click on 'Download' and a .zip file will be created and downloaded.
The maximum import size of a historical data folder is 5GB. If the size of this folder is bigger than 5GB, we advise you to manually upload the data on Moveshelf. 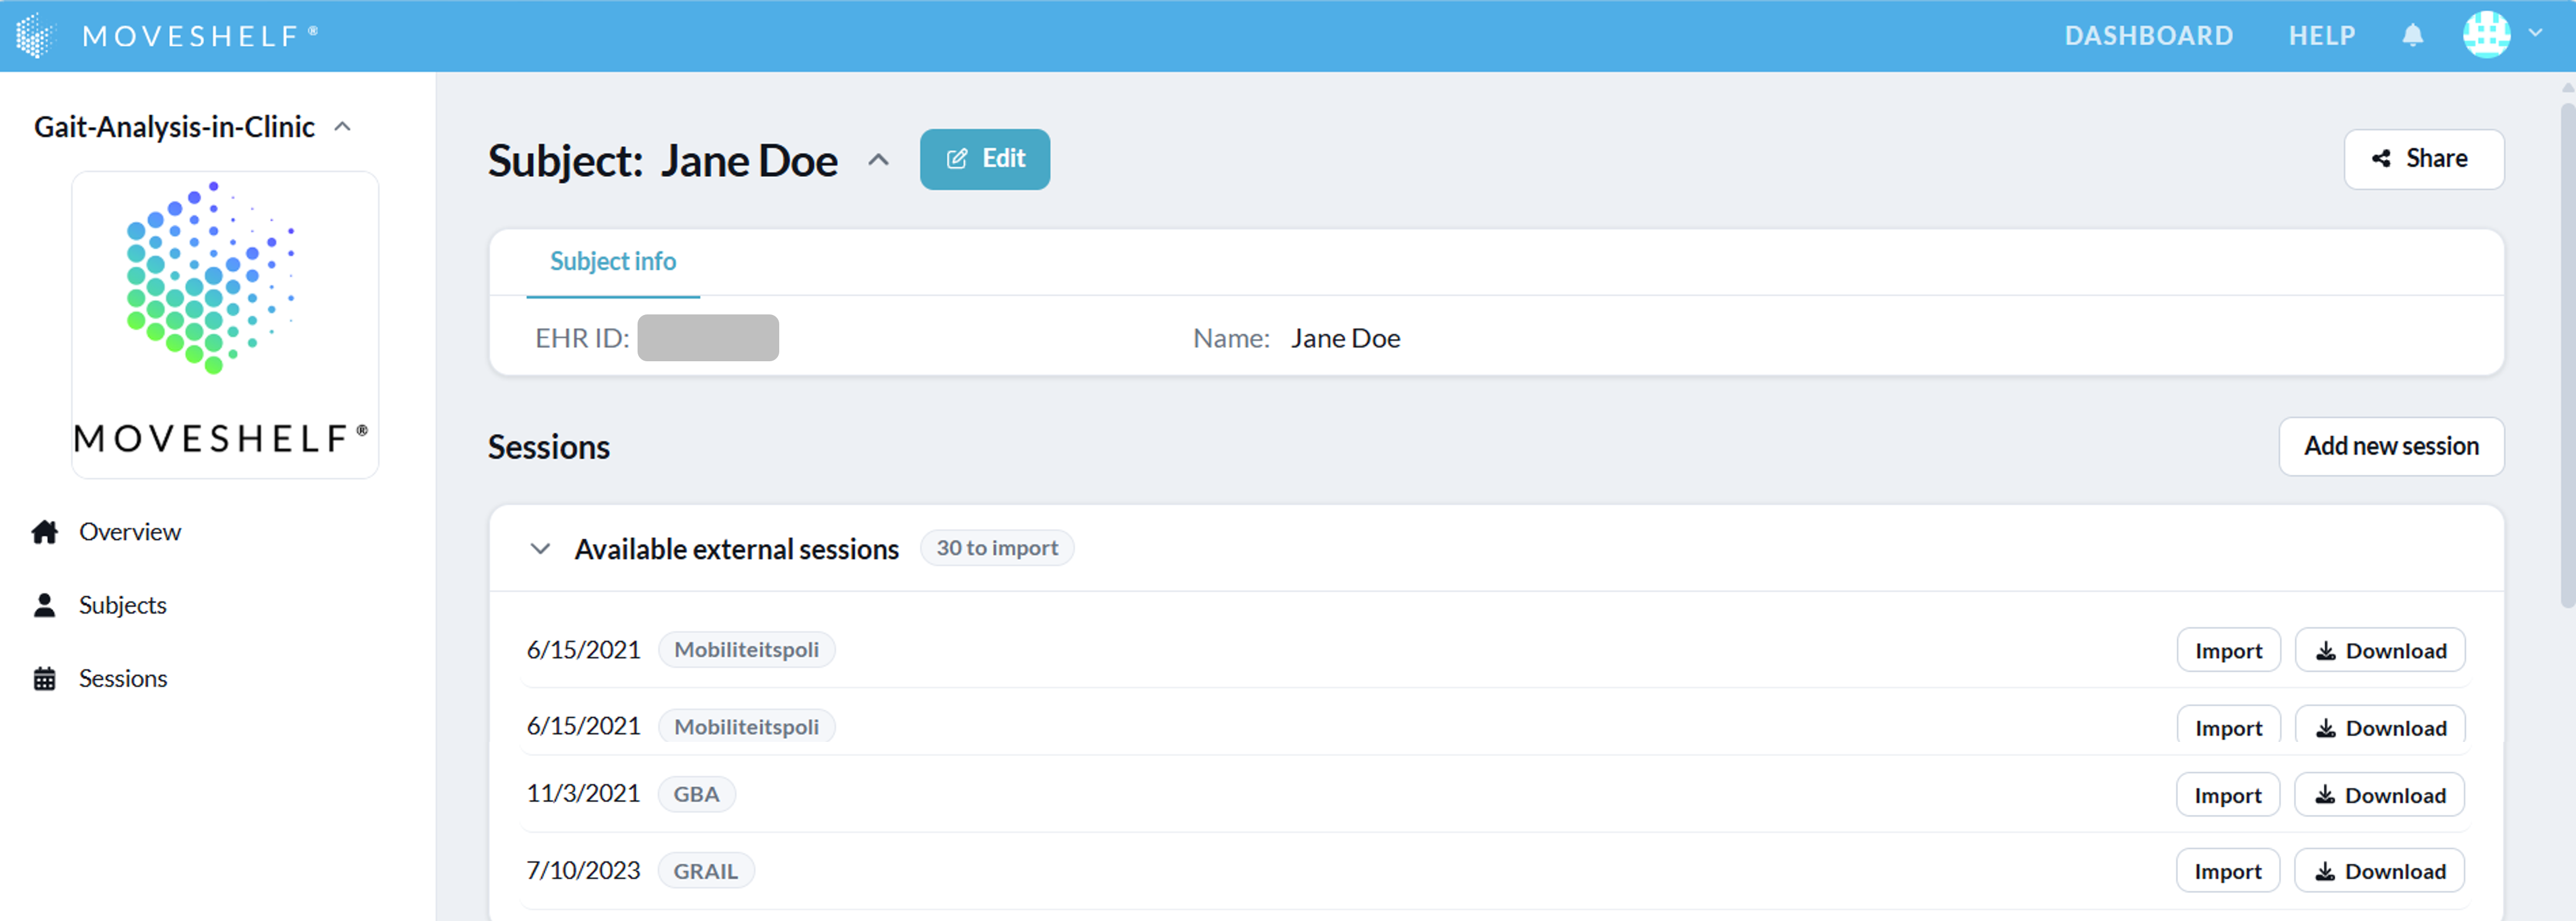
Import from ArQive
This feature is optional and only visible to Enterprise customers with this feature enabled.
Folder directories (e.g. Vicon directory, Templo or GRAIL) can be recognized by Moveshelf and automatically adds a predefined session label (e.g. '3D gait lab', '2D video lab' or 'GRAIL') to the session name to reflect the source.
