General
This page explains the workflow on Moveshelf for both the Shriners sports medicine evaluation and the Shriners gait evalution, and is an additional page to the general knowledge base. For general instructions that are not specific to Shriners,
you will be often directed to the general knowledge base.
This page covers the essential steps, including Getting started, understanding the Data structure, managing Subjects and Sessions, Uploading data, and how to Explore conditions. Additionally, you'll find workflow specific details for the Sports medicine evaluation and the Gait evaluation.
 As the Shriners knowledge base is a hidden website, navigate back by using the return button in your browser after visiting a page on
our general knowledge base, or type moveshelf.com/docs/shriners in your browser again.
As the Shriners knowledge base is a hidden website, navigate back by using the return button in your browser after visiting a page on
our general knowledge base, or type moveshelf.com/docs/shriners in your browser again.
This page covers the essential steps, including Getting started, understanding the Data structure, managing Subjects and Sessions, Uploading data, and how to Explore conditions. Additionally, you'll find workflow specific details for the Sports medicine evaluation and the Gait evaluation.
Getting started
Webinars
For both Shriners' workflows there are introductory webinars available. This is our recommended way to start and become familiar with Moveshelf and your (new) workflow.- Watch the Shriners' sports medicine workflow training webinar here.
- Watch the Shriners' gait workflow training webinar here.
Login
Login to Moveshelf on the Shriners-specific environment at https://shriners.moveshelf.com.See SSO-login for instructions on how to log in on Moveshelf with Single Sign-on.
Supported devices & browsers
For more information about the supported devices and browsers, navigate to supported devices & browsers.
Data structure on Moveshelf
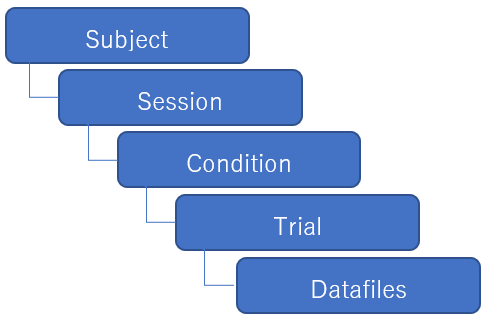
sessionsA session is an overview of all recorded measurements done in one ‘visit’ of a subject. It can include multiple conditions and trials.
, which then can be divided into conditionsA condition is a state in which a subject has been recorded, e.g., barefoot, or with shoes. It can include multiple trials.
to categorize trials. Your data is ultimately stored in trialsA trial contains all data that was captured of a subject during one recording. It can include multiple data types that have been recorded synchronously, e.g. C3D, video, forces and EMG.
, with one trial per recording. A trial can contain several data types that were recorded synchronously.
Subjects
Create a new subject
You can manually create a subject by clicking on Add new subject.
Once you have created a new subject, you will be directed to the subject home page. This page gives you a subject overview where you can find all relevant information and data related to this subject.

Add subject information
On top of the subject home page the subject information panel is displayed. By clicking on the Edit button next to the subject’s name, you will be able to add or edit subject information. For more information on editing subject information and using the Interventions and Research projects tabs, see add subject information.
Sessions
Create a new session
On the subject home page you can create a new session by clicking on 'Add new session', filling in the session date and name, and clicking on 'Add'. After creating a new session, you will be directed to the session home page. You can always get back to this session home page by clicking on the session name either on the subject home page or in the navigation menu on the left (visible when looking at a session or trial).Add session information
The session home page shows multiple tabs where you can view and edit session information, such as information from the physical exam or patient history. Please note that the tabs and their contents are different for the gait and the sports medicine workflow. Click on 'Edit' next to the session name to edit session information.
Upload data (Vicon directory)
Within the newly created session you are able to upload a Vicon directory. Make sure your data complies with the data requirements, to ensure proper visualization and automatic categorization into trials and conditions.
Follow the next steps to upload a Vicon directory on Moveshelf:
Follow the next steps to upload a Vicon directory on Moveshelf:
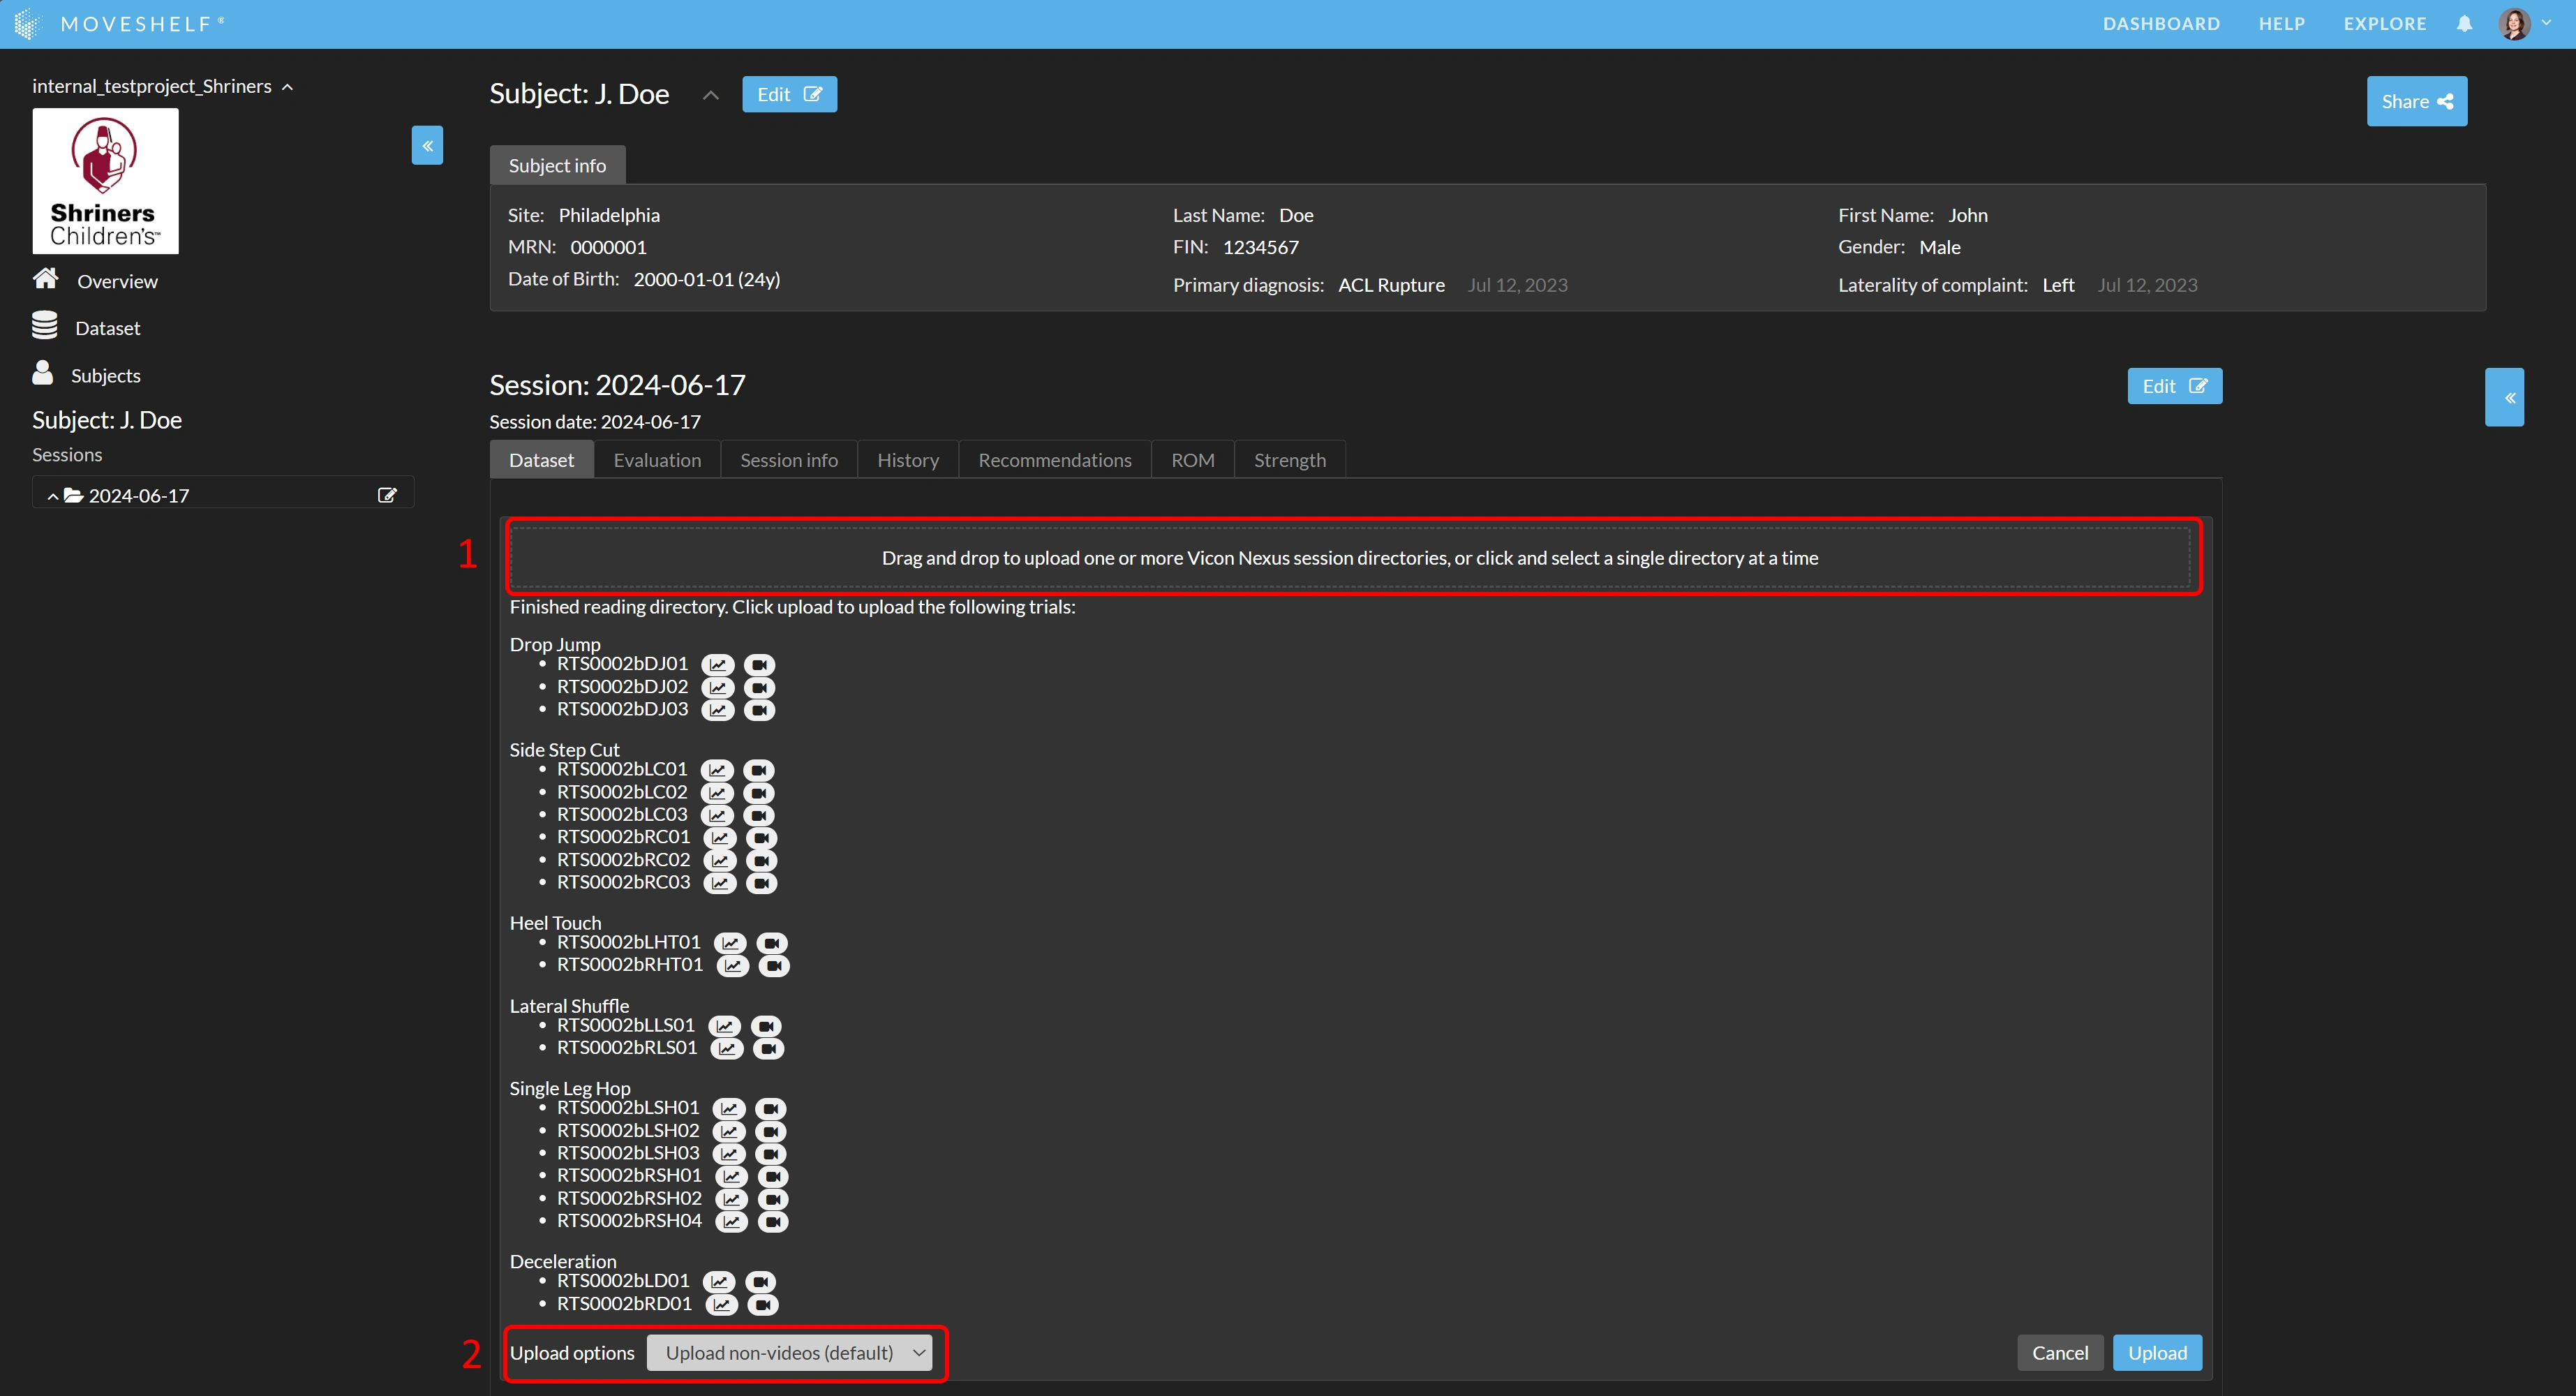
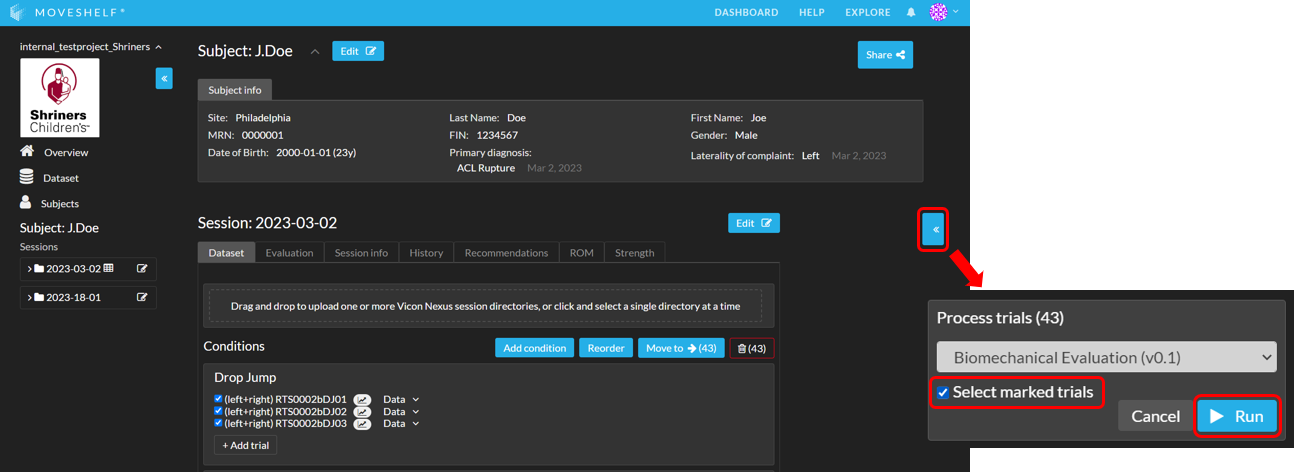
- Upload your folder by navigating in your local storage to your directory and drag and drop one (or more) session folder(s) in the upload area (see number 1 in the image below).
- Moveshelf will read the directory and show the conditions and trials included in the session folder.
- A dropdown will appear that allows you to choose whether to include videos with your directory upload (see number 2 in the image below). Select the preferred option.
- Click 'Upload'. All files will now be uploaded and processed. While uploading you can find a progress bar on top of the page. Please do not close the Moveshelf page or navigate away on the page while the green processing bar is still visible.
Reorganize trials and reports
For information about how to reorder reports, conditions and/or trials, navigate to
reorganize trials and reports.
Data requirements
Vicon folder structure
The Vicon directory upload works with a Vicon session folder. Commonly this is a direct child of the Subject folder. For the upload to work, this folder should include:- xxx.Session.enf file. This file is used to detect a Vicon session
- xxx.Trial.enf or xxx.Trialxx.enf files. This file is used to detect trials within the Vicon session
- .GCD files (optional)
- .avi files (optional)
- .pdf files (optional)
- image files (.jpeg, .png, .webp) (optional)
See Sports medicine data requirements and Gait data requirements for more details.
Mark trial context
GCD files can contain data for both the left and right side of the body. Moveshelf can mark the GCD files' context as 'left', 'right' or 'left + right', based on the name of the files. This context is used to select data from which side of the body is used as input for the sports medicine biomechanical evaluation or gait analysis word report.The marking is based on the following scheme:
- If a GCD file name contains L1/L2/L3/L< .. > or 'left' the trial will be marked as 'left'
- If a GCD file contains R1/R2/R3/R< .. > or 'right' the trial will be marked as 'right'
- If this is not true the trial will be marked as 'left + right'
Trial context marking can be edited also on Moveshelf when viewing a condition summary (or other report).
Explore a condition
A condition summary displays all the trials performed under a specific condition. For more information on clickable condition summaries and Shriners reports, refer to the clickable condition summary and Shriners reports sections, respectively.
To reflect the changes in the charts and spatiotemporal parameters on Moveshelf, you need to update the report visualization. To do this, click the refresh icon in front of the report title.
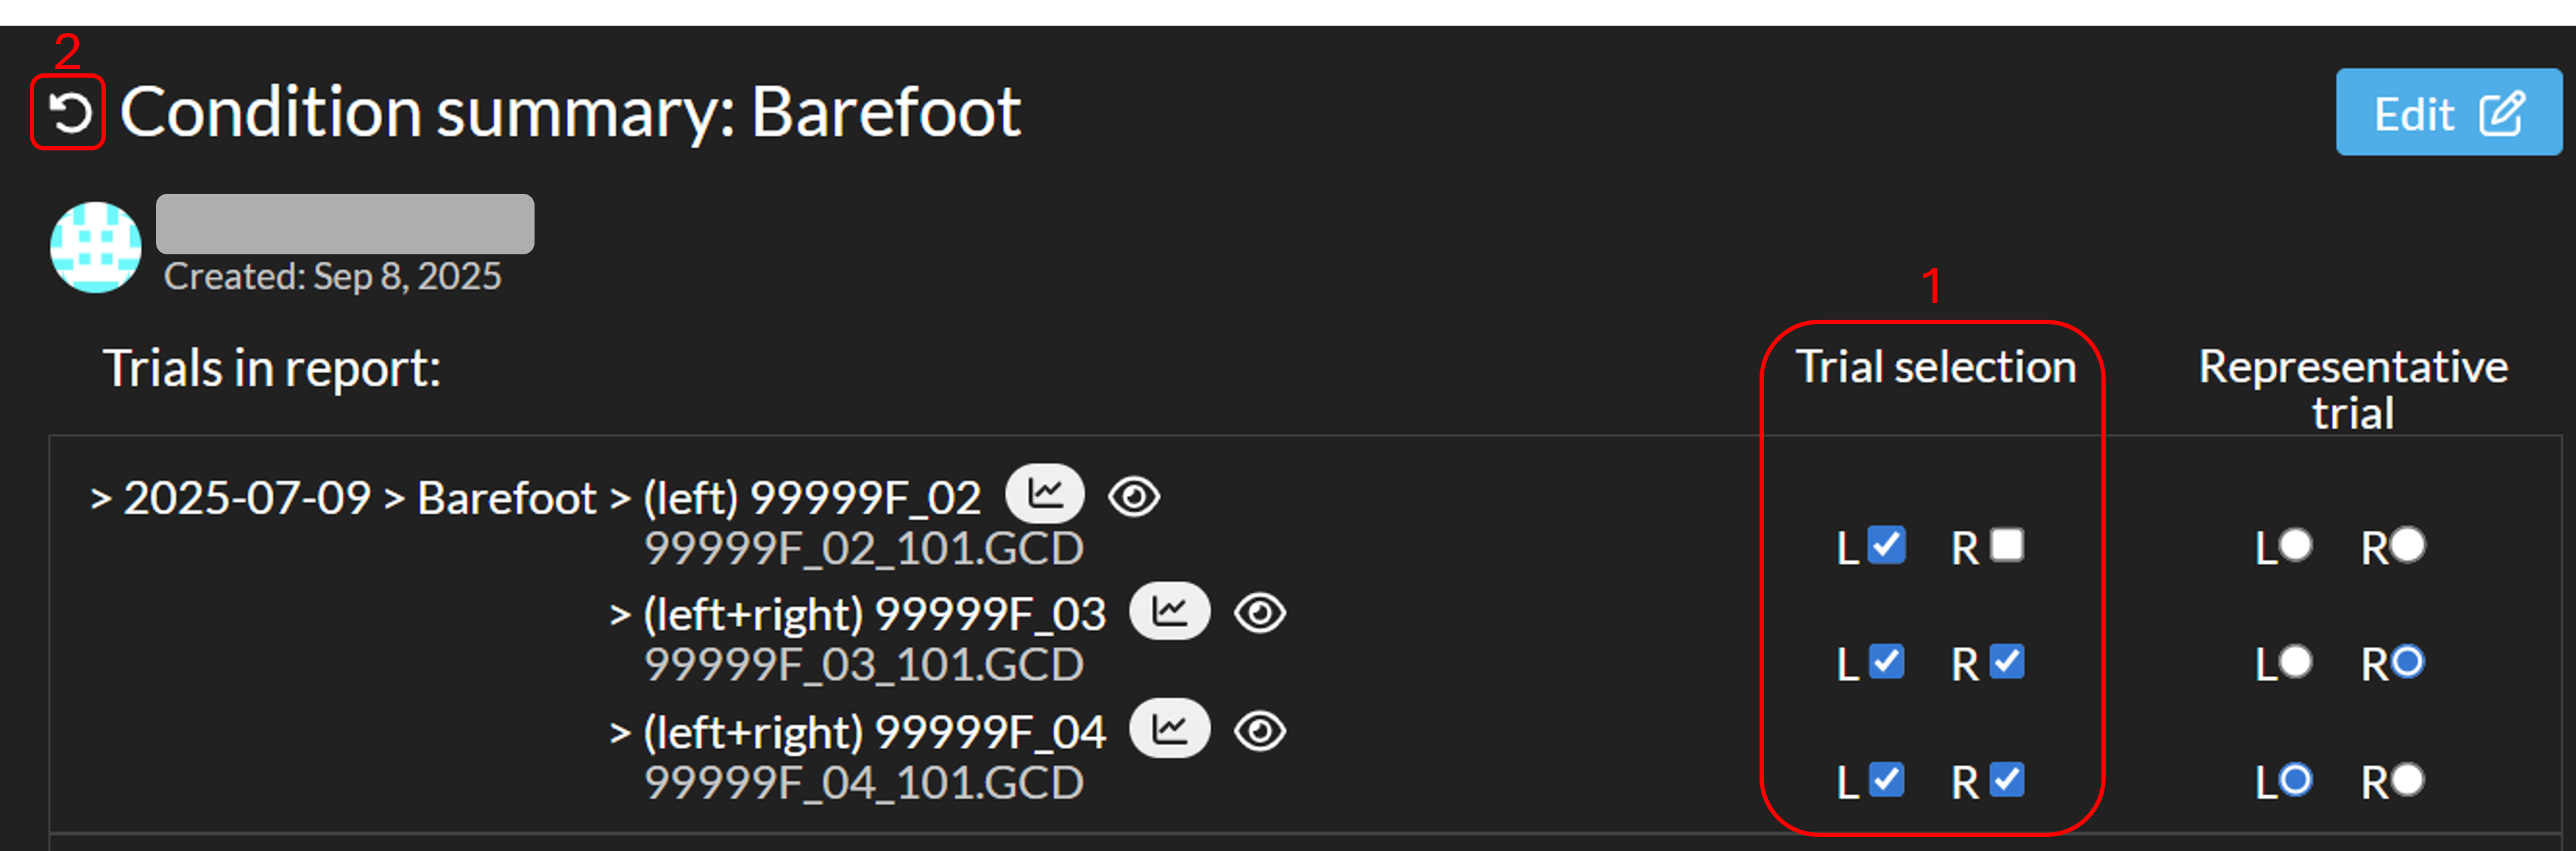
Mark trial context
Moveshelf automatically marks trials as 'left', 'right' or 'left + right' while processing a directory by reading the names of these files in the dataset (see Data requirements). The condition summary allows you to manually mark the trials with the options:- left
- right
- left + right
- none
To reflect the changes in the charts and spatiotemporal parameters on Moveshelf, you need to update the report visualization. To do this, click the refresh icon in front of the report title.
Human movement data visualization
Next to marking trial context, a condition summary gives you the the opportunity to have a look at the human movement data (and videos) of all trials that are included in a specific condition. Navigate to Trials for more information about the human movement data that is shown and go to interactive graphs when you are interested in the usage of Moveshelf's interactive graphs to have a better look at the data.
Sports medicine data requirements
For a complete report of a biomechanical evaluation at least one trial including 1 GCD file is required for each of the following conditions:
If not all required files are provided, an evaluation and final scores can be produced, but it will be based on an incomplete dataset. In case GCD files for (one of) the expected conditions are not present, marked with a conflicting laterality compared to its content, additional conditions beyond the list below are presented or too many trials within a condition are selected, warnings or errors will be displayed on Moveshelf with a clear description when generating the biomechanical evaluation report. In case of warnings the process will run and sections belonging to the missing/erroneous data in the table in the generated word document will be empty. In case of an error (e.g. no GCD files found) the process will not run.
An example directory can be found in the Moveshelf <> Shriners SharePoint.
- Heel Touch
- Drop Jump
- Side Step Cut
- Deceleration
- Lateral Shuffle
- Single Leg Hop
If not all required files are provided, an evaluation and final scores can be produced, but it will be based on an incomplete dataset. In case GCD files for (one of) the expected conditions are not present, marked with a conflicting laterality compared to its content, additional conditions beyond the list below are presented or too many trials within a condition are selected, warnings or errors will be displayed on Moveshelf with a clear description when generating the biomechanical evaluation report. In case of warnings the process will run and sections belonging to the missing/erroneous data in the table in the generated word document will be empty. In case of an error (e.g. no GCD files found) the process will not run.
Run a biomechanical evaluation
To run the biomechanical evaluation processor it is important that every condition contains trials that are marked correctly, meaning: at least one trial needs to be marked 'right' and one trial marked as 'left'. Note that the trials also need to have data included to succesfully run the biomechanical evaluation. Go to Explore a condition for more information on how to mark trials manually.
Once you have uploaded and annotated the data on Moveshelf, you are ready to run the Biomechanical Evaluation processor. If the selected data is missing laterality context, more than three trials are selected within a condition or other deviations from Shriners' general workflow, a warning or error will be displayed on Moveshelf together with a description of the reason. The word report will be produced but dependent on the warning cells will remain empty and final scores will be calculated based on limited data. To produce the biomechanical evaluation report please follow the steps below:
Once you have uploaded and annotated the data on Moveshelf, you are ready to run the Biomechanical Evaluation processor. If the selected data is missing laterality context, more than three trials are selected within a condition or other deviations from Shriners' general workflow, a warning or error will be displayed on Moveshelf together with a description of the reason. The word report will be produced but dependent on the warning cells will remain empty and final scores will be calculated based on limited data. To produce the biomechanical evaluation report please follow the steps below:
- Navigate to the Session home page, open the 'Processors' tab and select 'Biomechanical evaluation' (see image).
- Select the 'Select marked trials' checkbox. This checkbox selects all trials that were marked as 'left', 'right' or 'left + right'.
- Click on 'Run'.
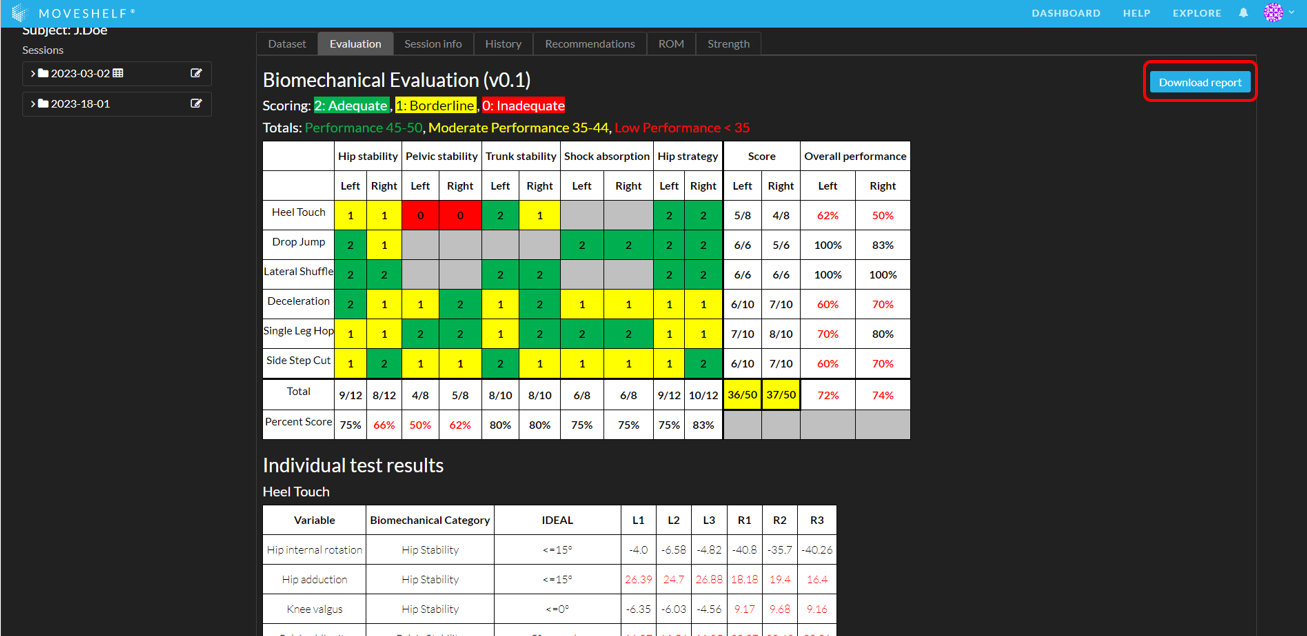
- When the processing is completed successfully, the tab 'Evaluation' next to 'Dataset' shows the biomechanical evaluation results. As shown in the image below, all values (max 3 per side) of the individual trials are shown in the tables of the individual test results.
In this tab you also have the option to download this biomechanical evaluation as a Word report. Click on Download report to download the biomechanical evaluation report.
Gait data requirements
Besides the general data requirements, please note the following additional requirements for the Shriners gait workflow:
- Gait cycle data:
- Gait cycle data should contain 51 or 101 samples (a complete cycle from 0-100%).
- This data includes kinematics, moments, powers, EMG, muscle lengths, and muscle velocities.
- Data Grouping on Moveshelf:
- On Moveshelf, data is grouped into the following groups: "Moment” (moments), "Power" (powers), "GRF" (forces), “EMG” (Raw EMG), “Envelope” (Envelope EMG), “Velocity” (Muscle velocity), “Length” (muscle length).
- These group names should be reflected in your data to ensure proper grouping of graphs.
- Anything that does not match any of the previously mentioned names will be placed in the group "Kinematics".
- Spatiotemporal parameters:
- Variables with the following names can be shown as spatiotemporal parameters on Moveshelf:
- rightcadence, rightspeed, rightstridelength, rightsteplength, rightsinglesupport, rightdoublesupport, rightfootoff, rightoppositefootoff, rightoppositefootcontact, rightgdi, and rightfdi.
- For the left side, replace "right" with "left" in the variable names (e.g., leftcadence, leftspeed, etc.).
- The Report template can be configured to include only a specific subset of these parameters.
- Gait events:
- To display gait events in a gait analysis graph, the following foot-off and footcontact times are extracted from the .GCD file:
- “RightFootOff" & "LeftFootOff" are used for the stance-swing transition lines of the respective legs.
- "RightOppositeFootOff", "RightOppositeFootContact", "LeftOppositeFootOff" and "LeftOppositeFootContact" are used for the contralateral gait events.
- EMG:
- To import high-frequency EMG data from a .GCD file, ensure the variable name includes "Raw" to include all samples. Note that the variable name should not contain the word "Envelope"; otherwise, an envelope will be displayed instead of the high-frequency EMG data.
- PDF files:
- All PDF files (e.g. photos or pedobarograph) are automatically added to a condition named "Additional files", and included in the appendix of the gait analysis report. The PDF filename will be used as trial name on Moveshelf and header in the gait analysis report.
An example directory can be found in the Moveshelf <> Shriners SharePoint.
Gait data requirements - rotational profile
To generate a correct rotational profile graph, please ensure to include the following:
- Kinematic data and reference data:
- Pelvic Rotation ("pelvicrotation")
- Hip Rotation ("hiprotation")
- Knee Rot w/o Tib Torsion ("kneerotation_proximal")
- Ankle Complex Rotation ("anklecomplexrotation") and Mid Foot Ab/Adduction ("midfootabadduct") or Foot to Tibia Rotation ("footrotation")
- Foot progression ("footprogression")
- Opposite foot gait events i.e., OppositeFootOff and OppositeFootContact, for the variables mentioned above.
- Physical exam data for:
- Left and Right 'Hip internal rotation ROM'
- Left and Right 'Transmal axis MrkSetComputed'
Metadata import
To import trial, session, subject, and intervention metadata, you can upload a configuration file named "moveshelf_config_import.json".
This can be used, for example, when uploading a gait analysis session from before Shriners started using the gait workflow on Moveshelf.
For more information on metadata import refer to the metadata import section.
For more information on metadata import refer to the metadata import section.
Reports on Moveshelf
A report on Moveshelf can be used to analyze multiple trials simultaneously, either to compare different conditions and/or sessions (comparison report), or to analyze consistency within a condition (condition summary). Since Shriners has a standard set of reports that are often required, this set of reports can be created using automatic report creation through a more efficient workflow.
General information on reports, how to manually create reports (for example for drop jump or running conditions), or use the automatic report creation can be found here.
Which reports are created for Shriners?
When using the 'Automatic' option to create reports, the following reports will be created:- For the current session:
- A condition summary for each condition.
- If there is more than one condition: A condition comparison including all different conditions.
- A session comparison report is created when a condition named 'Barefoot' or 'BF Walk' is present in both the current and previous session. The condition may be named 'Barefoot' in one session and 'BF Walk' in the other. Note, previous sessions labeled as 'Cancelled' or 'No show' will be ignored.
Gait Word reports Shriners
All subject information, session information, and reports on Moveshelf can be exported into two Word reports:
- The Physical Therapy Evaluation
- The Quantitative Report
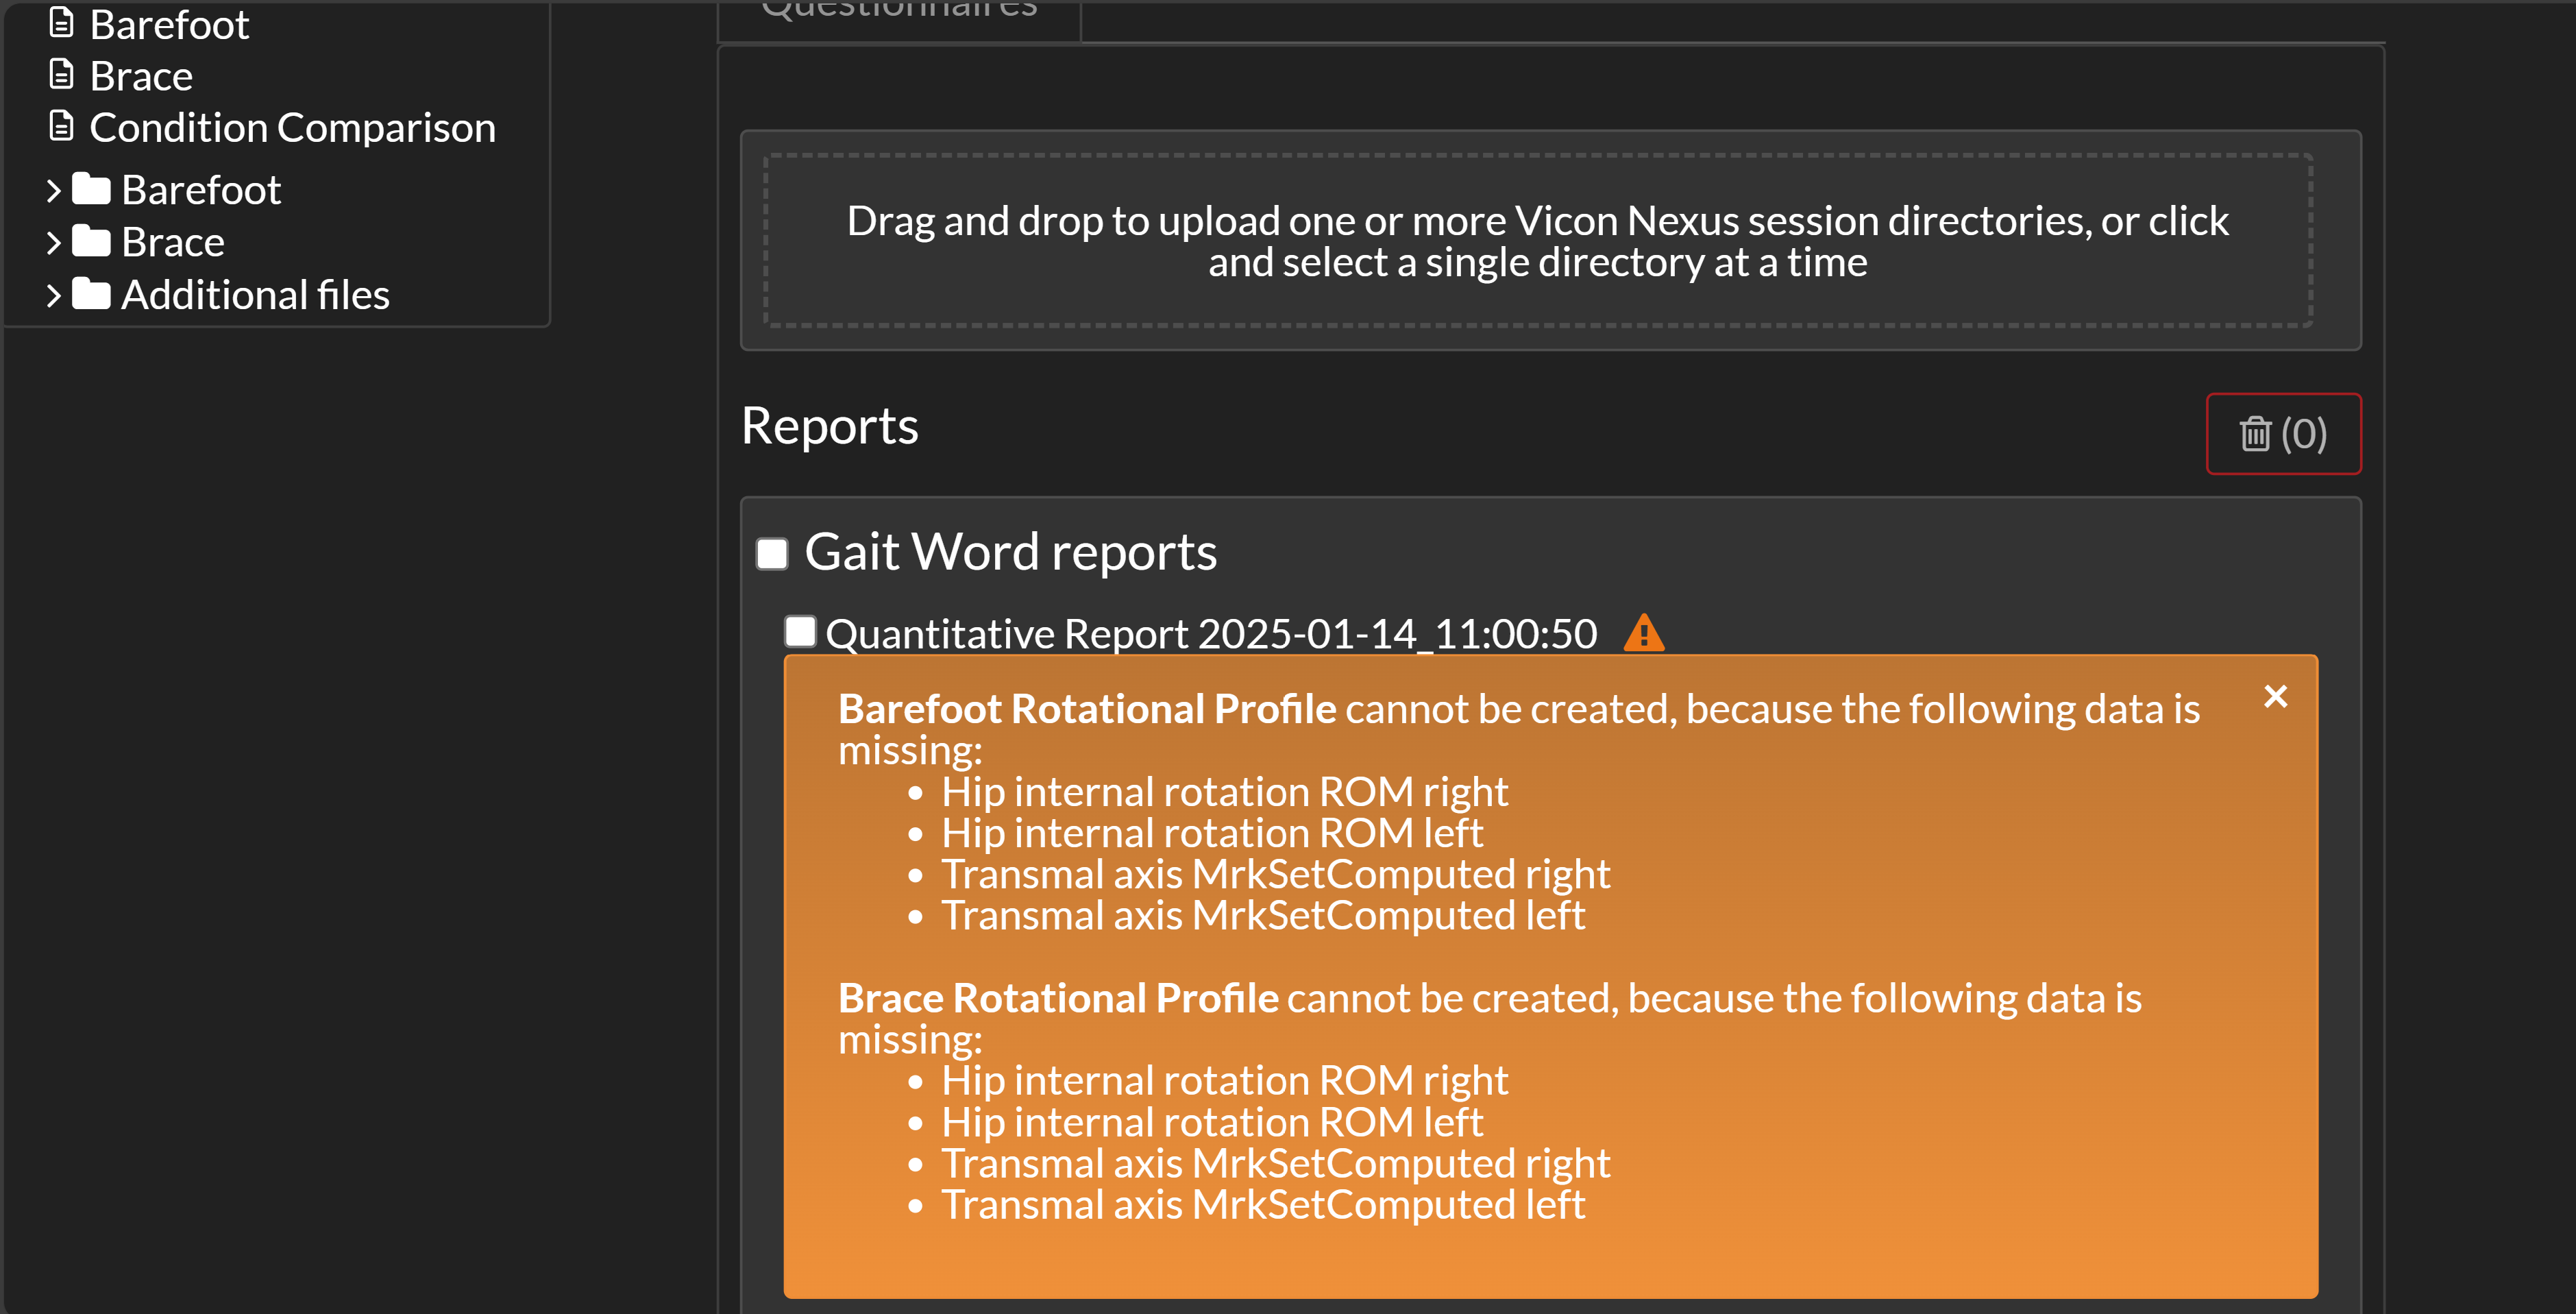
Gait Word reports input validation
For more information on general input validation, refer to the Gait Word reports section.If values or reference data related to the rotational profile are missing, an orange warning message will appear for the Quantitative Report. In this case, both Word reports will still be created, but the rotational profile will be excluded. By clicking on the triangle, a message detailing which value(s) are missing will be displayed. After adding the missing data, you can regenerate the reports to include the rotational profile.