Measurements on Moveshelf Information System
This chapter of our knowledgebase contains information on the Moveshelf Mobile app.
The Moveshelf Mobile app is designed and developed to simplify data collection from mobile and wearable devices recorded directly in the lab or from home.
Moveshelf Mobile is able to collect videos and data from a variety of sensors and to work in combination with the Moveshelf Information System (our web application) for secure transfer to the hospital.
Moveshelf Mobile is being developed closely collaborating with leading clinical and academic centers pioneering improved care of movement disorders, through ehealth and remote monitoring, in the Europe and in the US. Organizations that collaborate (or collaborated) with us include Amsterdam UMC, SintMaartenskliniek, Erasmumc MC, Noordwest Ziekenhuis, University of Twente, TU Delft, Vrije Universiteit Amsterdam and many more. This work is also supported through the EU project ReHome.
To use Moveshelf Mobile, your organization will need a Moveshelf Information System Enterprise account (this is usually available at <yourorg>.moveshelf.com) and you will need a project correctly configured to work in combination with the Moveshelf Mobile application. Please contact Moveshelf support to request that we configure a project to work with Moveshelf Mobile.
 Please be aware that this section is hidden from the general sections of the knowledge base, about
the use of the Moveshelf application.
You can only reach this section by direct URL.
Please be aware that this section is hidden from the general sections of the knowledge base, about
the use of the Moveshelf application.
You can only reach this section by direct URL.
Moveshelf Mobile is being developed closely collaborating with leading clinical and academic centers pioneering improved care of movement disorders, through ehealth and remote monitoring, in the Europe and in the US. Organizations that collaborate (or collaborated) with us include Amsterdam UMC, SintMaartenskliniek, Erasmumc MC, Noordwest Ziekenhuis, University of Twente, TU Delft, Vrije Universiteit Amsterdam and many more. This work is also supported through the EU project ReHome.
To use Moveshelf Mobile, your organization will need a Moveshelf Information System Enterprise account (this is usually available at <yourorg>.moveshelf.com) and you will need a project correctly configured to work in combination with the Moveshelf Mobile application. Please contact Moveshelf support to request that we configure a project to work with Moveshelf Mobile.
Download and installation
Our app is supported and tested only for Android (Samsung A53, A36 and higher). To install the Moveshelf Mobile app go to the Play Store and download the app.
Configuration
The mobile application can be configured either on a mobile device of the lab or on a personal device belonging to the patient for measuring at home. In both cases the configuration can be done by generating and scanning a subject QR code from the Moveshelf web application, performed by laboratory personnel with access to your project. This QR code holds unique information of the sensor setup and which subject it needs to connect with on the Moveshelf web application. In the mobile app it is easy to reset the app to switch to another subject by using the reset button.
For the FPA mode, one sensor is used, and should be placed on the lateral side of the shoe.
You can find the MAC address of a sensor in the sensor documentation that was provided together with the hardware.

After scanning the QR code, a pop up will open to confirm that the information of the subject is correct. After reviewing the information, click on 'Continue'. If the information is incorrect, click on 'Cancel' and scan a new QR code.
If this is the first time that you open the app, and you have not given permission yet, you will be prompted to give permission to Moveshelf Mobile to take pictures and record videos. In order for the app to function, you need to give permission for it.
After confirming the information, this will be stored in the internal memory of the device to avoid scanning the QR code each time the mobile app is launched. If you want to configure a new subject on the same device (for example a device from the lab), reset the app and follow the steps above again.
Generate a QR code to setup your subject
Navigate to the subject (or create a new subject) on the Moveshelf web application, press ‘Generate QR Code' and choose your monitoring type (e.g.,Garmin Connect, Video or Xsens DOT + Video).Sensor configuration
When you select Xsens DOT + Video or FPA, you have to define a sensor configuration. This information will be included together with the subject information in the QR code. Click on the + sign to complete your configuration. With this, you are able to give a location to the sensor(s). Follow the steps and image below to add sensors to your QR code:- Fill in the the MAC address of the sensor and assign a location to that sensor.
- Click on 'Add' to add this sensor to your QR code.
- Repeat the two steps above for each sensor you would like to add.
- Select 'Generate' to generate the QR code.
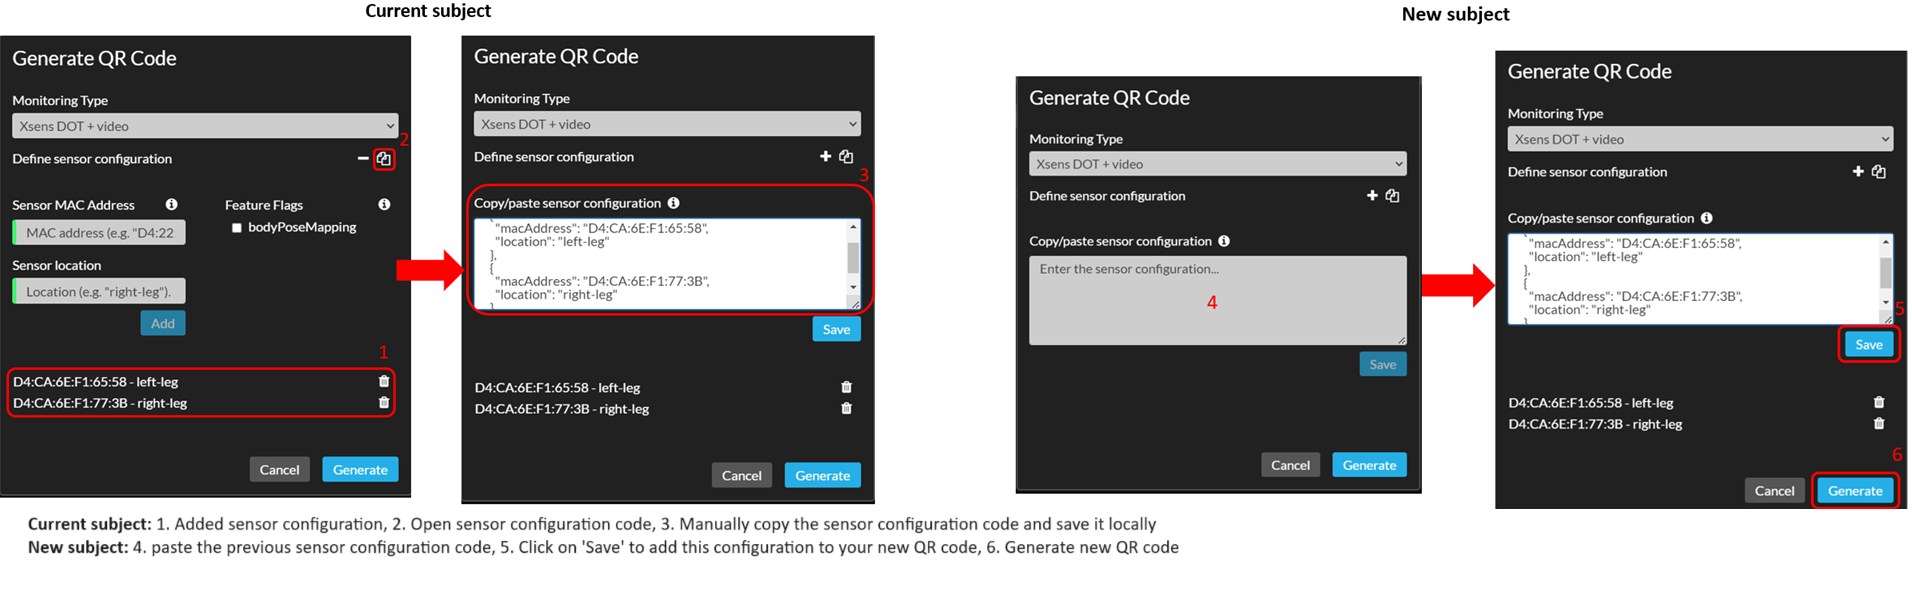
Reuse sensor configuration for next subject(s)
If you plan to reuse the same sensor configuration for multiple subjects, you can copy, store and paste the sensor configuration for when you're setting up the mobile app for your next subject. This can be done by copying the JSON code that specifies your sensor configuration, storing it (where you can find it again later) and pasting it on Moveshelf when you're generating a new QR code for your next subject. See the images below for visualization of this workflow.
Scan the QR Code
To configure the Mobile app, scan the QR code that you’ve generated on the Moveshelf web application with the Mobile app. Open the Mobile app and select 'Scan QR Code'.After scanning the QR code, a pop up will open to confirm that the information of the subject is correct. After reviewing the information, click on 'Continue'. If the information is incorrect, click on 'Cancel' and scan a new QR code.
After confirming the information, this will be stored in the internal memory of the device to avoid scanning the QR code each time the mobile app is launched. If you want to configure a new subject on the same device (for example a device from the lab), reset the app and follow the steps above again.
Garmin download and installation
Supported watch
The watch which is supported for connecting to Moveshelf is the Garmin Forerunner® 55.Garmin Connect
To install the Garmin Connect app go to the Play Store for Android and download the app.Moveshelf app for Garmin watch
The MoveshelfMobile-TopTreat app for the Garmin watch is available in the Garmin IQ store. Install the app on the Garmin watch, by following the instructions here.
Garmin watch configuration
Pair your watch with the Garmin connect app
Follow the instructions here to pair your watch with the Garmin connect app.Configure watch to use Moveshelf watch app
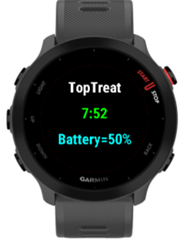
After installing the MoveshelfMobile-TopTreat watch app, the watch should show the TopTreat watch face (see image). If not: Follow the instructions here to use the MoveshelfMobile-TopTreat app as Watch Face.
Record video data
To record video only (without sensor data), you need to select Video when generating the QR code. Click on 'Record Video' to record video data.
Start a video recording
To start a video recording, press on the red button once. Before starting to record, you can choose between back or front camera (if available on your device) by clicking the rotate camera icon. Upon starting, you will see the red button shrinking and the timer will start counting the seconds elapsed.Stop a video recording
To stop a video recording, click on the red button once again. When recording with DOT sensors, the recording will automatically stop after one minute (unless configured differently by Moveshelf support). After the recording is finished, a pop-up will appear where you can select a video label. Please select a video label and click on 'Save'.
Record Xsens DOT + video data
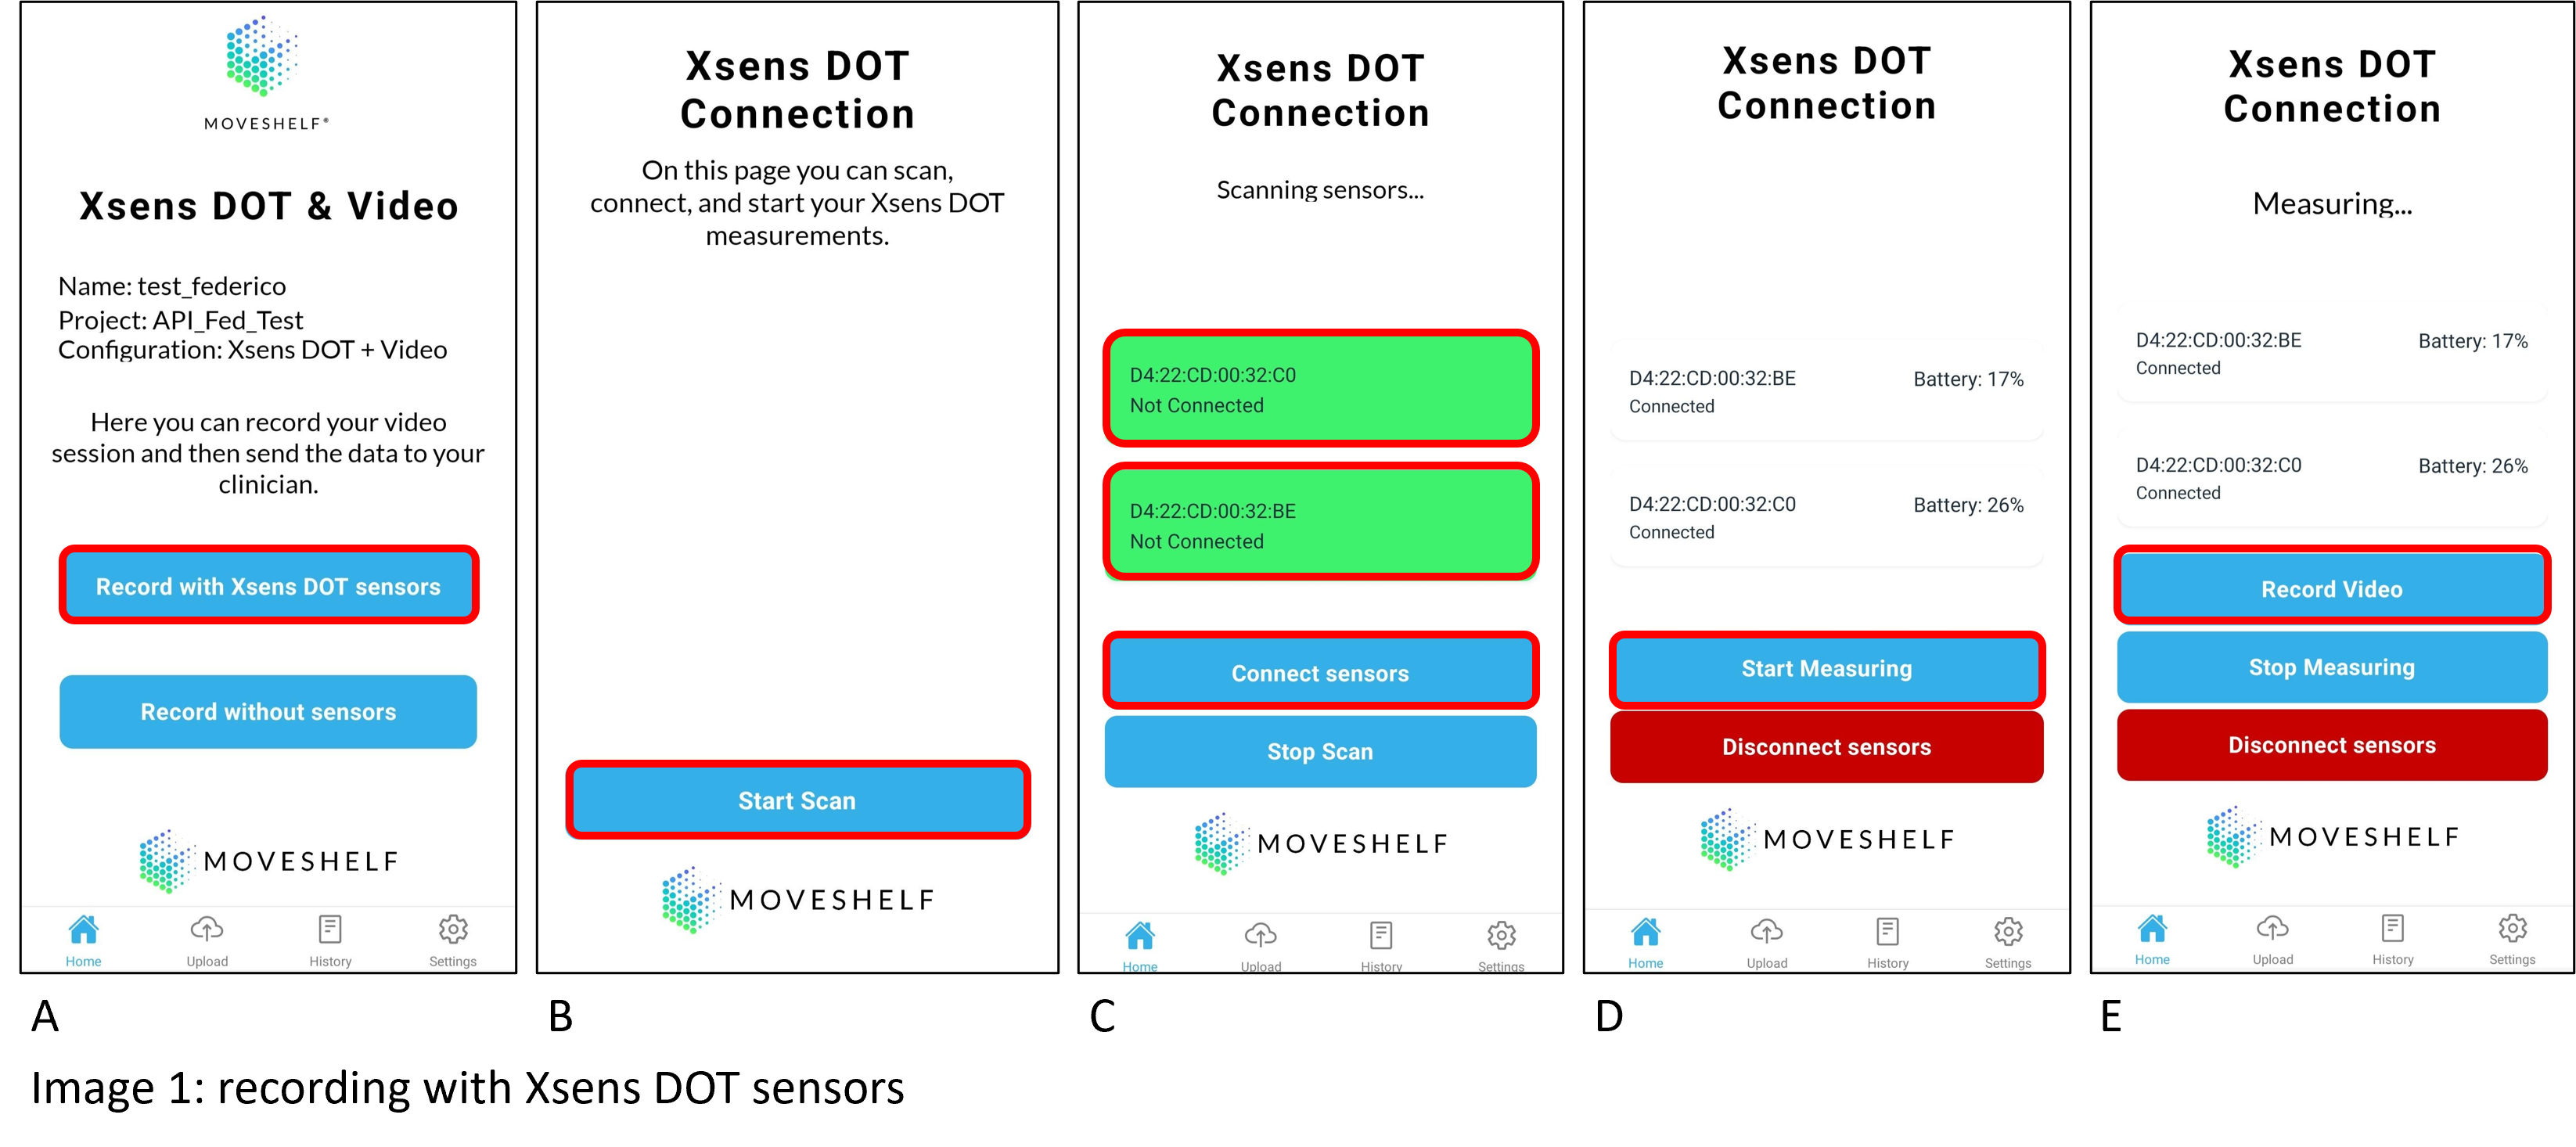
If you have chosen the Xsens DOT + Video monitoring type, you will be able to record inertial data from the Xsens DOT sensors together with a synchronized video. Click on 'Record with Xsens DOT sensors' to start (image 1A). Before doing the actual measurements you first have to scan and connect one or more sensors.
Xsens DOT data is recorded using the "PAYLOAD_TYPE_CUSTOM_MODE_4" measurement mode. We have selected this measurement mode because it outputs both orientation (in quaternion) and the raw sensor data (acceleration), allowing you to calculate free acceleration. Read more about measurement modes in the Movella Dot SDK Programming Guide for Android.
If this is the first time opening the app, or permission has not been granted, you will be prompted to grant permission for discovering nearby devices. This is necessary to find and connect the Xsens DOT sensors.
Now you will be able to also make video recordings during the measurement of inertial data. Click on ‘Record Video’ to record video data (image 1E). During an Xsens DOT sensor session, you can record multiple videos and they will be synced with the sensor recordings on Moveshelf Information System (web). For more information on how to record a video see chapter Record video data.
At the end of your session, make sure to disconnect the sensors, otherwise you will encounter problems syncing the sensors during the next session.
Scan Xsens DOT sensors
First you have to find all sensors. Click on 'Start Scan' to start scanning (image 1B). If sensors are found by your device, a new card will appear on the screen showing information from the sensor(s) that are found.
Connect Xsens DOT sensors
Click on the card (it will turn green) to select the sensor(s) to connect with your device. You can connect all the scanned sensors or a subset of it. After selecting the sensors, click on 'Connect sensors' to initiate the connection (image 1C). Once the connection is finished, the cards will appear again showing more information for the sensors (e.g., battery level, location).Start Measuring
After the connection is successful, click on 'Start Measuring' to start your measurement recording session (image 1D). The sensors will initialize a synching process, and afterwards start the measurement. The sensor cards will appear again when the measurement has started and the screen will show “Measuring…” if everything went well.Now you will be able to also make video recordings during the measurement of inertial data. Click on ‘Record Video’ to record video data (image 1E). During an Xsens DOT sensor session, you can record multiple videos and they will be synced with the sensor recordings on Moveshelf Information System (web). For more information on how to record a video see chapter Record video data.
Stop Measuring
When the measurement session is completed, click on 'Stop Measuring' to finish the recordings. The screen will show 'Start Measuring' again. If you click on 'Start Measuring', a new file will be created to record new sensor data without overriding the previous one.Questionnaire
If configured, a questionnaire will be shown after each measurement (see image below for an example). The questions and dropdown items can be customized. Contact Moveshelf support to configure a questionnaire for your Moveshelf project.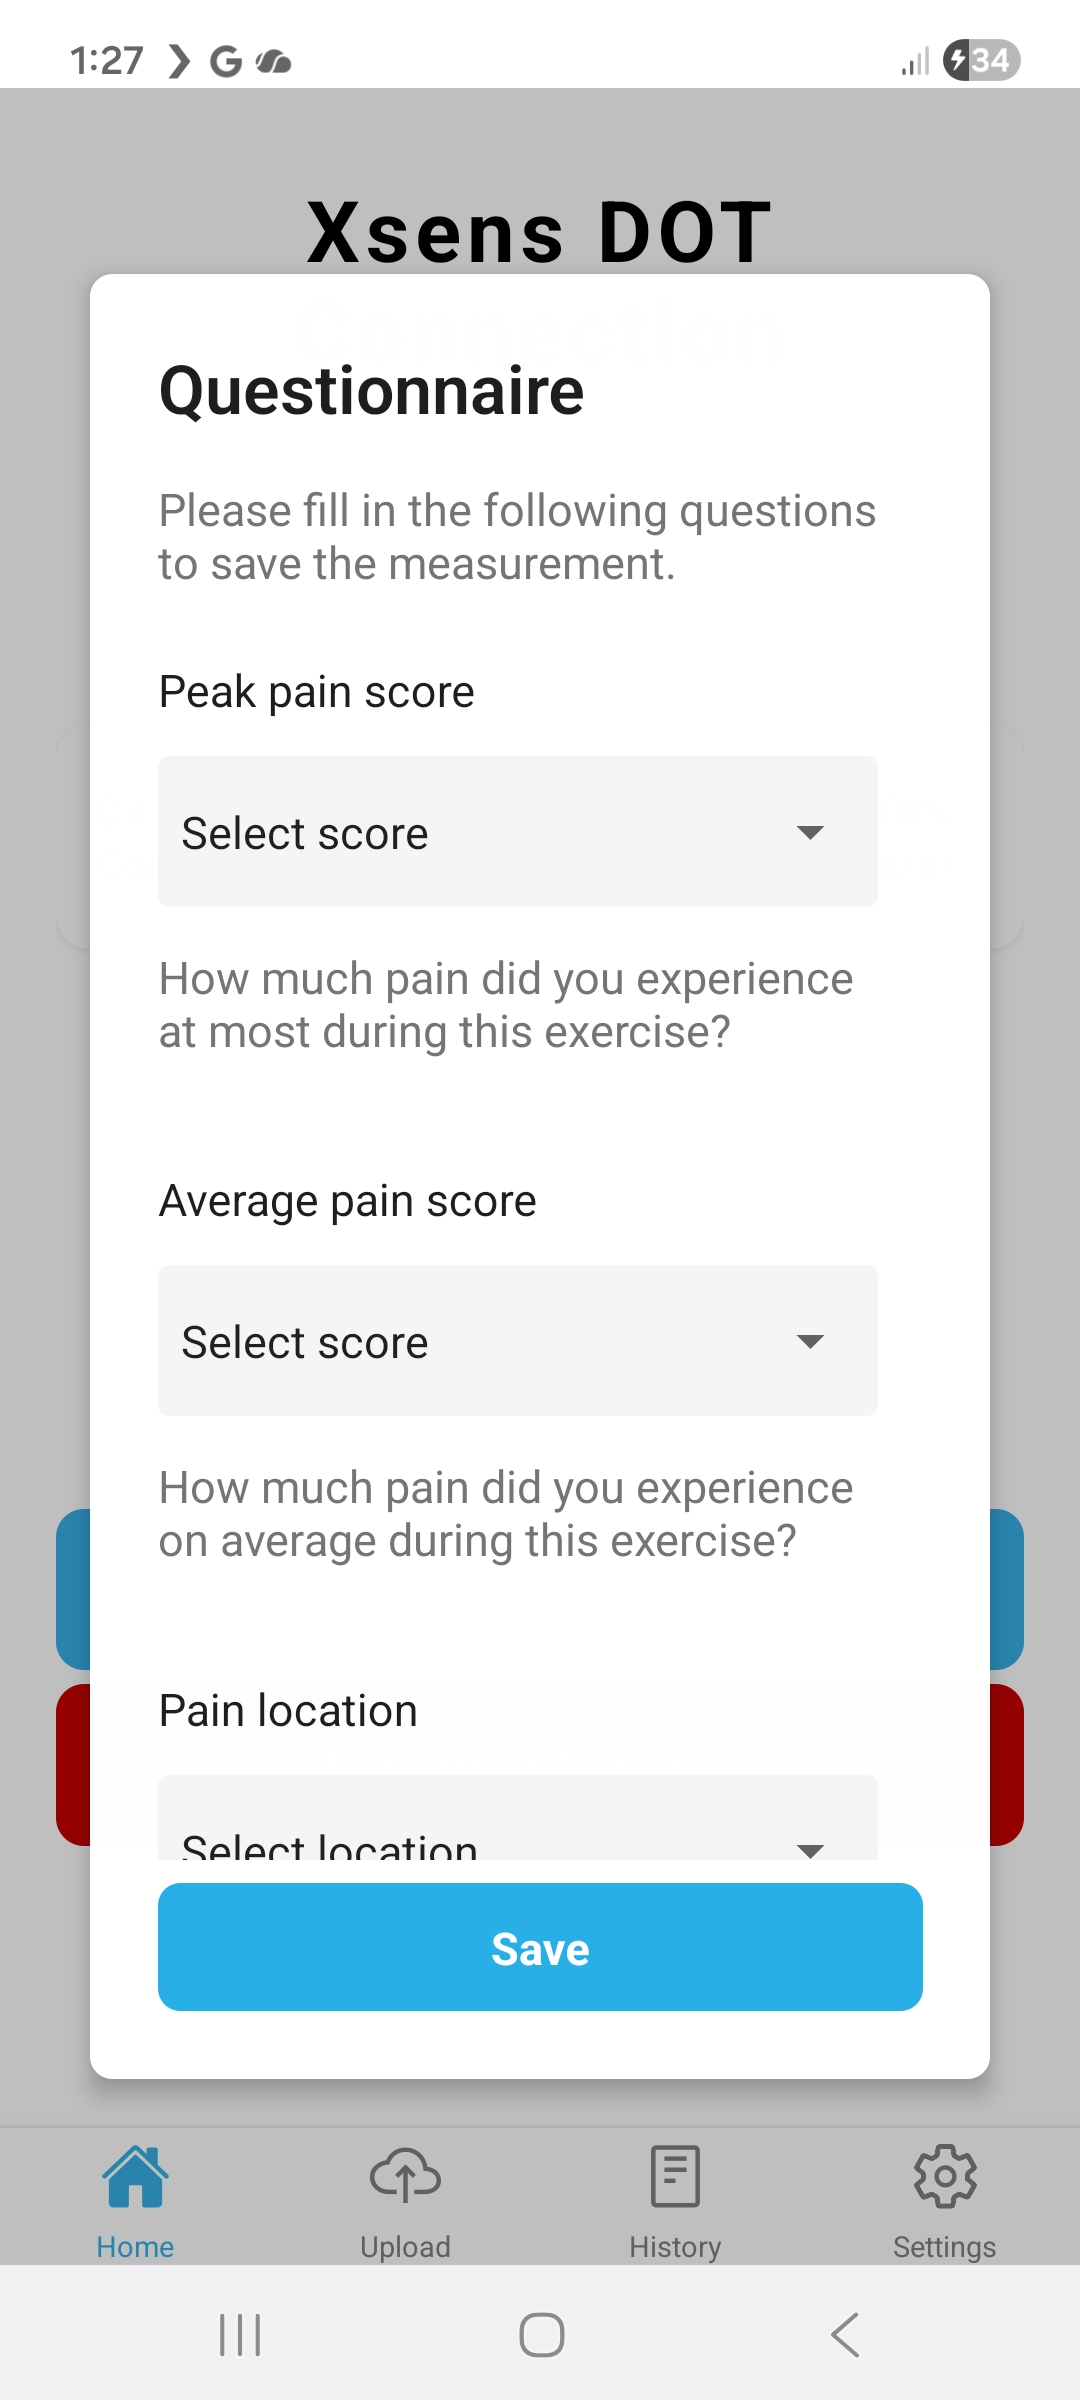
Disconnect sensors
If you have completed all the recordings, click on 'Disconnect sensors' to disconnect the sensor(s) from your device. Make sure not to click on it with a recording in progress, but only after having stopped the current recordings.
Record Garmin data
Using the Garmin Connect monitoring type, you will be able to record step count per minute from the Garmin watch.
If sending data from the watch to Moveshelf fails, the application continues with trying to send the data from the next day. If this also fails, synchronization is aborted and a warning is shown. If sending the second day succeeds, data from the previous day is deleted from the watch and an empty trial is created on Moveshelf.
How it works
- Each minute, the Moveshelf watch app checks if current step count is different than last count and stores the count in a dictionary if it has changed with time as key, count as value.
- The data can be sent from the watch to Moveshelf using the Moveshelf Mobile app.
- When synchronizing with Moveshelf Mobile, all data from full days are sent from the watch to Moveshelf. This means data from the current day is not included (not a full day yet).
- Data is stored per day in a trial, each session is a click on the synchronize button (if it finds data).
Instructions for use
- Wear the watch for one or more days (up to one week).
- The next day, open the Moveshelf Mobile app and press “Synchronize”.
- After synchronization, data should be available in the connected subject on Moveshelf.
Record FPA data
Using the FPA monitoring type, you will be able to record and provide feedback on the foot progression angle (FPA).
Instructions for use
- Before first use you need to set the target FPA for this specific patient. You can change the target FPA in the Settings page (click on 'Settings' in the bottom navigation bar). Then click on 'Change target FPA' and enter the correct target FPA.
- Connect the sensor as explained in Record Xsens DOT + video data.
- Go to training mode, by clicking on 'Go to training'.
- Start the training session by clicking on 'Start training session'. This will automatically start the calibation, where you need to stand still for 5 seconds with your foot flat on the ground.
- Now you can start walking. Make sure to walk straight as much as possible.
- Stop the training session by clicking on 'Stop training session'.
FPA measurement
The FPA is defined as the angle between the foot direction and the walking direction. The FPA measurement starts after three consecutive steps of walking straight, and is averaged over five steps. Whenever the algorithm detects a turn, FPA measurement is stopped until there are again three consetive steps of walking straight.
FPA feedback
FPA feedback is provided both visually and through audio.- If FPA is too far out: FPA will be displayed in red and the audio feedback will say "naar binnen"
- If FPA is too far in: FPA will be displayed in green and the audio feedback will say "naar buiten".
- If FPA is within the target range: FPA will be displayed in grey and the audio feedback will say "Goed".
- If FPA cannot be calculated (e.g. in or right after a turn): FPA will be displayed as "NaN" and no audio feedback will be provided.
Upload measurements
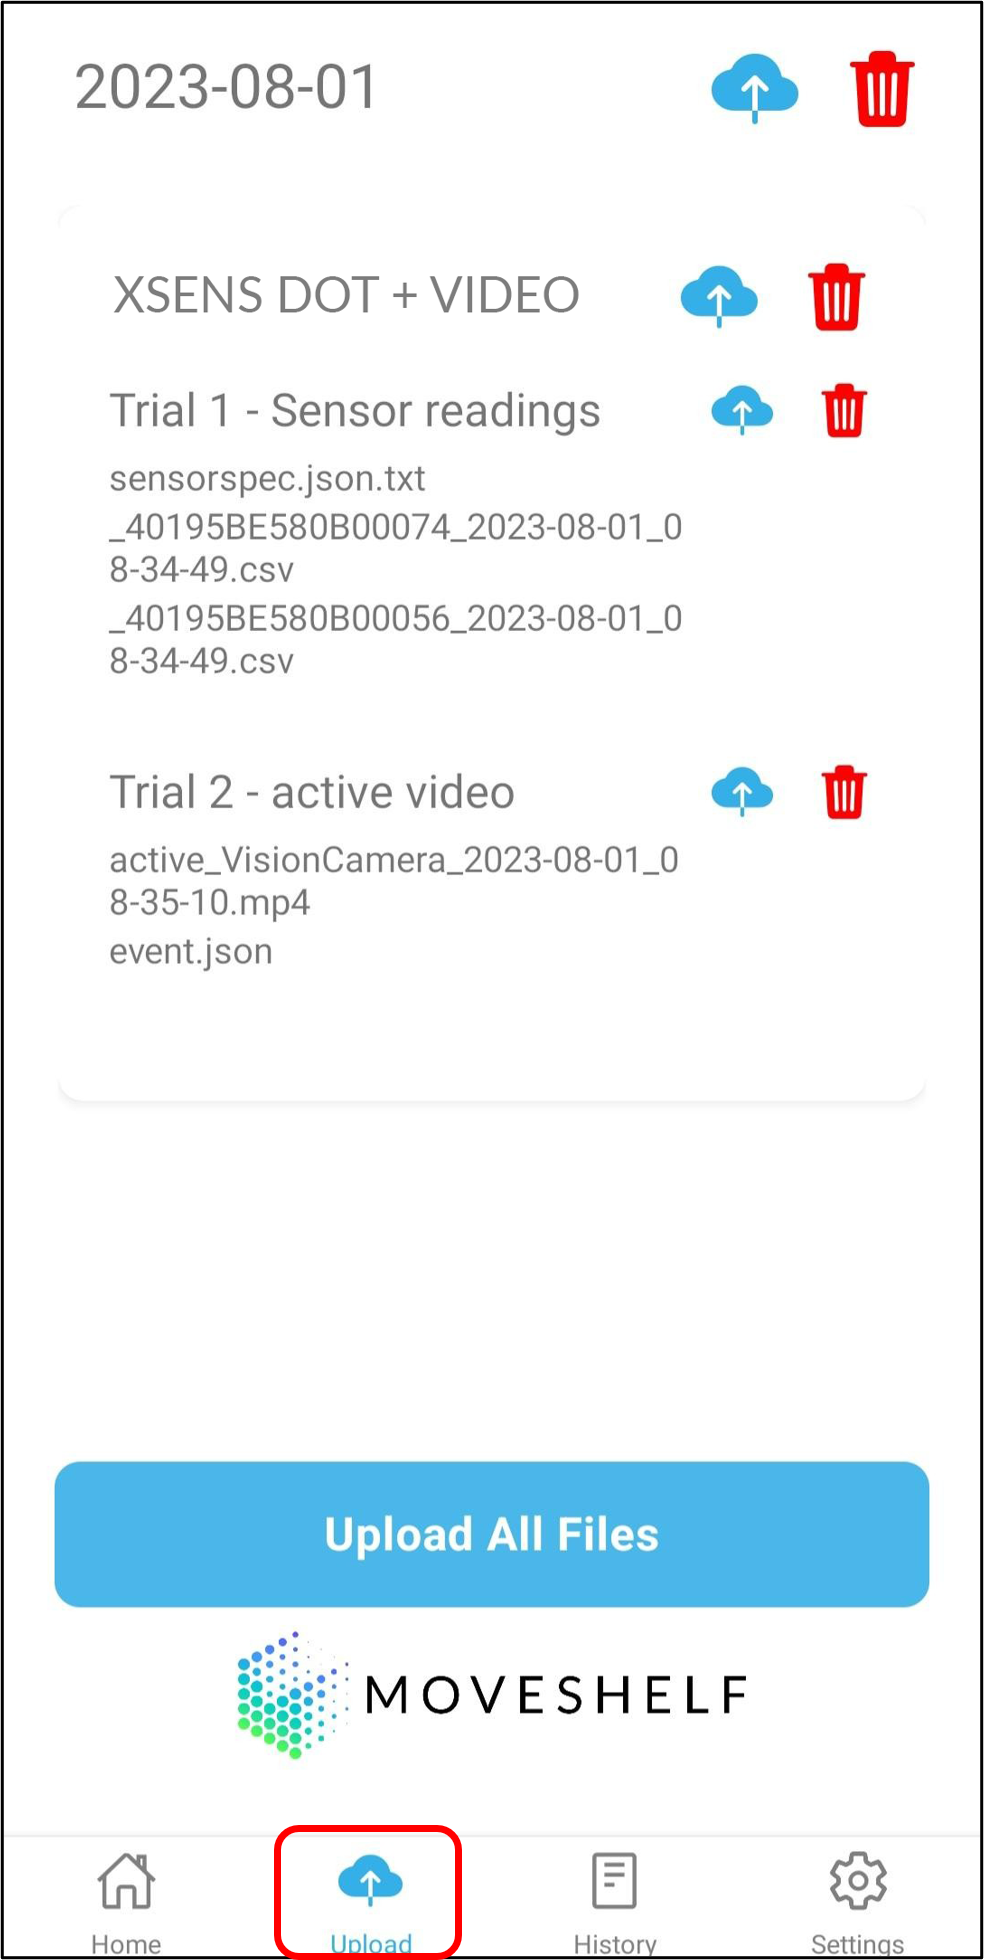
The Moveshelf Mobile app provides a way to upload your sensor and/or video recordings directly to Moveshelf Information System (web). Click on the 'Upload' button in the bottom navigation bar to open the upload screen.
On this screen, you can upload a session, condition, and individual trial(s) by clicking on the blue upload-to-cloud icon. Alternatively, you can click on 'Upload all Files' to upload everything that still needs to be uploaded. Once the upload is completed and successful, the item(s) will be automatically deleted from the phone.
If you want to manually delete an item instead of uploading it, click on the red trash icon to delete a session, condition, or individual trial. The item will be permanently deleted from the phone storage.
Session history
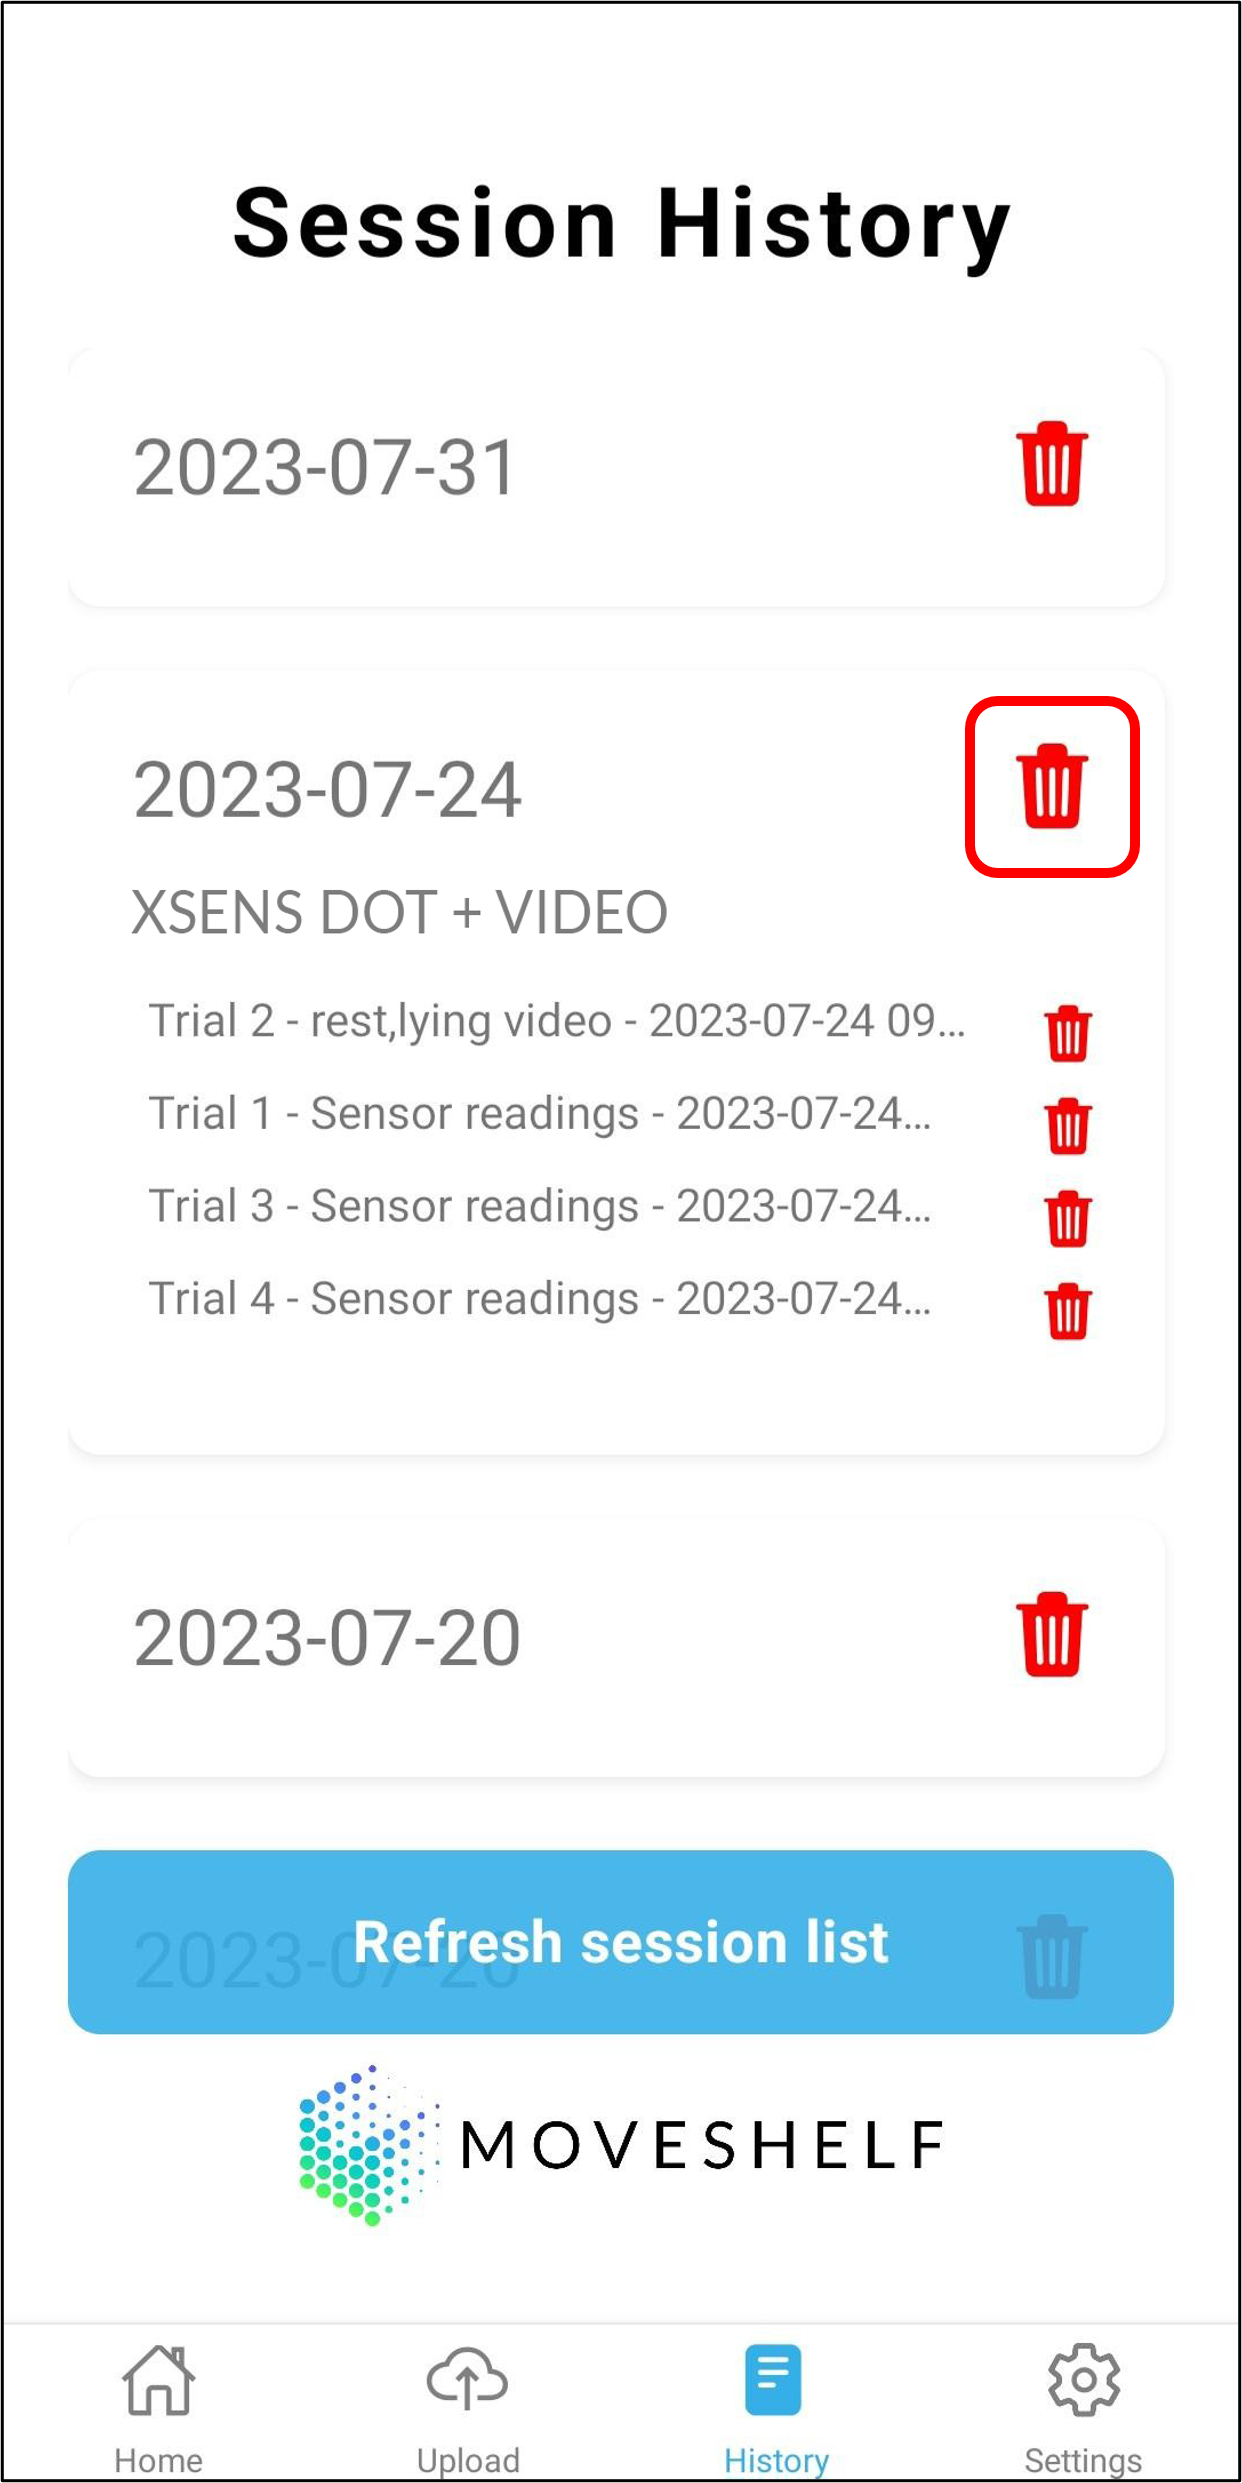
The Moveshelf Mobile app provides a way to see the session history of a subject, with all data from this subject present on Moveshelf Information System (web). To see the session history, click on the 'History' icon in the bottom navigation bar.
If a session is created manually on Moveshelf Information System (web) in the meantime, you can click on 'Refresh session list' to see it in the Mobile app. Otherwise, the list will be refreshed each time a new item is added. This way, the session history is always up-to-date.
If a session is created manually on Moveshelf Information System (web) in the meantime, you can click on 'Refresh session list' to see it in the Mobile app. Otherwise, the list will be refreshed each time a new item is added. This way, the session history is always up-to-date.
Delete session history
If you want to delete a session or trial from the Moveshelf Mobile app on Moveshelf Information System (web), click on the red trash icon in the app. A delete confirmation pop-up will be shown. Click 'Yes' if you want to proceed on deleting the session/trial, otherwise click 'No'.
Visualization on Moveshelf
Go to the subject on the Moveshelf Information System (web). In the subject home page you will find an overview of all available sessions from this subject, including the uploaded sessions from the Mobile app. Open the session on the Moveshelf Information System (web) and you will see all trials that were included in the upload. This upload can have different datatypes: .mov, .txt and .csv files. There are two different ways to view this data:
- Trial view
- Report view
A trial can include a video or sensor data. The sensor data is displayed in graphs and the video can be viewed using the playbar on top. For more detailed information on how to view data on Moveshelf, please read Playback controls for media and Interactive graphs.

All trials from the same session and monitoring type are combined in a report, called the condition summary. To open a condition summary click on the name of the condition, visible in the subject home screen or in the left navigation bar (see image below).

If you have used Xsens DOT + Video you will be able to view the sensor data synchronously with the video. Graphs will automatically be zoomed in on the data for the part that contains video when looking at them in split screen (read more instructions and hints about split screen here). This can be done by following the steps below:
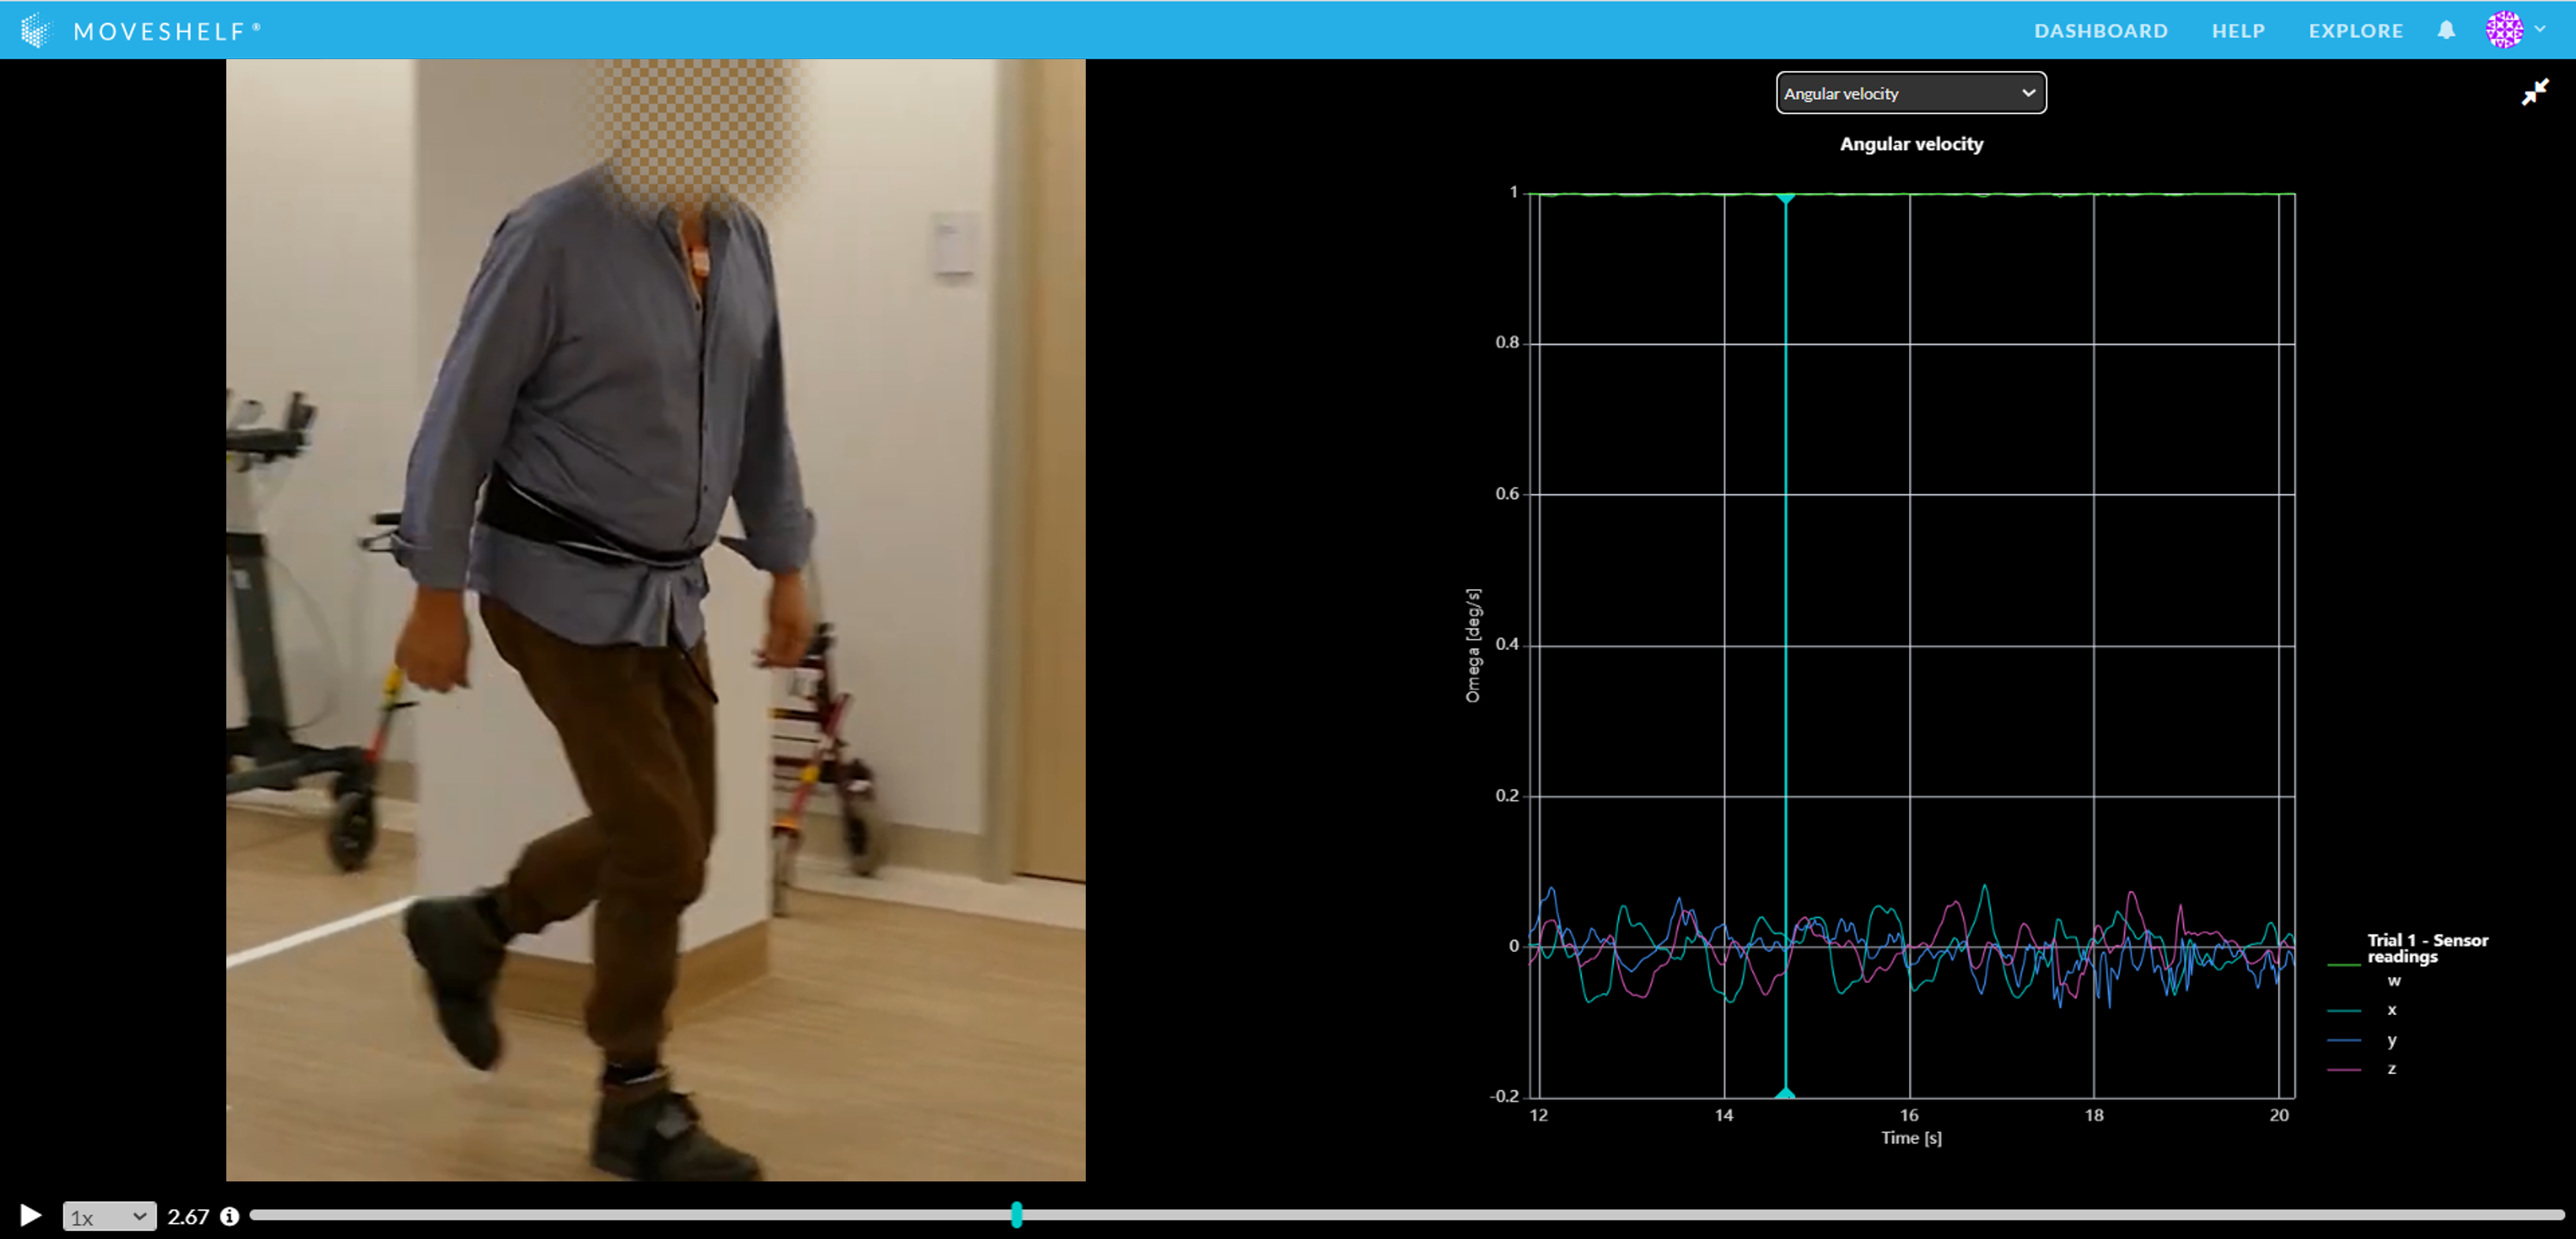
If you have used Xsens DOT + Video you will be able to view the sensor data synchronously with the video. Graphs will automatically be zoomed in on the data for the part that contains video when looking at them in split screen (read more instructions and hints about split screen here). This can be done by following the steps below:
- Click on one of the trial names in a condition summary that includes a video you would like to view
- Select up to 2 graphs and the video for either the left and/or right side of the screen by clicking on the small arrow at the top left of the graph/video (the icon appears when hovering over the graph with your mouse).
- Next, click on the 'split screen' icon right next to the previously mentioned arrow icon to open your selection in the split screen (full screen).
Troubleshooting
If the app doesn’t work as expected, please try the steps below:
- Close and open the app again
- Turn the sensors off and on
- Reset the app
Reset the app
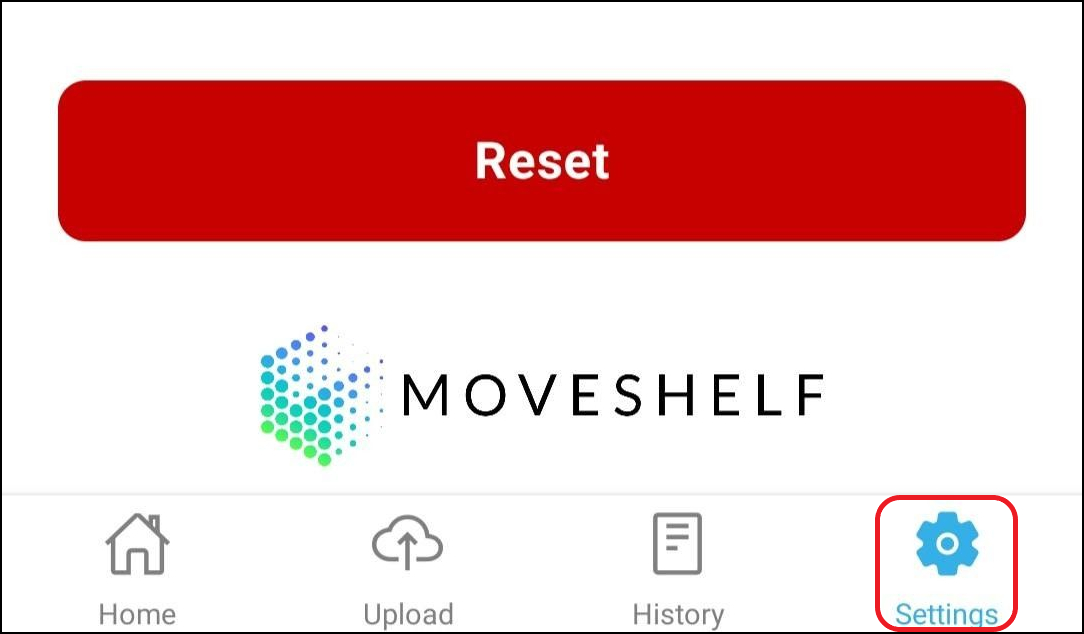
If you want to delete all the subject information from the device, navigate on the bottom navigation bar to 'Settings' and click on 'Reset'. For example, this may be helpful when a device was temporarily loaned to a subject, and you are now setting up the device for a new subject. Resetting the app will delete all the stored data, recordings, and anything related to the app and reset it to its original state. Be careful, all data are irreversible lost. After resetting you can scan a new QR code for a new patient.
Moveshelf Mobile changelog
If you would like to be up-to-date with our new features and fixes, click here for our Moveshelf Mobile changelog.