The mobile application can be configured either on a mobile device of the lab or on a personal device belonging to the patient for measuring at home. In both cases the configuration can be done by generating and scanning a subject QR code from the Moveshelf web application, performed by laboratory personnel with access to your project. This QR code holds unique information of the sensor setup and which subject it needs to connect with on the Moveshelf web application. In the mobile app it is easy to reset the app to switch to another subject by using the reset button.
Generate a QR code to setup your subject
Navigate to the subject (or create a
new subject) on the Moveshelf web application, press ‘Generate QR Code' and choose your monitoring type (e.g.,Garmin Connect, Video or Xsens DOT + Video).
Sensor configuration
When you select Xsens DOT + Video or FPA, you have to define a sensor configuration. This information will be included together with the subject information in the QR code. Click on the + sign to complete your configuration. With this, you are able to give a location to the sensor(s). Follow the steps and image below to add sensors to your QR code:
- Fill in the the MAC address of the sensor and assign a location to that sensor.
- Click on 'Add' to add this sensor to your QR code.
- Repeat the two steps above for each sensor you would like to add.
- Select 'Generate' to generate the QR code.

For the FPA mode, one sensor is used, and should be placed on the lateral side of the shoe.
You can find the MAC address of a sensor in the sensor documentation that was provided together with the hardware.

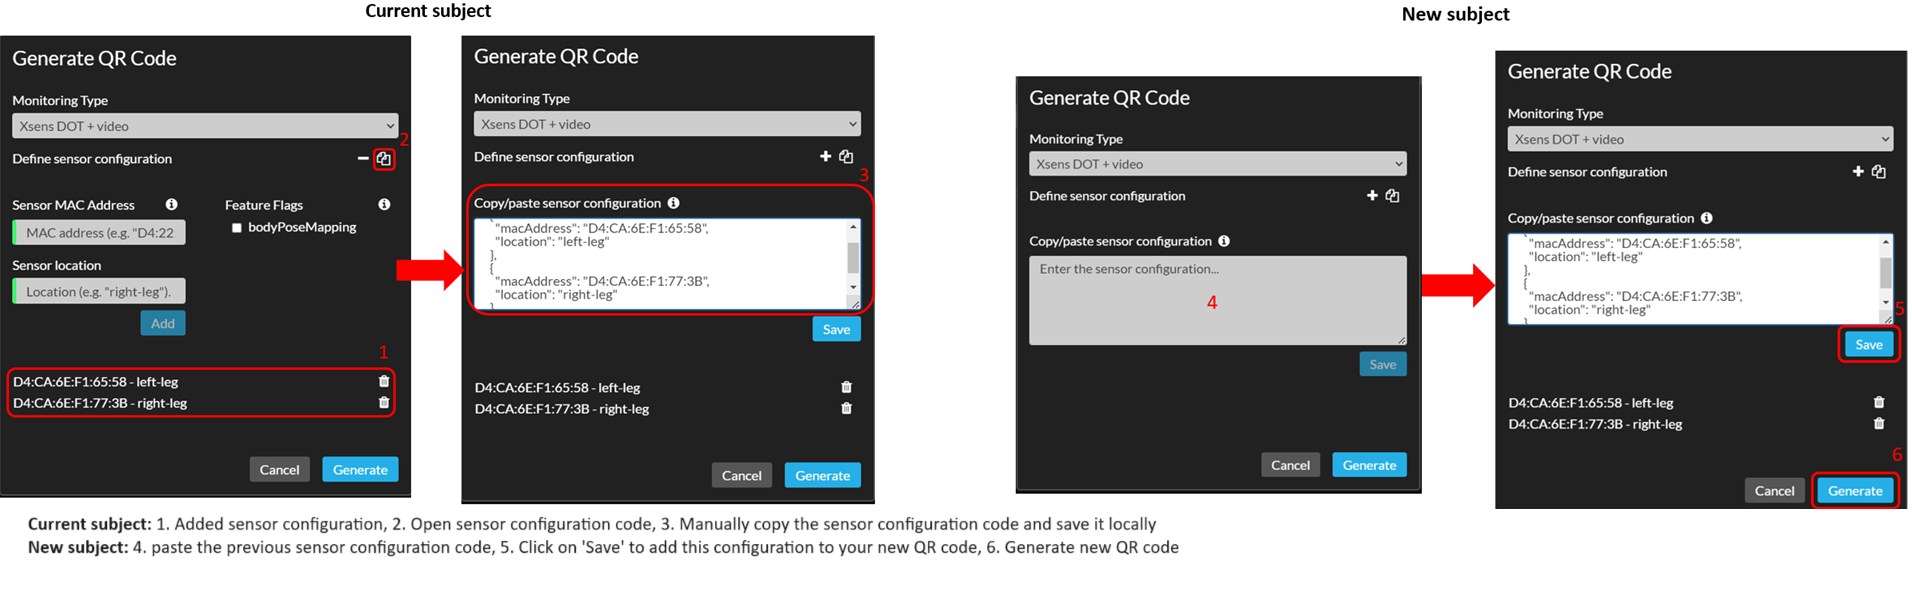
Reuse sensor configuration for next subject(s)
If you plan to reuse the same sensor configuration for multiple subjects, you can copy, store and paste the sensor configuration for when you're setting up the mobile app for your next subject. This can be done by copying the JSON code that specifies your sensor configuration, storing it (where you can find it again later) and pasting it on Moveshelf when you're generating a new QR code for your next subject. See the images below for visualization of this workflow.
Scan the QR Code
To configure the Mobile app, scan the QR code that you’ve generated on the Moveshelf web application with the Mobile app. Open the Mobile app and select 'Scan QR Code'.
After scanning the QR code, a pop up will open to confirm that the information of the subject is correct. After reviewing the information, click on 'Continue'. If the information is incorrect, click on 'Cancel' and scan a new QR code.
If this is the first time that you open the app, and you have not given permission yet, you will be prompted to give permission to Moveshelf Mobile to take pictures and record videos. In order for the app to function, you need to give permission for it.
After confirming the information, this will be stored in the internal memory of the device to avoid scanning the QR code each time the mobile app is launched. If you want to configure a new subject on the same device (for example a device from the lab),
reset the app and follow the steps above again.